FRONT BRAKE FLEXIBLE HOSE INSTALLATION
CAUTION / NOTICE / HINT
Tech Tips
-
Use the same procedures for the LH side and RH side.
-
The procedures listed below are for the LH side.
Note
While the battery is connected, even if the power switch is off, the brake control system activates when the brake pedal is depressed or the door courtesy switch turns on. Therefore during servicing of the brake system components, do not operate the brake pedal or open/close the doors while the battery is connected.
PROCEDURE
-
INSTALL FRONT BRAKE FLEXIBLE HOSE
-
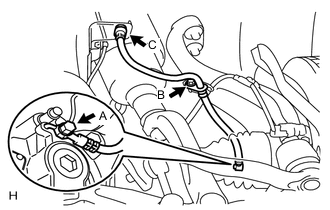
Connect the flexible hose with a new union bolt (labeled A) and a new gasket.
Tech Tips
This illustration shows vehicles that are not equipped with a 6-pot caliper. For vehicles equipped with a 6-pot caliper, the shape of the parts differs slightly.
- Torque:
- 39 N*m { 400 kgf*cm, 29 ft.*lbf }
Note
Install the flexible hose lock securely in the lock hole in the disc brake caliper.
-
Install the clamp bolt (labeled B).
- Torque:
- 20 N*m { 204 kgf*cm, 15 ft.*lbf }
-
Connect the brake tube to the flexible hose with a union nut wrench while holding the flexible hose with a wrench.
- Torque:
- 15 N*m { 155 kgf*cm, 11 ft.*lbf }
Note
-
Do not bend or damage the brake tube.
-
Do not allow any foreign matter such as dirt and dust to enter the brake tube from the connecting points.
-
Use the formula to calculate special torque values for situations where a union nut wrench is combined with a torque wrench Click here.
-
Install the flexible hose with a new clip (labeled C).
Note
Securely install the clip.
-
-
CONNECT CABLE TO NEGATIVE AUXILIARY BATTERY TERMINAL
Note
When disconnecting the cable, some systems need to be initialized after the cable is reconnected Click here.
-
INSTALL BATTERY SERVICE HOLE COVER LH
-
INSTALL DECK TRIM SIDE BOARD LH (w/o Spare Tire)
-
INSTALL DECK BOARD ASSEMBLY (w/o Spare Tire)
-
INSTALL LUGGAGE COMPARTMENT MAT SUB-ASSEMBLY (w/ Spare Tire)
-
BLEED BRAKE LINE
-
INSTALL FRONT WHEEL
- Torque:
- 140 N*m { 1428 kgf*cm, 103 ft.*lbf }
-
CLEAR THE DTC
-
CHECK FOR DTC
-
Check for DTC. If any DTC is output, perform the troubleshooting for that DTC Click here.
-