FRONT LOWER SUSPENSION ARM INSTALLATION

CAUTION / NOTICE / HINT
Tech Tips
-
Use the same procedures for the RH side and LH side.
-
The procedures listed below are for the LH side.
-
A bolt without a torque specification is shown in the standard bolt chart Click here.
PROCEDURE
-
TEMPORARILY INSTALL FRONT SUSPENSION LOWER ARM ASSEMBLY LH

*1 Matchmark
-
Temporarily install the front suspension lower arm LH, and insert the camber adjusting cam from the rear of the vehicle.
-

*1 Matchmark Install the No. 2 camber adjusting cam and temporarily install the nut.
Tech Tips
After stabilizing the suspension, tighten the nut.
-
Align the matchmarks of the camber adjusting cam, No. 2 camber adjusting cam and front frame assembly.
-
-
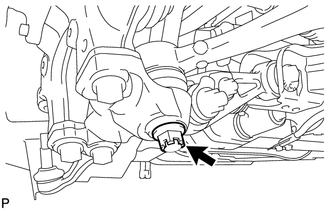
CONNECT FRONT SHOCK ABSORBER LOWER BRACKET SUB-ASSEMBLY LH
-
Connect the front shock absorber lower bracket to the front suspension lower arm LH.
-
Align the protrusion of the front shock absorber upper bracket plate with the cutout of the front shock absorber lower bracket, and temporarily install the plate with the nut.
Tech Tips
After stabilizing the suspension, tighten the nut.
-
-
INSTALL FRONT STABILIZER LINK ASSEMBLY LH
-
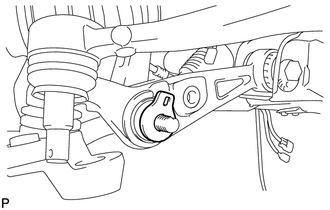
INSTALL FRONT LOWER BALL JOINT ASSEMBLY LH

-
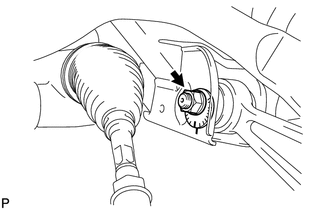
Install the front lower ball joint LH to the front suspension lower arm with the nut.
- Torque:
- 145 N*m { 1479 kgf*cm, 107 ft.*lbf }
Note
If it is necessary to align the holes for the clips after installing the nuts, the nuts can be tightened up to 60° more.
-
Install a new clip.
-
-
INSTALL STEERING KNUCKLE LH
-
CONNECT FRONT NO. 1 SUSPENSION UPPER ARM ASSEMBLY LH
-
CONNECT FRONT NO. 2 SUSPENSION UPPER ARM ASSEMBLY LH
-
CONNECT TIE ROD ASSEMBLY LH
-
INSTALL FRONT SPEED SENSOR LH
-
CONNECT SKID CONTROL SENSOR WIRE
-
TEMPORARILY INSTALL FRONT NO. 2 SUSPENSION LOWER ARM LH
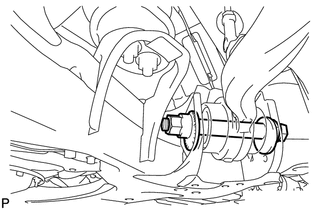
-
Temporarily install the front No. 2 suspension lower arm LH, and insert the toe adjusting cam from the rear of the vehicle.
-
Install the bolt, No. 2 toe adjusting plate and temporarily install the nut.
Tech Tips
After stabilizing the suspension, tighten the nut.
-
Align the matchmarks of the camber adjusting cam, No. 2 camber adjusting cam and front frame assembly.
-
Connect the front suspension lower arm LH to the front lower ball joint with the nut.
- Torque:
- 145 N*m { 1479 kgf*cm, 107 ft.*lbf }
Note
If it is necessary to align the holes for the clips after installing the nuts, the nuts can be tightened up to 60° more.
-
Install a new clip.
-
-
CONNECT FRONT HEIGHT CONTROL SENSOR SUB-ASSEMBLY LH
-
INSTALL FRONT DISC BRAKE DUST COVER LH
-
INSTALL FRONT DISC
-
CONNECT FRONT DISC BRAKE CALIPER ASSEMBLY LH
-
INSTALL FRONT AXLE SHAFT NUT LH
-
Clean the threaded parts on the drive shaft and axle shaft nut using a non-residue solvent.
Note
-
Be sure to perform this work for a new drive shaft.
-
Keep the threaded parts free of oil and foreign objects.
-
-
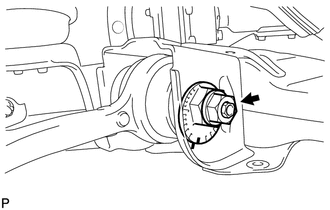
Using a 30 mm socket wrench, install a new axle shaft nut.
- Torque:
- 294 N*m { 2998 kgf*cm, 217 ft.*lbf }
-
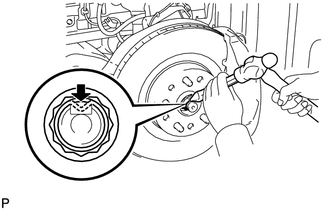
Using a chisel and hammer, stake the front axle shaft nut.
-
-
STABILIZE SUSPENSION
-
TIGHTEN FRONT SUSPENSION LOWER ARM ASSEMBLY LH
-
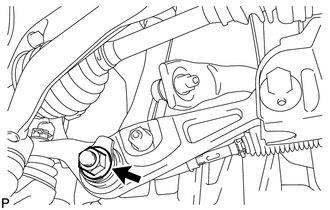
Tighten the nut of the front No. 2 suspension lower arm LH.
- Torque:
- 210 N*m { 2141 kgf*cm, 155 ft.*lbf }
Note
Tighten the nut while making sure that the marks are aligned.
-
-
TIGHTEN FRONT SHOCK ABSORBER LOWER BRACKET SUB-ASSEMBLY LH
-
Tighten the nut of the lower front shock absorber bracket.
- Torque:
- 112 N*m { 1142 kgf*cm, 83 ft.*lbf }
-
-
TIGHTEN FRONT NO. 2 SUSPENSION LOWER ARM LH
-
Tighten the nut of the front No. 2 suspension lower arm LH.
- Torque:
- 210 N*m { 2141 kgf*cm, 155 ft.*lbf }
Note
Tighten the nut while making sure that the marks are aligned.
-
-
INSTALL FRONT WHEEL
- Torque:
- 140 N*m { 1428 kgf*cm, 103 ft.*lbf }
-
INSPECT AND ADJUST FRONT WHEEL ALIGNMENT
-
Inspect and adjust the front wheel alignment Click here.
-
-
CHECK SUSPENSION CONTROL SYSTEM
-
Check the suspension control system Click here.
-
-
ADJUST HEADLIGHT ASSEMBLY
-
Adjust the headlight Click here.
-
-
ADJUST OBJECT RECOGNITION CAMERA
-
Adjust the object recognition camera Click here.
-