TRANSFER ASSEMBLY DISASSEMBLY

PROCEDURE
-
REMOVE DYNAMIC DAMPER
-
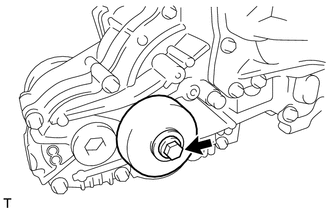
Remove the bolt, 2 washers and damper from the rear transfer case.
-
-
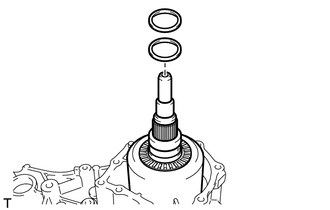
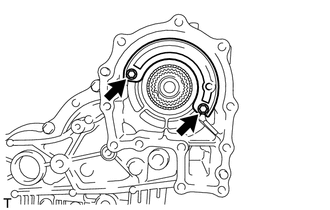
REMOVE TRANSFER CASE PLUG
-
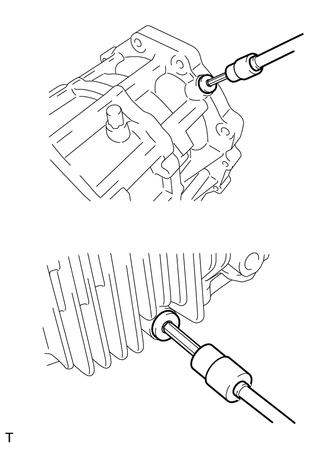
Using a 6 mm hexagon socket wrench, remove the 2 case plugs and 2 O-rings from the front transfer case.
-
-
REMOVE FILLER PLUG
-
Using a 10 mm hexagon socket wrench, remove the filler plug and gasket from the rear transfer case.
-
-
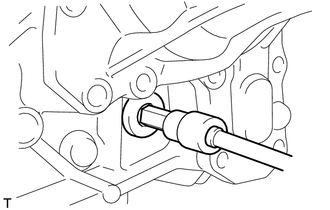
REMOVE TRANSFER DRAIN PLUG
-
Using a 10 mm hexagon socket wrench, remove the drain plug and O-ring from the front transfer case.
-
-
REMOVE TRANSFER CASE BREATHER PLUG
-
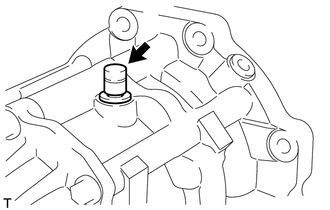
Remove the breather plug from the front transfer case.
-
-
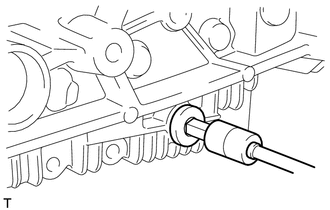
REMOVE NO. 2 TRANSFER CASE PLUG
-
Using a 17 mm straight hexagon wrench, remove the case plug and gasket from the rear transfer case.
-
-
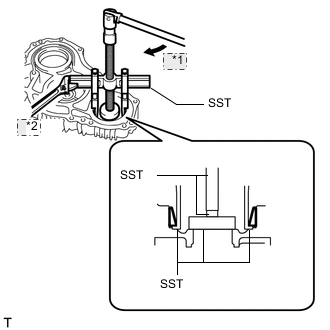
REMOVE OUTPUT SHAFT COMPANION FLANGE SUB-ASSEMBLY
-
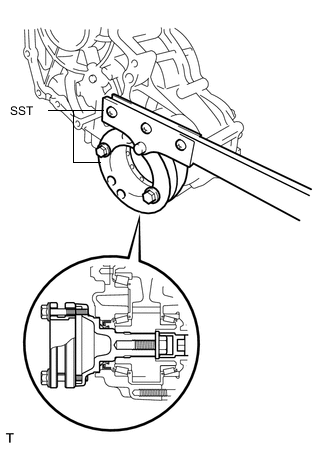
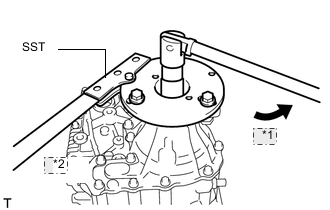
Using SST, hold the companion flange in place.
- SST
- 09213-58013
- 09330-00021
Tech Tips
Use bolts of size M8 x P1.25 with a length of approximately 55 mm (2.16 in.) or equivalent to secure the companion flange.
-
*1 Hold *2 Turn Remove the companion flange bolt and companion flange from the transfer assembly.
-
-
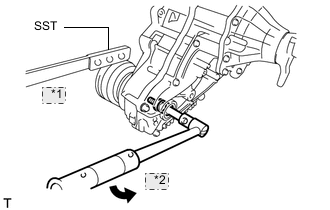
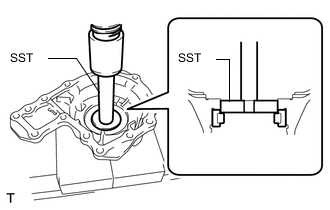
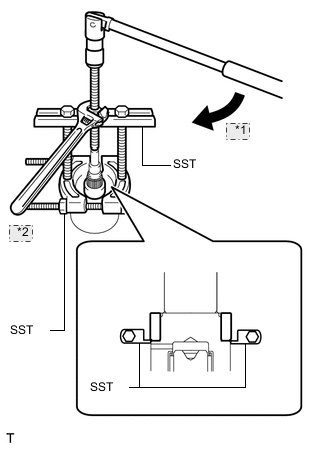
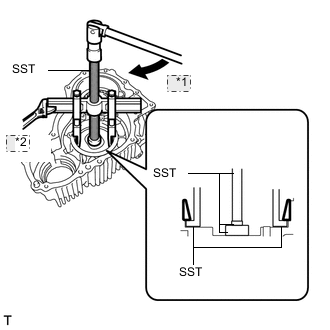
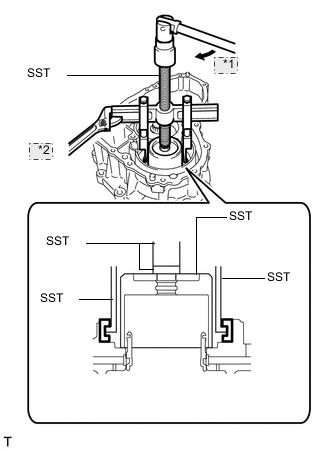
REMOVE DRIVE PINION COMPANION FLANGE SUB-ASSEMBLY
-
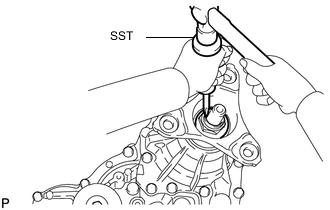
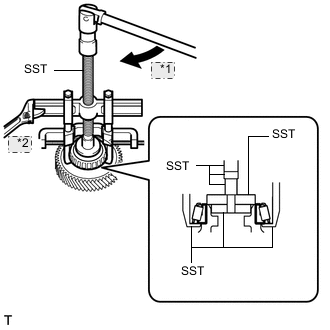
Using SST and a hammer, loosen the staked part of the transfer output shaft nut.
- SST
- 09930-00010
Note
-
Completely loosen the staked part of the transfer output shaft nut.
-
Do not damage the threads of the No. 1 differential case.
-
Use SST with the tapered surface facing the No. 1 differential case.
-
Do not grind the end of SST with a grinder or other tool.
-
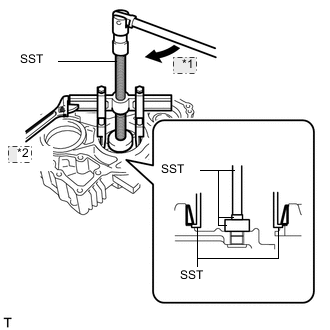
*1 Turn *2 Hold Using SST, hold the companion flange in place.
- SST
- 09330-00021
- 09950-30012 ( 09955-03040 )
-
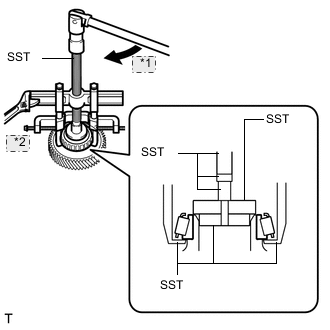
Using a 30 mm socket wrench, remove the transfer output shaft nut.
-
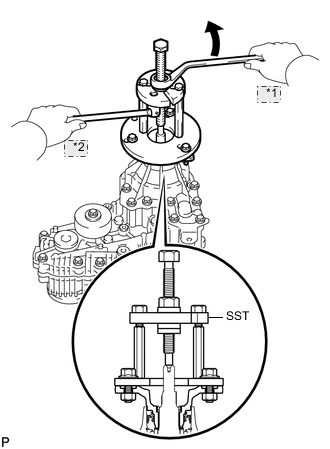
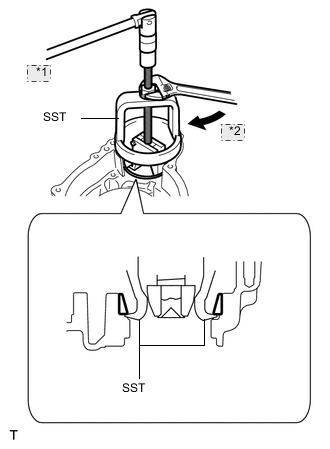
*1 Turn *2 Hold Using SST, remove the companion flange.
- SST
- 09950-30012 ( 09951-03010, 09953-03010, 09954-03010, 09955-03040 )
-
-
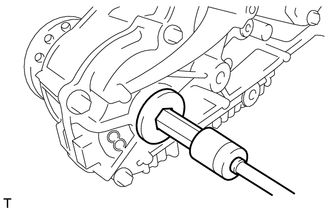
REMOVE TRANSFER EXTENSION HOUSING OIL SEAL
-
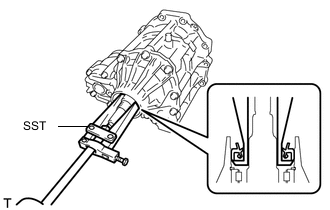
Using SST, remove the oil seal.
- SST
- 09308-00010
Note
Be careful not to damage the surface of the transfer extension housing that contacts the oil seal.
-
-
REMOVE NO. 1 DIFFERENTIAL CASE HOLE SNAP RING
-
Using needle-nose pliers, remove the snap ring from the extension housing.
-
-
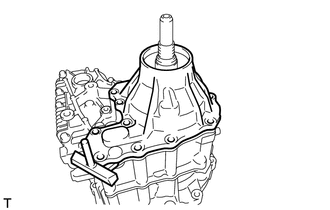
REMOVE TRANSFER EXTENSION HOUSING
-
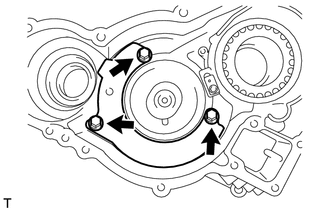
Remove the 11 bolts and bracket.
-
Using an oil pan seal cutter, remove the extension housing.
Note
Be careful not to damage the contact surface of the extension housing or rear transfer case.
-
-
REMOVE NO. 1 TRANSFER THRUST BEARING RACE
-
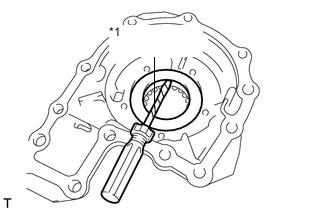
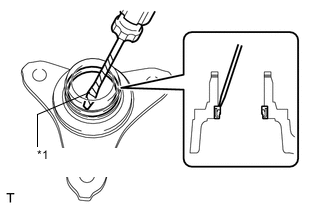
*1 Protective Tape Using a screwdriver, remove the bearing race from the extension housing.
Tech Tips
Tape the screwdriver tip before use.
Note
Be careful not to damage the surface which contacts the bearing race.
-
-
REMOVE TRANSFER OUTPUT SHAFT CYLINDRICAL ROLLER BEARING
-
Using SST and a press, remove the bearing (outer race) from the extension housing.
- SST
- 09950-60010 ( 09951-00460 )
- 09950-70010 ( 09951-07100 )
Tech Tips
The bearing (inner race) is removed from the No. 1 differential case sub-assembly.
-
-
REMOVE TRANSFER OUTPUT SHAFT WASHER
-
Remove the 2 shaft washers from the No. 1 differential case.
-
-
REMOVE DIFFERENTIAL CASE NEEDLE ROLLER BEARING
-

Remove the bearing from the No. 1 differential case.
-
-
REMOVE NO. 2 TRANSFER THRUST BEARING RACE
-
Remove the bearing race from the No. 1 differential case.
-
-
REMOVE TRANSFER OUTPUT SHAFT SHIM
-
Remove the shim from the No. 1 differential case.
-
-
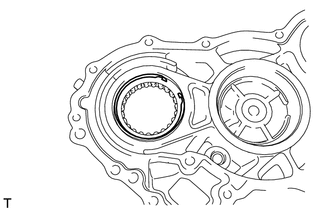
REMOVE NO. 1 DIFFERENTIAL CASE SUB-ASSEMBLY
-
Remove the No. 1 differential case from the rear transfer case.
-
-
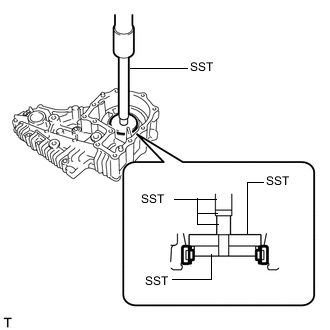
REMOVE TRANSFER OUTPUT SHAFT CYLINDRICAL ROLLER BEARING
-
*1 Turn *2 Hold Using SST, remove the bearing (inner race) from the No. 1 differential case.
- SST
- 09950-00020
- 09950-00030
-
-
REMOVE BREATHER OIL DEFLECTOR
-
Remove the 2 bolts and oil deflector.
-
-
REMOVE TRANSFER INPUT GEAR STOPPER SHAFT SNAP RING
-
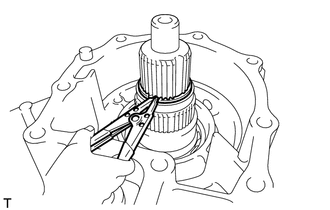
Using a snap ring expander, remove the snap ring from the input shaft.
-
-
REMOVE TRANSFER INPUT GEAR STOPPER
-
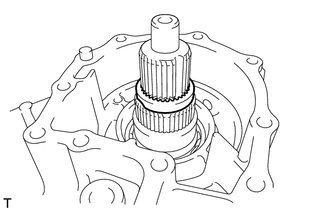
Remove the gear stopper from the input shaft.
-
-
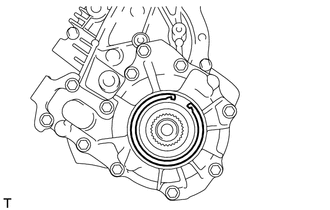
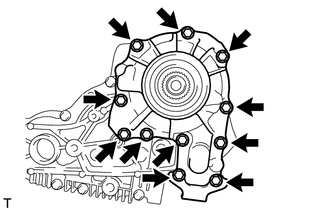
REMOVE REAR TRANSFER CASE
-
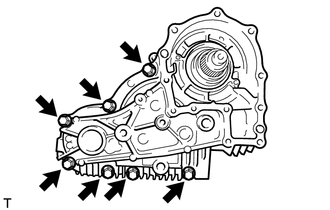
Remove the 7 bolts and rear transfer case.
-
-
REMOVE TRANSFER IDLER GEAR ASSEMBLY
-
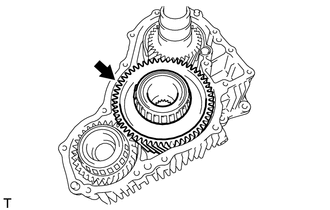
Remove the idler gear from the front transfer case.
-
-
REMOVE TRANSFER OIL PUMP DRIVE SHAFT
-
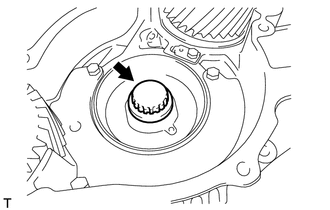
Remove the oil pump drive shaft from the front transfer case.
-
-
REMOVE TRANSFER COUNTER GEAR ASSEMBLY
-
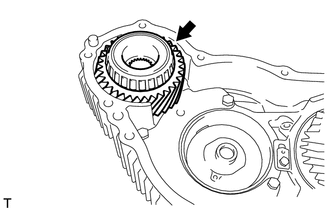
Remove the counter gear from the front transfer case.
-
-
REMOVE TRANSFER FRONT DRIVE GEAR ASSEMBLY
-
Remove the drive gear from the front transfer case.
-
-
REMOVE TRANSFER FRONT DRIVE GEAR PIN
-
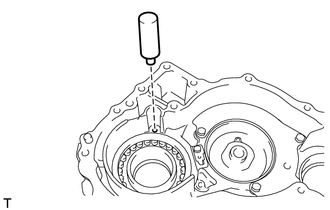
Remove the drive gear pin from the front transfer case.
-
-
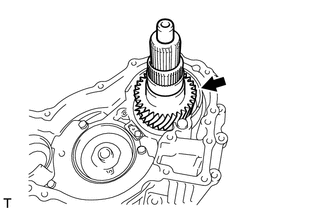
REMOVE TRANSFER INPUT SHAFT
-
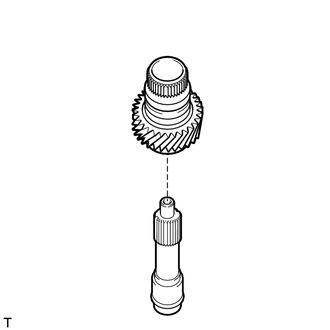
Remove the input shaft from the drive gear.
-
-
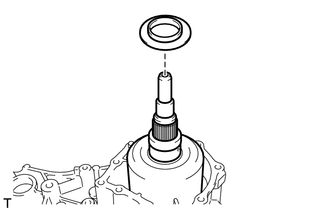
REMOVE TRANSFER OIL SEAL RING
-
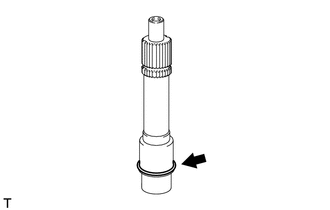
Remove the oil seal ring from the input shaft.
-
-
REMOVE DRIVE PINION COMPANION FLANGE OIL SEAL
-
*1 Protective Tape Using a screwdriver and hammer, tap out the oil seal from the companion flange.
Tech Tips
Tape the screwdriver tip before use.
-
-
REMOVE TRANSFER IDLER GEAR BEARING
-
*1 Turn *2 Hold for Front Transfer Case Side:
Using SST, remove the idler gear bearing (inner race) from the idler gear.
- SST
- 09950-40011 ( 09951-04020, 09952-04010, 09953-04030, 09954-04010, 09955-04021, 09957-04010, 09958-04011 )
- 09950-60010 ( 09951-00420, 09951-00540, 09952-06010 )
-
*1 Turn *2 Hold for Rear Transfer Case Side:
Using SST, remove the idler gear bearing (inner race) from the idler gear.
- SST
- 09950-40011 ( 09951-04020, 09952-04010, 09953-04030, 09954-04010, 09955-04021, 09957-04010, 09958-04011 )
- 09950-60010 ( 09951-00440, 09951-00540, 09952-06010 )
-
-
REMOVE TRANSFER COUNTER GEAR BEARING
-

*1 Hold *2 Turn for Front Transfer Case Side:
Using SST, remove the counter gear bearing (inner race) from the counter gear.
- SST
- 09950-00020
- 09950-00030
- 09950-40011 ( 09957-04010 )
- 09950-60010 ( 09951-00280, 09951-00440, 09952-06010 )
-

*1 Hold *2 Turn for Rear Transfer Case Side:
Using SST, remove the counter gear bearing (inner race) from the counter gear.
- SST
- 09950-00020
- 09950-00030
- 09950-40011 ( 09957-04010 )
- 09950-60010 ( 09951-00360, 09951-00500, 09952-06010 )
-
-
REMOVE TRANSFER OIL SEPARATOR
-
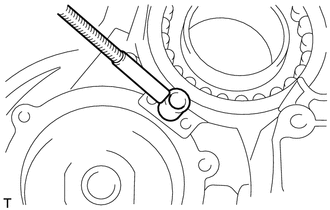
Remove the 3 bolts and oil separator from the front transfer case.
-
-
REMOVE NO. 1 TRANSFER OIL STRAINER
-
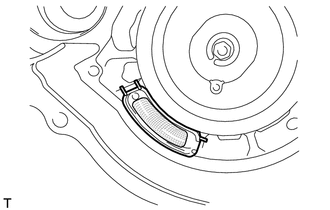
Remove the oil strainer from the front transfer case.
-
-
REMOVE TRANSFER OIL COOLER RELIEF VALVE
-
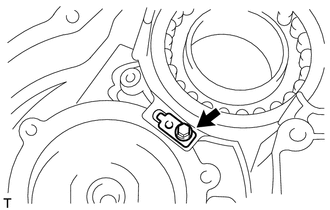
Remove the bolt, relief valve plate and relief valve compression spring from the front transfer case.
Note
Be careful to prevent the relief valve compression spring from jumping out.
-
Using a magnet hand, remove the relief valve from the front transfer case.
-
-
REMOVE TRANSFER OUTPUT SHAFT COMPANION FLANGE OIL SEAL
-
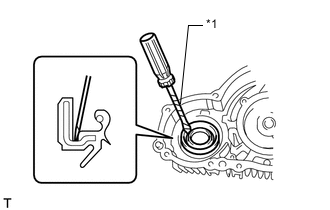
*1 Protective Tape Using a screwdriver and hammer, tap out the oil seal from the front transfer case.
Note
Be careful not to damage the surface which contacts the oil seal.
-
-
REMOVE TRANSFER IDLER GEAR BEARING
-
*1 Turn *2 Hold for Front Transfer Case Side:
Using SST, remove the idler gear bearing (outer race) from the front transfer case.
- SST
- 09950-40011 ( 09951-04020, 09952-04010, 09953-04030, 09954-04010, 09955-04071, 09957-04010 )
- 09950-60010 ( 09951-00290 )
-
*1 Turn *2 Hold for Rear Transfer Case Side:
Using SST, remove the idler gear bearing (outer race) from the rear transfer case.
- SST
- 09950-40011 ( 09951-04020, 09952-04010, 09953-04030, 09954-04010, 09955-04071, 09957-04010 )
- 09950-60010 ( 09951-00380 )
-
Remove the idler gear shim from the rear transfer case.
-
-
REMOVE TRANSFER OIL PUMP PLATE SUB-ASSEMBLY
-
Using an air gun, gradually apply air and remove the transfer oil pump plate from the front transfer case.
-
Remove the transfer oil pump plate pin from the transfer oil pump plate.
-
Remove the drive rotor and driven rotor from the front transfer case.
-
-
REMOVE TRANSFER COUNTER GEAR BEARING
-
*1 Hold *2 Turn for Front Transfer Case Side:
-
Using SST, remove the bearing (outer race) from the front transfer case.
- SST
- 09612-65014 ( 09612-01020 )
-
-
*1 Turn *2 Hold for Rear Transfer Case Side:
-
Using SST, remove the bearing (outer race) from the rear transfer case.
- SST
- 09950-40011 ( 09951-04020, 09952-04010, 09953-04030, 09954-04010, 09955-04071, 09957-04010 )
- 09950-60010 ( 09951-00420 )
-
-
Remove the counter gear shim from the rear transfer case.
-
-
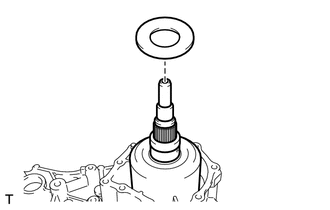
REMOVE FORWARD CLUTCH DRAM OIL SEAL RING
-
Remove the oil seal ring from the sleeve.
-
-
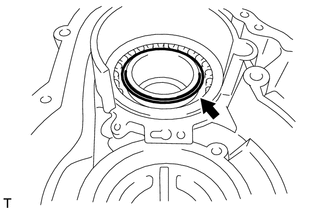
REMOVE TRANSFER FRONT CASE OIL SEAL
-
*1 Protective Tape Using a screwdriver, pry out the oil seal from the front transfer case.
Note
Be careful not to damage the surface which contacts the oil seal.
Tech Tips
Tape the screwdriver tip before use.
-
-
REMOVE TRANSFER FRONT DRIVE GEAR CYLINDRICAL ROLLER BEARING (for Front Transfer Case Side)
-
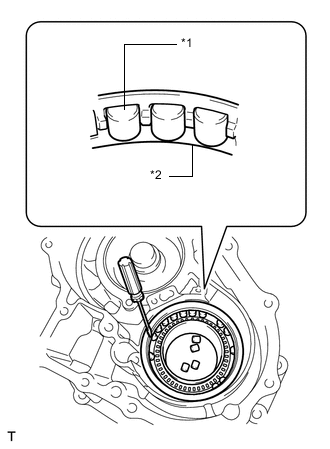
*1 Roller *2 Roller Cage Using a screwdriver, remove the bearing rollers and roller cage.
-
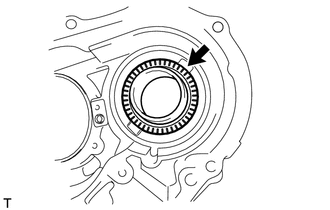
Remove the drive gear bearing and race from the front transfer case.
-
*1 Turn *2 Hold Using SST, remove the bearing from the front transfer case.
- SST
- 09649-17010
- 09950-40011 ( 09951-04010, 09952-04010, 09953-04020, 09954-04010, 09955-04041, 09957-04010 )
-
-
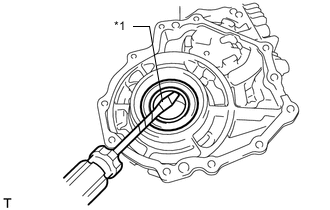
REMOVE TRANSFER OUTPUT SHAFT CYLINDRICAL ROLLER BEARING (for Rear Transfer Case Side)
-
Using needle-nose pliers, remove the snap ring from the rear transfer case.
-
Using SST and a press, remove the bearing from the rear transfer case.
- SST
- 09950-60010 ( 09951-00540, 09951-00650, 09952-06010 )
- 09950-70010 ( 09951-07100 )
Note
Be careful of the straight pins when placing the case on the press.
-