OIL PRESSURE SWITCH INSTALLATION
PROCEDURE
-
INSTALL OIL COOLER TUBE
-
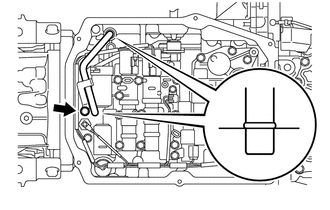
Install the oil cooler tube to the valve body.
Note
Make sure to fully insert the oil cooler tube.
-
Install the oil cooler tube clamp with the bolt.
- Torque:
- 10.8 N*m { 110 kgf*cm, 96 in.*lbf }
Note
Make sure not to pinch the wire harness when tightening the bolt.
-
-
INSTALL OIL PRESSURE SWITCH
-
Install the oil pressure switch (PB1).
-
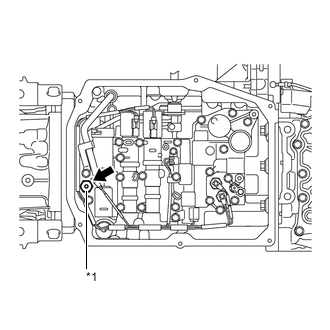
*1 Oil Pressure Switch (PB1) Install the oil pressure switch (PB1) to the valve body.
- Torque:
- 4.4 N*m { 45 kgf*cm, 39 in.*lbf }
Tech Tips
An oil pressure switch (PB1) is marked with blue paint.
-
Connect the oil pressure switch connector.
Note
Make sure that the terminals are securely engaged with the oil pressure switch.
Tech Tips
If the terminals do not engage securely, replace the transmission wire.
-
-
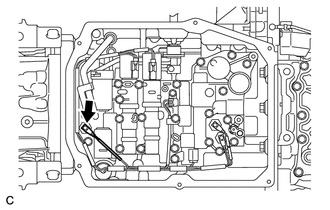
Install the oil pressure switch (PB2).
-

*1 Oil Pressure Switch (PB2) Install the oil pressure switch (PB2) to the valve body.
- Torque:
- 4.4 N*m { 45 kgf*cm, 39 in.*lbf }
Tech Tips
An oil pressure switch (PB2) is marked with blue paint.
-
Connect the oil pressure switch connector.
Note
Make sure that the terminals are securely engaged with the oil pressure switch.
Tech Tips
If the terminals do not engage securely, replace the transmission wire.
-
-
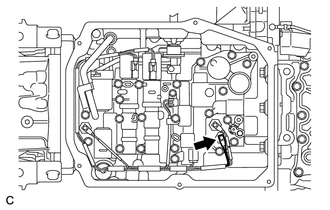
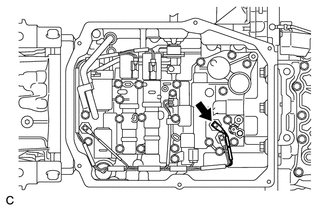
Install the oil pressure switch (PB3).
-

*1 Oil Pressure Switch (PB3) Install the oil pressure switch (PB3) to the valve body.
- Torque:
- 4.4 N*m { 45 kgf*cm, 39 in.*lbf }
Tech Tips
An oil pressure switch (PB3) is marked with purple paint.
-
Connect the oil pressure switch connector.
Note
Make sure that the terminals are securely engaged with the oil pressure switch.
Tech Tips
If the terminals do not engage securely, replace the transmission wire.
-
-
-
INSTALL OIL STRAINER ASSEMBLY
-
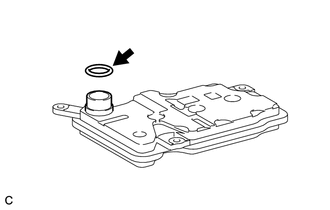
Coat a new O-ring with ATF and install it to the oil strainer.
-
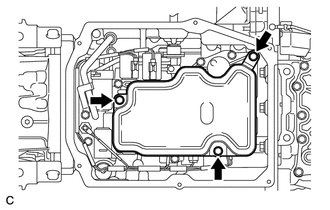
Install the oil strainer to the valve body with the 3 bolts.
- Torque:
- 10 N*m { 102 kgf*cm, 7 ft.*lbf }
Note
-
When installing the oil strainer, do not allow the wire harness to get caught between the parts.
-
When installing the oil strainer, make sure that the O-ring is not twisted.
-
Do not allow the O-ring to get jammed between the parts.
Tech Tips
-
If a new oil strainer assembly is reinstalled, repeat turning the power switch off and on twice. DTC for the oil pressure switch system may be output while performing this procedure, but they do not indicate malfunctions. Therefore, clear the DTCs.
-
After the oil strainer is replaced with a new one, perform the following menus: Powertrain / Hybrid Control / Utility / B1 Air Bleeding.
-
-
INSTALL TRANSMISSION OIL PAN SUB-ASSEMBLY
-
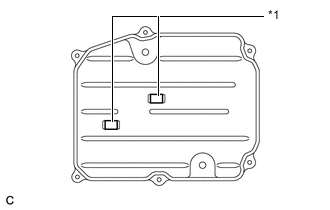
*1 Magnet Install the 2 magnets to the oil pan.
-
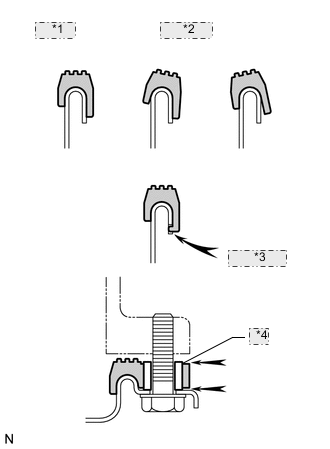
*1 CORRECT *2 INCORRECT *3 Protrusion *4 Sleeve Install a new gasket to the oil pan.
Note
-
Make sure that there is no oil or foreign matter on the gasket seal surface or oil pan contact surface.
-
Install the gasket so that there is no slack in the gasket, and that the entire circumference of the seal surface is level.
-
Make sure that the 6 gasket drop prevention protrusions are set on the oil pan.
-
When tightening the oil pan, make sure that the gasket is not pinched between the gasket tightening area sleeve and the transmission seal surface.
-
-
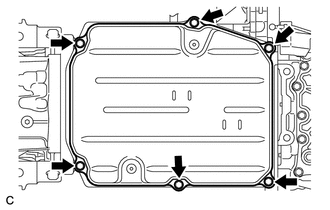
Install the oil pan to the transmission case with the 6 bolts.
- Torque:
- 7.5 N*m { 76 kgf*cm, 66 in.*lbf }
-
-
ADD TRANSMISSION FLUID
-
Add transmission fluid Click here.
-
-
INSTALL FRONT CENTER FLOOR COVER (w/ Cover)