ECM REMOVAL
PROCEDURE
-
REMOVE LUGGAGE COMPARTMENT MAT SUB-ASSEMBLY (w/ Spare Tire)
-
REMOVE DECK BOARD ASSEMBLY (w/o Spare Tire)
-
REMOVE DECK TRIM SIDE BOARD LH (w/o Spare Tire)
-
REMOVE BATTERY SERVICE HOLE COVER LH
-
PRECAUTION
Note
After turning the power switch off, waiting time may be required before disconnecting the cable from the battery terminal. Therefore, make sure to read the disconnecting the cable from the battery terminal notice before proceeding with work Click here.
-
DISCONNECT CABLE FROM NEGATIVE AUXILIARY BATTERY TERMINAL
Note
When disconnecting the cable, some systems need to be initialized after the cable is reconnected Click here.
-
REMOVE AIR CLEANER INLET COVER SUB-ASSEMBLY
-
REMOVE ENGINE ROOM SIDE COVER LH
-
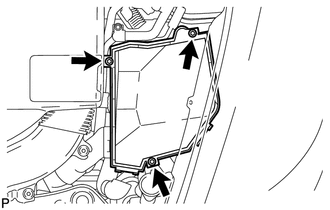
REMOVE ENGINE ROOM ECU COVER
Note
-
Wipe off any water on or around the ECU cover.
-
Perform these procedures in a dry place away from rain, etc.
-
Do not allow water to enter the ECM through its connectors areas, screw areas, etc.
-
Remove the 3 bolts and engine room ECU cover.
-
-
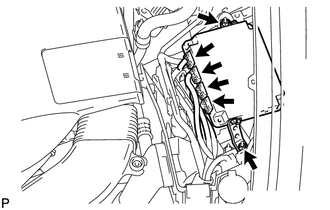
REMOVE HYBRID VEHICLE CONTROL ECU
-
Disconnect the 4 hybrid vehicle control ECU connectors.
-
Remove the 2 nuts and hybrid vehicle control ECU.
-
-
DISCONNECT NO. 2 CONNECTOR HOLDER
-
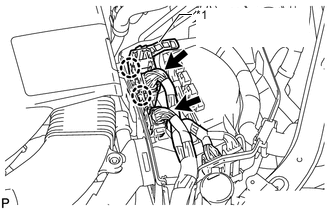
*1 Connector Holder Disconnect the 2 engine wire connectors.
-
Disconnect the 2 claws with the No. 2 connector holder.
-
-
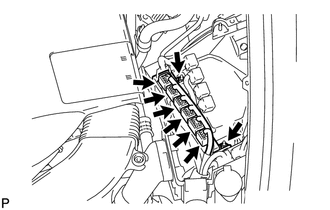
REMOVE ECM
-
Disconnect the 6 ECM connectors.
-
Remove the 2 nuts and ECM.
-
Remove the 4 screws and 2 ECM brackets from the ECM.
-