LIGHTING SYSTEM OPERATION CHECK
-
BEFORE PERFORMING TROUBLESHOOTING
-
Basic inspection
-
Inspect the auxiliary battery voltage.
-
-
Visually inspect for burned out lights, blown fuses, open or shorted wire harnesses, malfunctioning or partially connected connectors, etc.
-
-
INSPECT INTELLIGENT AFS SYSTEM
-
With the vehicle stopped and the power switch is on (Ready), check that the leveling motor and swivel motor initialization (initial position setting) is performed.
Tech Tips
For the swivel motor, only perform the vehicle inner side movement inspection (facing forward → facing inner side → facing forward).
-
Based on the vehicle condition, check that the intelligent AFS system operation starts and stops accordingly.
-
-
INSPECT FRONT DOME LIGHT CONTROL OPERATION
Tech Tips
The front dome light control illuminates the lights below.
-
Map light assembly
-
Power switch illumination
-
With the power switch off, and all doors closed and locked, unlock a door. Check that the lights listed above illuminate for approximately 15 seconds, and then turn off. (*1)
-
With the power switch off and all doors closed, open and close the driver side or front passenger side door. Check that the lights listed above illuminate for approximately 15 seconds, and then turn off.
-
With all doors closed, turn the power switch on (IG or ACC), or turn the power switch from on (IG) to off. Check that the lights listed above illuminate for approximately 15 seconds, and then turn off. (*2)
-
For (*1) and (*2), before the lights listed above turn off, open a door. Check that the illumination continues. Then close the door and check that the lights remain illuminated for approximately 15 seconds from when the door was closed.
-
With the power switch off and the lights listed above illuminated based on the timer control (approximately 15 seconds), close and lock all doors, or turn the power switch on (IG or ACC). Check that the lights turn off.
-
With the power switch off and all the doors closed, approach the driver side or front passenger side door while holding the key. Check that the lights turn on for 15 seconds.
-
-
INSPECT REAR DOME LIGHT CONTROL OPERATION
-
With the power switch off, and all doors closed and locked, unlock a door. Check that the lights listed above illuminate for approximately 15 seconds, and then turn off. (*1)
-
With the power switch off and all doors closed, open and close the rear LH side or rear RH side door. Check that the lights listed above illuminate for approximately 15 seconds, and then turn off.
-
With all doors closed, turn the power switch on (IG or ACC), or turn the power switch from on (IG) to off. Check that the lights listed above illuminate for approximately 15 seconds, and then turn off. (*2)
-
For (*1) and (*2), before the lights listed above turn off, open a door. Check that the illumination continues. Then close the door and check that the lights remain illuminated for approximately 15 seconds from when the door was closed.
-
With the power switch off and the lights listed above illuminated based on the timer control (approximately 15 seconds), close and lock all doors, or turn the power switch on (IG or ACC). Check that the lights turn off.
-
With the power switch off and all the doors closed, approach the rear LH side or rear RH side door while holding the key. Check that the lights turn on for 15 seconds.
-
-
INSPECT SHIFT LIGHT (ROOF) CONTROL
Note
The related light is listed below.
-
Map light assembly (shift light)
-
Check that the condition described below illuminates the shift light.
-
With the headlight dimmer switch assembly set to TAIL position, the power switch is turned on (ACC or IG), and the shift lever is moved to P.
-
-
Check that the condition described below dims the shift light.
-
With the headlight dimmer switch assembly set to TAIL position, the power switch is turned on (IG) and the shift lever is moved to a position other than P.
-
-
Check that the condition described below turns off the shift light.
-
The headlight dimmer switch assembly is turned OFF.
-
Turn the power switch off.
-
-
-
INSPECT CLOCK ILLUMINATION OPERATION
-
With the power switch off, and all doors closed and locked, unlock a door. Check that the clock illumination illuminates for approximately 15 seconds, and then turns off.
-
With all doors closed, turn the power switch on (IG or ACC). Check that the clock illumination illuminates.
-
With the power switch off. Check that the clock illumination turn off.
-
With the power switch off and all the doors closed, approach the driver side front passenger side, rear left or rear right door while holding the key. Check that the clock illumination turn on for approximately 15 seconds.
-
-
INSPECT ROOM LIGHT SWITCH ILLUMINATION OPERATION
Tech Tips
The following lights are relevant to this inspection.
-
Map light assembly (switch illumination)
-
Spot light assembly (switch illumination) (w/o Console Box) or Console box light assembly (switch illumination) (w/ Console Box)
-
Check that the switches illuminate when any of the doors is opened.
-
Check that the switches turn off when all the doors are closed.
-
-
INSPECT INSTRUMENT PANEL ILLUMINATION OPERATION
Note
Perform this inspection with the customize parameter at the initial setting.
-
Check that the instrument panel illumination immediately turns off and then turns on (flowing illumination toward the outside of the vehicle) when the power switch is turned on (ACC) with the shift lever in P after a door lock operation is performed (wireless or entry).
-
Check that the instrument panel illumination turns on (flowing illumination toward the inside of the vehicle) and then appropriately dims when the power switch is turned on (IG) and the shift lever is moved to a position other than P.
-
When the power switch is turned off with the power switch turned on (IG) and the shift lever not in P, check that the instrument panel illumination momentarily illuminates brightly starting from the center and moving towards the outside of the vehicle, and then turns off moving towards the center.
-
When the power switch is turned off with the power switch turned on (IG) and the shift lever in P, check that the instrument panel illumination turns off moving towards the center from the outside.
-
-
INSPECT INTERIOR FOOT LIGHT CONTROL
Note
Perform this inspection with the customize parameter at the initial setting.
Tech Tips
The related lights are listed below.
-
Interior illumination light assembly (front interior foot light LH)
-
Interior illumination light assembly (front interior foot light RH)
-
Interior illumination light assembly RH (rear interior foot light RH)
-
Interior illumination light assembly LH (rear interior foot light LH)
-
Check that either condition described below illuminates the interior foot light.
-
A door is opened.
-
The power switch is turned on (IG) and the shift lever is moved to P.
-
-
Check that the condition described below dims the interior foot light.
-
The power switch is turned on (IG) and the shift lever is moved to a position other than P (the dimming does not turn off until the power switch is turned off if the shift lever is not in P).
-
-
Check that either condition described below illuminates the interior foot light for approximately 15 seconds, and then turns off the interior foot light. (1) With the power switch off and a door open, the door is closed.
-
With the power switch off and a door open, the door is closed.
-
With all the doors closed, the power switch is turned from on (IG) to off.
-
-
Check that the condition described below turns off the interior foot light.
-
With the power switch off, all doors are closed and locked.
-
-
-
INSPECT INSIDE HANDLE ILLUMINATION CONTROL
Note
Perform this inspection with the customize parameter at the initial setting.
Tech Tips
The related lights are listed below.
-
Front door inside handle illumination RH
-
Front door inside handle illumination LH
-
Rear door inside handle illumination RH
-
Rear door inside handle illumination LH
-
Check that either of the conditions described below illuminates the inside handle illumination.
-
A door is opened.
-
The power switch is turned on (IG) and the shift lever is moved to P.
-
-
Check that the condition described below dims the inside handle illumination.
-
The power switch is turned on (IG) and the shift lever is moved to a position other than P (the dimming does not turn off until the power switch is turned off if the shift lever is not in P).
-
-
Check that either condition described below illuminates the inside handle illumination for approximately 15 seconds, and then turns off the inside handle illumination.
-
With the power switch off and a door open, the door is closed.
-
With all the doors closed, the power switch is turned from on (IG) to off.
-
-
Check that the condition described below turns off the inside handle illumination.
-
With the power switch off, all doors are closed and locked.
-
-
-
INSPECT COURTESY LIGHT CONTROL
Tech Tips
The related lights are listed below.
-
Front door courtesy light assembly LH
-
Front door courtesy light assembly RH
-
Rear door courtesy light assembly LH
-
Rear door courtesy light assembly RH
-
Check that the condition described below illuminates the courtesy light.
-
A door is opened.
-
-
Check that the condition described below turns off the courtesy light.
-
A door is closed.
-
-
-
INSPECT DOOR MIRROR FOOT LIGHT CONTROL
Note
Perform this inspection with the customize parameter at the initial setting.
Tech Tips
The related lights are listed below.
-
Door mirror foot light LH
-
Door mirror foot light RH
-
Check that any of the conditions described below illuminates the foot light for approximately 15 seconds, and then turns off the foot light.
-
The key ID certification area of the vehicle is entered.
-
With the shift lever on P, a wireless, entry or key-linked unlock operation is performed, or a driver side or front passenger side door control switch unlock operation is performed.
-
-
With the foot light illuminated, check that the condition described below turns off the shift light after 1 approximately 5 seconds have passed.
-
Open and close the driver or front passenger door.
-
-
Check that either of the conditions described below turns off the foot light.
-
With the power switch on (IG), the shift lever is moved from P to a position other than P.
-
A wireless, entry or key-linked lock operation is performed.
-
-
-
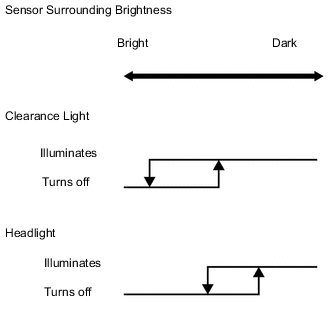
INSPECT CLEARANCE LIGHT CONTROL
Tech Tips
The related lights are listed below.
-
Parking lights
-
Taillights
-
License plate lights
-
Turn the headlight dimmer switch to the AUTO position.
-
When the doors are unlocked, check that the clearance light turns on for 15 seconds and then turns off.
-
-
INSPECT DAYTIME RUNNING LIGHT SYSTEM OPERATION
-
Turn the headlight dimmer switch off.
-
Turn the power switch on (Ready).
-
Release the parking brake.
-
Check that the daytime running lights come on.
-
-
INSPECT AUTOMATIC LIGHT CONTROL SYSTEM OPERATION
Note
Perform this inspection with the customize parameter at the initial setting.
-
Turn the power switch on (IG).
-
Set the headlight dimmer switch assembly to AUTO.
-
Slowly cover the automatic light control sensor with a lightproof object, and check that the lights automatically illuminate.
-
After illuminating the light, slowly move the lightproof object off of the automatic light control sensor, and check that the lights automatically turn off.
-
-
INSPECT AUTOMATIC LIGHT CONTROL SYSTEM (ILLUMINATION, TURN OFF)
-
Make the area around the automatic light control sensor dark to automatically illuminate the lights.
-
Check that any of the conditions described below turns off the lights.
-
The headlight dimmer switch assembly is turned OFF.
-
The automatic light control sensor's surrounding area is brightened.
-
With the power switch off, the driver door is opened.
-
-
Make the area around the automatic light control sensor dark to automatically illuminate the lights.
-
With the power switch off, open the driver door to turn off the lights.
-
When the power switch is turned on (IG), check that the lights turn on again.
-
-
INSPECT LIGHT AUTO TURN OFF SYSTEM (w/ Light Auto Turn-off Delay Function)
-
When the headlight dimmer switch is in the AUTO position:
-
Close all of the doors (including luggage compartment door).
-
Turn the power switch on (IG).
-
Set the headlight dimmer switch to the AUTO position to illuminate the lights.
-
Turn the power switch off.
-
Open the driver door.
-
Close the driver door.
-
Check that the headlights, taillights, parking lights and license plate lights go off after 30 seconds (delay function).
-
-
When the headlight dimmer switch is not in the AUTO position:
-
Close all of the doors (including luggage compartment door).
-
Turn the power switch on (IG).
-
Set the headlight dimmer switch to the except AUTO position to illuminate the lights.
-
Turn the power switch off.
-
Open the driver door.
-
Check that the buzzer sounds.
-
-
-
INSPECT LIGHT AUTO TURN OFF SYSTEM (w/ Follow Me Home System)
-
*: w/ Rear Fog Light
-
When headlight dimmer switch in AUTO position.
-
Turn the power switch on (IG).
-
Turn the headlights, front fog lights, rear fog lights*, parking lights, taillights or license plate lights on.
-
Turn the power switch off.
-
Check that all of lights go off immediately.
-
-
When headlight dimmer switch in TAIL or HEAD position.
-
Turn the power switch on (IG).
-
Turn the headlights, front fog lights, rear fog lights*, parking lights, taillights or license plate lights on.
-
Turn the power switch off.
-
Check that the headlights and front fog lights go off immediately.
-
Open the driver door.
-
Check that the buzzer sounds.
-
-
-
INSPECT AUTO TURN OFF SYSTEM (w/o Light Auto Turn-off Delay Function, w/o Follow Me Home System)
-
*: w/ Rear Fog Light
-
Prepare the vehicle so that the power switch is on (IG) and the driver door is closed.
-
Set the headlight dimmer switch to the TAIL, HEAD or AUTO position to illuminate the lights.
-
Turn the power switch off and open the driver door. Check that the headlights, front fog lights, rear fog lights*, taillights, parking lights and license plate lights turn off.
-
-
INSPECT AUTOMATIC HIGH BEAM SYSTEM (w/ Automatic High Beam System)
-
Check the operation of the inner rear view mirror assembly indicator light.
-
Turn the power switch on (IG).
-

*1 Indicator Light *2 AUTO Switch Check that the inner rear view mirror assembly indicator light comes on.
-
Press the inner rear view mirror assembly AUTO switch once.
-
Check that the inner rear view mirror assembly indicator light goes off.
-
Press the inner rear view mirror assembly AUTO switch once again.
-
Check that the inner rear view mirror assembly indicator light comes on.
-
-

*1 Indicator Light Check the operation of the automatic high beam indicator light.
-
Turn the power switch on (IG).
-
Move the shift lever to any position except R.
-
Turn the headlight dimmer switch to the AUTO or HEAD position.
-
Cover the automatic light control sensor to turn the low beam headlights on (when headlight dimmer switch is in the AUTO position).
-
Turn the dimmer switch to the high position.
-
The outer mirror switch (automatic high beam main switch) is on.
-
Check that the automatic high beam indicator comes on.
-
-
Check the operation of the automatic high beam function.
-
At night, when driving the vehicle with the automatic high beam system in standby mode, check that the headlights are changed from the low beams to the high beams automatically after a short delay when all of the following conditions are met:
-
The vehicle speed is more than approximately 40 km/h (25 mph)*1, 30 km/h (19 mph)*2 or 34 km/h (21 mph)*3.
-
There are no oncoming vehicles that have their headlights on, no vehicles in front that have their taillights on, there are only a few street lights and the surrounding area is dark.
-
*1: for Middle East and Europe
-
*2: for Taiwan, Hong Kong and China
-
*3: except Middle East, Europe, Taiwan, Hong Kong and China
-
-
At night, when driving the vehicle with the high beams turned on by the automatic high beam system, check that the automatic high beam system turns off the high beams and returns to standby mode when any of the following conditions are met:
-
The vehicle speed is less than 30 km/h (19 mph)*1, 25 km/h (16 mph)*2 or 27 km/h (17 mph)*3.
-
There are oncoming vehicles that have their headlights on, vehicles in front that have their taillights on, there are street lights and the surrounding area is bright.
-
*1: for Middle East and Europe
-
*2: for Taiwan, Hong Kong and China
-
*3: except Middle East, Europe, Taiwan, Hong Kong and China
-
-
-
Using the following procedure, the automatic high beam operation can be checked without driving the vehicle.
-
Turn the power switch on (IG).
-
Using the GTS, follow the instructions to switch to the "AFS" screen and select "Active Test".
-
Select "Automatic High Beam Operation" on the screen and forcibly operate the automatic high beam system.
-
Check that the inner rear view mirror assembly indicator light flashes.
-
Check that the low beams change to the high beams when the surrounding area is dark enough.
-
Shine a flashlight, white LED or red LED on the camera built into the inner rear view mirror assembly.
-
Check that the high beams change to the low beams.
Note
The high beams may not change to the low beams when the surrounding area is bright or due to on other lighting conditions. Therefore, this function check should not be used as the only method of determining if a malfunction is present (if parts need to be replaced).
-
-
-
INSPECT ADAPTIVE HIGH BEAM SYSTEM (w/ Adaptive High Beam System)
-
Check the operation of the inner rear view mirror assembly indicator light.
-
Turn the power switch on (IG).
-
*1 Indicator Light *2 AUTO Switch Check that the inner rear view mirror assembly indicator light comes on.
-
Press the inner rear view mirror assembly AUTO switch once.
-
Check that the inner rear view mirror assembly indicator light goes off.
-
Press the inner rear view mirror assembly AUTO switch once again.
-
Check that the inner rear view mirror assembly indicator light comes on.
-
-
*1 Indicator Light Check the operation of the adaptive high beam system indicator light.
-
Turn the power switch on (IG).
-
Move the shift lever to any position except R.
-
Turn the headlight dimmer switch to the AUTO or HEAD position.
-
Cover the automatic light control sensor to turn the low beam headlights on (when headlight dimmer switch is in the AUTO position).
-
Turn the dimmer switch to the high position.
-
The outer mirror switch (adaptive high beam system main switch) is on.
-
Check that the adaptive high beam system indicator comes on.
Tech Tips
-
When the inner rear view mirror assembly (adaptive high beam system sensor) cannot properly perform detection in front of the vehicle due to weather conditions (fog, etc.) or other obstacles, the adaptive high beam system indicator light in the combination meter may not illuminate and the adaptive high beam system may not operate.
-
When the auxiliary battery is disconnected and the vehicle is not being driven, the adaptive high beam system indicator light may not illuminate and the adaptive high beam system may not operate. When the auxiliary battery is disconnected, perform a driving test to perform steering angle zero point calibration.
-
-
-
Check the operation of the adaptive high beam system function.
-
At night, when driving the vehicle with the adaptive high beam system in standby mode, check that the headlights are changed from the low beams to the high beams automatically after a short delay when all of the following conditions are met:
-
The vehicle speed is more than approximately 60 km/h (37 mph).
-
When there are no oncoming vehicles that have their headlights on and no vehicles in front that have their taillights on.
-
The surrounding area is dark and there are only a few street lights on the side of the road in front of the vehicle.
-
-
At night, when driving the vehicle with the adaptive high beam system in standby mode, check that the headlights are changed from the low beams to the variable shade beams automatically after a short delay when all of the following conditions are met:
-
The vehicle speed is more than approximately 60 km/h (37 mph).
-
When there are oncoming vehicles that have their headlights on and vehicles in front that have their taillights on.
-
The surrounding area is dark and there are only a few street lights on the side of the road in front of the vehicle.
-
-
At night, when driving the vehicle with the high beams turned on by the adaptive high beam system, check that the adaptive high beam system turns off the high beams and returns to standby mode when any of the following conditions are met:
-
The vehicle speed is less than 40 km/h (25 mph).
-
When there are oncoming vehicles that have their headlights on and vehicles in front that have their taillights on.
-
The surrounding area is bright and there are many street lights on the side of the road in front of the vehicle.
-
The vehicle in front is moving quickly and is being blinded by the bright lights of the vehicle.
-
-
-
-
INSPECT LANE CHANGE FLASHER SYSTEM
Note
Perform this inspection with the customize parameter at the initial setting.
-
Turn the power switch on (IG).
-
Check that the turn signal light flashes a specified number of times when the turn signal switch is moved to the lane change position (it is not necessary to hold the switch).
-
While the turn signal light is flashing after the turn signal switch is moved to the lane change position (it is not necessary to hold the switch), check that the turn signal light turns off after the turn signal switch is moved in the opposite direction.
-
-
INSPECT BATTERY SAVER
-
Inside handle illumination
-
With the power switch off, any of the doors open and no vehicle condition changes, check that the lights illuminated by the inside handle illumination control remain illuminated for approximately 20 minutes, and then turn off.
Tech Tips
When the light control operation conditions are met, the battery saver control is canceled.
-
-
Interior foot light
-
With the power switch off, any of the doors open and no vehicle condition changes, check that the lights illuminated by the interior foot light control remain illuminated for approximately 20 minutes, and then turn off.
Tech Tips
When the light control operation conditions are met, the battery saver control is canceled.
-
-
Map light
-
With the power switch on (ACC) or off and no vehicle condition changes, check that the illuminated map light remains illuminated for approximately 20 seconds, and then turns off.
Tech Tips
When the power switch is on (IG), the battery saver control is canceled.
-
-
Front dome light
-
With the power switch off, any of the doors open and no vehicle condition changes, check that the lights illuminated by the front dome light control remain illuminated for approximately 20 minutes, and then turn off.
Tech Tips
When the light control operation conditions are met, the battery saver control is canceled.
-
-
Rear dome light
-
With the power switch off, any of the doors open and no vehicle condition changes, check that the lights illuminated by the rear dome light control remain illuminated for approximately 20 minutes, and then turn off.
Tech Tips
When the light control operation conditions are met, the battery saver control is canceled.
-
-
Luggage compartment light
-
With the power switch off, check that the illuminated luggage compartment light remains illuminated for approximately 30 minutes, and then turns off.
Tech Tips
Within approximately 30 minutes after the illumination, if the power switch is turned on (IG or ACC) or the luggage compartment door is closed, the battery saver control is canceled.
-
-
Front and rear vanity light
-
With the power switch on (ACC) or off and no vehicle condition changes, check that the illuminated front and rear vanity light remains illuminated for approximately 20 seconds, and then turns off.
Tech Tips
When the power switch is on (IG), the battery saver control is canceled.
-
-
Front and rear door courtesy light
-
With the power switch on (ACC) or off and no vehicle condition changes, check that the illuminated front and rear door courtesy light remains illuminated for approximately 20 seconds, and then turns off.
Tech Tips
When the power switch is on (IG), the battery saver control is canceled.
-
-