BACK DOOR GLASS(for Glass Hatch Type) INSTALLATION
PROCEDURE
-
INSTALL BACK DOOR HINGE ASSEMBLY LH
Tech Tips
Perform the following procedures if replacing the back door hinge assembly LH.
-
Using a T30 "TORX" socket wrench, install the back door hinge with the 2 screws.
- Torque:
- 8.0 N*m { 82 kgf*cm, 71 in.*lbf }
-
-
INSTALL BACK DOOR HINGE ASSEMBLY RH
Tech Tips
Use the same procedure described for the LH side.
-
INSTALL BACK WINDOW GLASS SPACER
Tech Tips
Perform the following procedures if replacing any back window glass spacer.
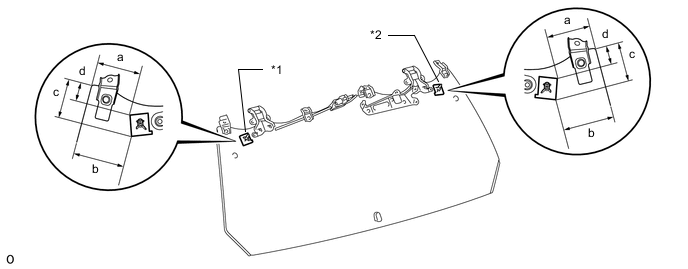
Text in Illustration *1 No. 2 Back Window Glass Spacer *2 No. 1 Back Window Glass Spacer
-
Apply Primer G to the window where the spacer will be installed.
Standard Area Specified Condition a 88.2 mm (3.47 in.) b 100.7 mm (3.94 in.) c 73.7 mm (2.90 in.) d 35.0 mm (1.37 in.) -
Note
-
Allow the primer to dry for 3 minutes or more.
-
Throw away any leftover primer.
-
Do not apply too much primer.
Tech Tips
If the primer is applied to an area that is not specified, apply non-residue solvent to a clean cloth and wipe off the excess primer before it dries.
-
-
Remove the peeling paper from a new spacer install the spacer to the back door glass at the location shown in the illustration.
-
-
INSTALL BACK WINDOW LOCK STRIKER ASSEMBLY
-
Install the lock striker with the 2 nuts.
-
-
INSTALL BACK DOOR LOCK STRIKER COVER
-
Attach the 3 claws to install the lock striker cover.
-
-
INSTALL BACK DOOR WINDOW PROTECTOR
-
Apply Primer G to the back window glass where the back door window protector will be installed.
Note
-
Allow the primer to dry for 3 minutes or more.
-
Throw away any leftover primer.
-
Do not apply too much primer.
-
-
Remove the peeling paper from a new back door window protector. Install a back door window protector to the back window glass at the locations shown in the illustration.
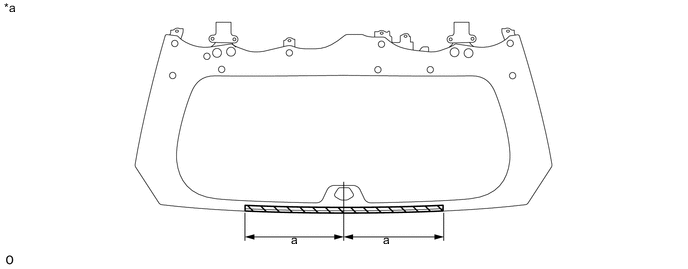
Text in Illustration *a Backside - - Standard Area Specified Condition a 310.0 mm (12.20 in.)
-
-
INSTALL BACK DOOR SEAL LH
-
Apply Primer G to the back window glass where the back door seal LH will be installed.
Note
-
Allow the primer to dry for 3 minutes or more.
-
Throw away any leftover primer.
-
Do not apply too much primer.
-
-
Remove the peeling paper from a new back door seal LH. Install a back door seal LH to the back window glass at the locations shown in the illustration.
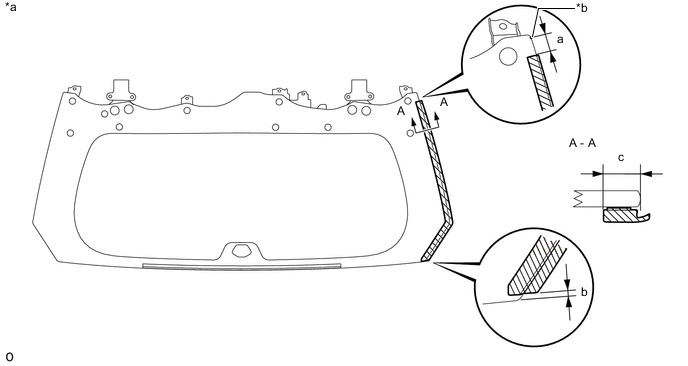
Text in Illustration *a Backside *b R End Standard Area Specified Condition a 25.1 mm (0.99 in.) b 3.1 mm (0.12 in.) c 11.0 mm (0.43 in.)
-
-
INSTALL BACK DOOR SEAL RH
Tech Tips
Use the same procedure described for the back door seal LH.
-
INSTALL BACK DOOR GLASS
-
Install the back door glass with the 4 bolts.
- Torque:
- 20 N*m { 204 kgf*cm, 15 ft.*lbf }
-
Attach the 2 clamps and install the connector.
-
-
INSTALL BACK WINDOW STAY ASSEMBLY LH
-
INSTALL BACK WINDOW STAY ASSEMBLY RH
Tech Tips
Use the same procedures described for the LH side.
-
INSTALL REAR WIPER MOTOR ASSEMBLY
-
INSTALL REAR WIPER ARM
-
INSTALL REAR SPOILER SUB-ASSEMBLY
-
INSTALL REAR SPOILER COVER RH
-
INSTALL REAR NO. 1 SPOILER COVER