REAR NO. 1 SEAT ASSEMBLY(for 60/40 Split Double-folding Seat Type RH Side) REMOVAL
CAUTION / NOTICE / HINT
CAUTION:
Wear protective gloves. Sharp areas on the parts may injure your hands.
PROCEDURE
-
REMOVE REAR SEAT CUSHION HINGE COVER LH
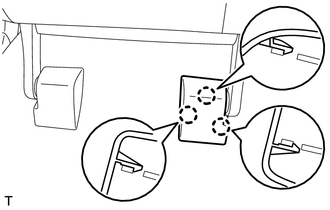
-
Using a moulding remover, detach the 3 claws and remove the cover.
-
-
REMOVE REAR SEAT CUSHION HINGE COVER RH
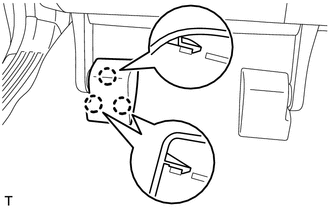
-
Using a moulding remover, detach the 3 claws and remove the cover.
-
-
REMOVE REAR SEAT CUSHION ASSEMBLY RH
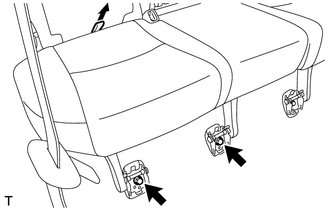
-
Pull the rear seat cushion band and release the lock.
-
Remove the 2 bolts and seat cushion.
Note
Be careful not to damage the vehicle body.
-
-
REMOVE REAR SEAT HEADREST ASSEMBLY
-
Remove the headrest.
-
-
REMOVE REAR SEATBACK COVER
-
Press the seatback lock release button to release the lock and fold down the seatback.
-
Using a screwdriver, detach the 4 claws and remove the cover.
Tech Tips
Tape the screwdriver tip before use.
-
-
REMOVE REAR SEATBACK BOARD CARPET ASSEMBLY RH
-
Using a clip remover, detach the 5 clips.
-
Detach the 2 claws and remove the carpet.
-
-
REMOVE REAR SEATBACK ASSEMBLY RH
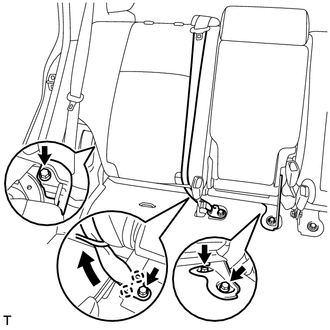
-
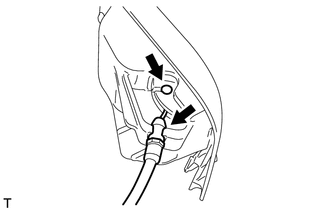
Remove the bolt and detach the 2 claws, and then disconnect the outer belt.
-
Remove the 2 bolts that secure the seatback to the floor.
-
Fold down the seatback, remove the bolt from the hinge, and then remove the seatback.
Note
Be careful not to damage the vehicle body.
-
-
REMOVE REAR SEATBACK HINGE SUB-ASSEMBLY RH
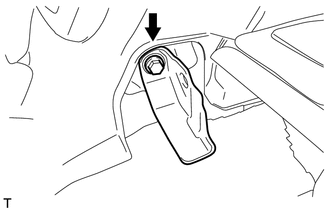
-
Remove the bolt and hinge.
-
-
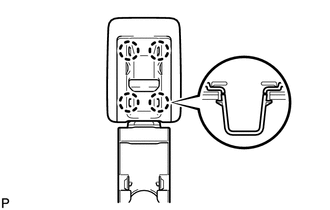
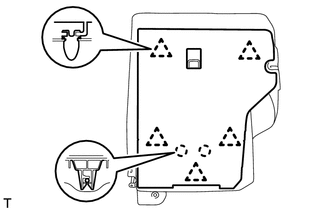
REMOVE REAR SEATBACK LOCK CONTROL LEVER BASE RH
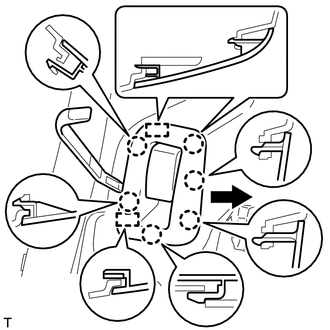
-
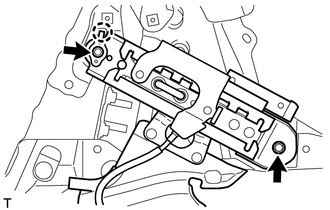
Using a moulding remover, detach the 6 claws.
-
Move the cover in the direction of the arrow to detach the 2 guides and remove the lever base.
-
Detach the cable clamp and disconnect the cable.
-
-
REMOVE REAR NO. 2 SEAT ASSEMBLY RH
-
for Face to Face Seat Type:
Remove the rear No. 2 seat assembly Click here.
-
-
REMOVE REAR DOOR SCUFF PLATE RH
-
REMOVE REAR DOOR OPENING TRIM WEATHERSTRIP RH
-
REMOVE TONNEAU COVER ASSEMBLY (w/ Tonneau Cover)
-
REMOVE FRONT LUGGAGE COMPARTMENT TRIM COVER
-
REMOVE NO. 1 DECK BOARD SUB-ASSEMBLY
-
REMOVE REAR FLOOR REAR MAT SUPPORT PLATE
-
REMOVE FLOOR SIDE RAIL LH (w/ Deck Rail)
-
REMOVE FLOOR SIDE RAIL RH (w/ Deck Rail)
-
REMOVE REAR FLOOR CARPET ASSEMBLY
-
REMOVE REAR NO. 1 SEAT OUTER LAP BELT ANCHOR COVER
-
REMOVE NO. 1 LUGGAGE COMPARTMENT TRIM HOOK
-
REMOVE NO. 1 TONNEAU COVER HOLDER CAP (w/o Tonneau Cover)
-
REMOVE FRONT DECK SIDE TRIM COVER (w/ Tonneau Cover)
-
REMOVE DECK TRIM SIDE PANEL ASSEMBLY RH
-
REMOVE REAR NO. 2 SEATBACK LOCK STRIKER SUB-ASSEMBLY RH
-
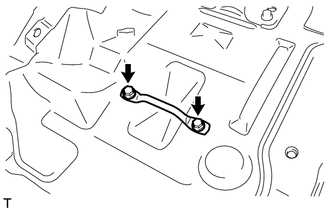
Remove the 2 bolts.
-
Detach the claw and remove the striker.
Note
Do not wipe off the grease on the sliding portion of the striker.
-
-
REMOVE REAR SEAT CUSHION LOCK STRIKER
-
Remove the 2 bolts and striker.
-