REAR NO. 1 SEAT ASSEMBLY(for 60/40 Split Slide Walk-in Seat Type RH Side) DISASSEMBLY
CAUTION / NOTICE / HINT
CAUTION:
Wear protective gloves. Sharp areas on the parts may injure your hands.
Tech Tips
-
Use the same procedure for RHD and LHD vehicles.
-
The procedure listed below is for LHD vehicles.
PROCEDURE
-
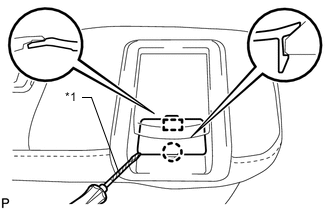
REMOVE REAR SEAT UPPER RECLINING COVER RH
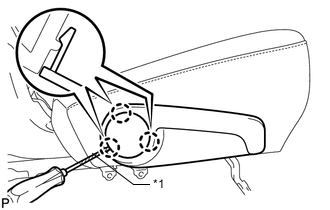
Text in Illustration *1 Protective Tape
-
Using a screwdriver, detach the 3 claws and remove the rear seat upper reclining cover RH.
Tech Tips
Tape the screwdriver tip before use.
-
-
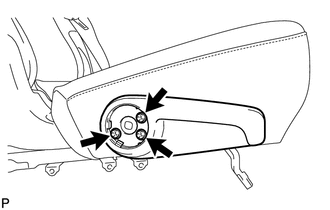
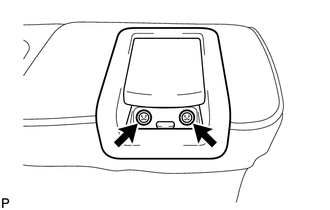
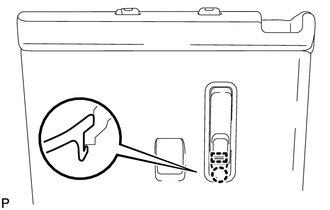
REMOVE RECLINING ADJUSTER RELEASE HANDLE RH
-
Remove the 3 screws and reclining adjuster release handle RH.
-
-
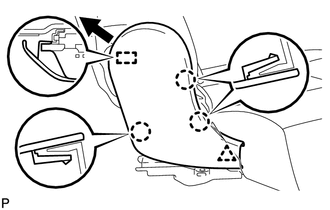
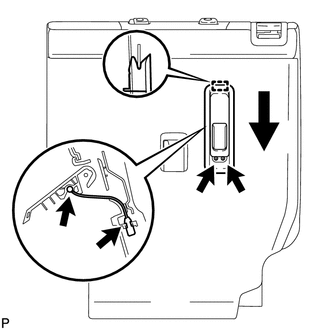
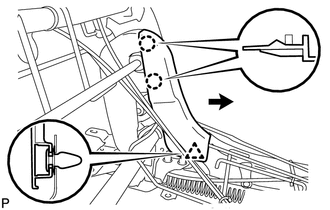
REMOVE REAR SEAT CUSHION MOULDING RH
-
Using a clip remover, detach the clip.
-
Using a moulding remover, detach the 3 claws.
-
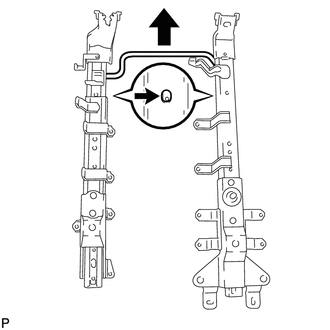
Move the rear seat cushion moulding RH in the direction of the arrow to detach the guide and remove the rear seat cushion moulding RH.
-
-
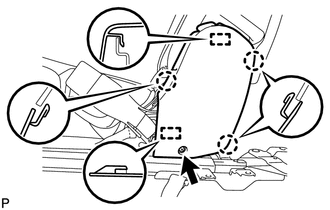
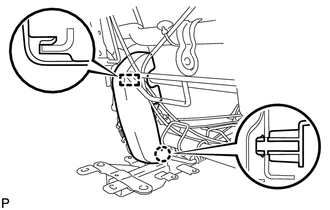
REMOVE REAR SEAT REAR CUSHION MOULDING LH
-
Remove the screw.
-
Using a moulding remover, detach the 3 claws.
-
Detach the 2 guides and remove the rear seat rear cushion moulding LH.
-
-
REMOVE REAR NO. 1 SEAT INNER BELT ASSEMBLY RH
-
REMOVE REAR SEAT INNER BELT ASSEMBLY
-
REMOVE REAR SEATBACK LOCK STRIKER COVER RH
-
Using a clip remover, detach the 3 clips and remove the rear seatback lock striker cover RH.
-
-
REMOVE SEAT CUSHION COVER WITH PAD
-
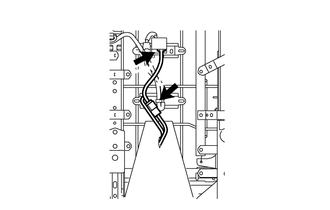
w/ Seat Heater System:
-
Disconnect the 2 rear seat heater connectors.
-
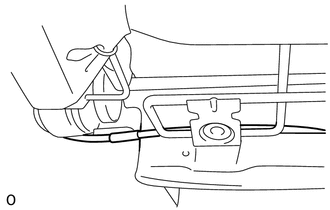
Pull out the wire harness as shown in the illustration.
-
-
Detach the hooks and remove the seat cushion cover with pad.
-
-
REMOVE REAR NO. 2 SEAT PROTECTOR
-
Remove the 2 rear No. 2 seat protectors from the separate type rear seat cushion pad.
-
-
REMOVE REAR SEAT CUSHION EDGE PROTECTOR
-
Remove the rear seat cushion edge protector from the cushion spring.
-
-
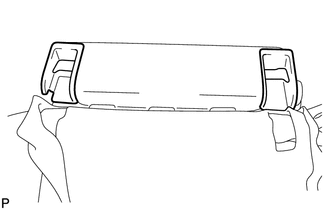
REMOVE SEPARATE TYPE REAR SEAT CUSHION COVER
-
Remove the 14 hog rings and separate type rear seat cushion cover from the separate type rear seat cushion pad.
-
-
REMOVE REAR SEAT CUSHION HEATER ASSEMBLY (w/ Seat Heater System)
-
REMOVE RECLINING ADJUSTER KNOB CAP RH
-
Text in Illustration *1 Protective Tape Using a screwdriver, detach the claw and guide, and then remove the reclining adjuster knob cap RH.
Tech Tips
Tape the screwdriver tip before use.
-
-
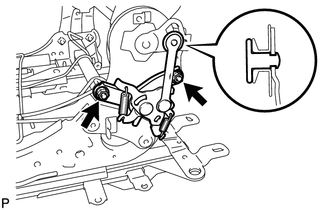
REMOVE REAR SEAT LOCK CONTROL LEVER SUB-ASSEMBLY RH
-
Remove the 2 screws.
-

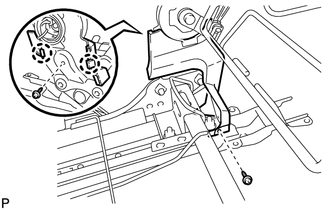
Disconnect the cable in the order shown in the illustration and remove the rear seat lock control lever sub-assembly RH.
-
-
REMOVE REAR SEAT COVER CAP
-
Using a screwdriver, detach the claw and guide, and then remove the rear seat cover cap.
Tech Tips
Tape the screwdriver tip before use.
-
-
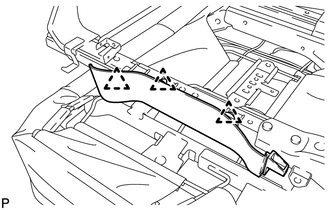
REMOVE REAR CENTER BACK LOCK CONTROL LEVER
-
Remove the 2 screws.
-
Move the rear center back lock control lever in the direction of the arrow to detach the guide and remove the rear center back lock control lever.
-
Detach the cable clamp and disconnect the cable from the rear center back lock control lever.
-
-
REMOVE REAR SEATBACK COVER
-
Using a screwdriver, detach the 4 claws and remove the rear seatback cover.
Tech Tips
Tape the screwdriver tip before use.
-
-
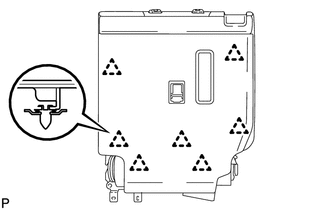
REMOVE REAR SEATBACK BOARD CARPET ASSEMBLY RH
-
Using a clip remover, detach the 7 clips and remove the rear seatback board carpet assembly RH.
-
-
REMOVE REAR NO. 1 SEAT HEADREST SUPPORT ASSEMBLY
-
Detach the 4 claws and remove the 2 rear No. 1 seat headrest support assemblies.
-
-
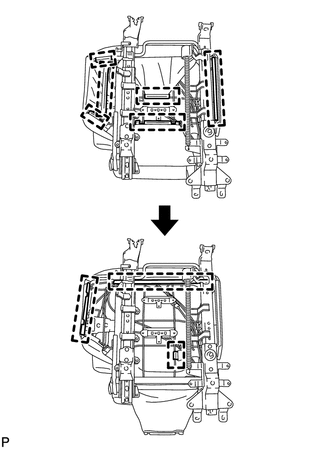
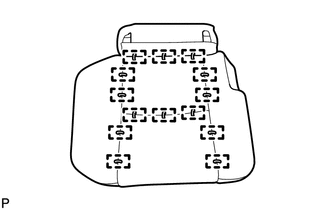
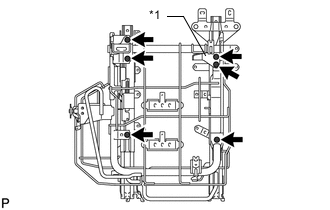
REMOVE SEATBACK COVER WITH PAD
-

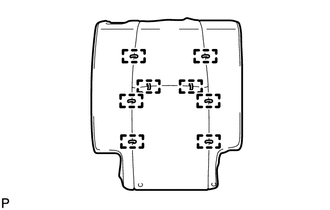
Text in Illustration *1 Hook *2 Hog Ring Remove the 14 hog rings and detach the hooks, and then remove the seatback cover with pad.
-
w/ Seat Heater System:
-
Remove the wire harness.
-
-
-
REMOVE SEPARATE TYPE REAR SEATBACK COVER
-

w/ Seat Heater System:
-
Disconnect the rear seatback heater assembly wire harness from the separate type rear seatback pad.
-
-
Remove the 8 hog rings and separate type rear seatback cover from the separate type rear seatback pad.
-
-
REMOVE REAR SEATBACK HEATER ASSEMBLY (w/ Seat Heater System)
-
REMOVE REAR SEATBACK EDGE PROTECTOR
-
Remove the rear seatback edge protector from the rear seatback frame sub-assembly RH.
-
-
REMOVE REAR SEAT INNER RECLINING COVER RH

-
Remove the 2 screws.
-
Detach the guide and remove the rear seat inner reclining cover RH.
-
-
REMOVE RECLINING ADJUSTER INSIDE COVER RH
-
Remove the 2 screws.
-
Detach the 2 claws and remove the reclining adjuster inside cover RH.
-
-
REMOVE RECLINING ADJUSTER INSIDE COVER RH
-
Using a clip remover, detach the clip.
-
Move the reclining adjuster inside cover RH in the direction of the arrow to detach the 2 claws and remove the reclining adjuster inside cover RH.
-
-
REMOVE RECLINING ADJUSTER INSIDE COVER RH
-
Detach the claw and guide, and remove the reclining adjuster inside cover RH.
-
-
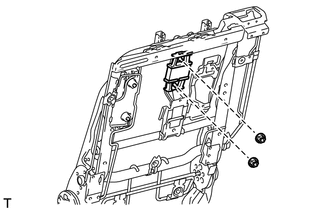
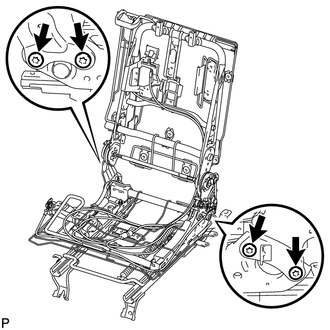
REMOVE REAR SEAT CUSHION SPRING DAMPER

-
Remove the 2 nuts and rear seat cushion spring damper.
-
-
REMOVE REAR SEATBACK SPRING DAMPER (w/ Dynamic Damper)
-
Remove the 2 nuts and rear seatback spring damper.
-
-
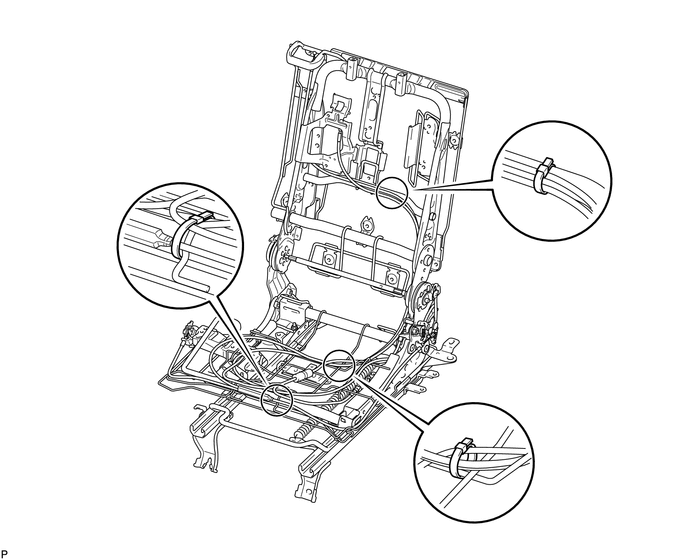
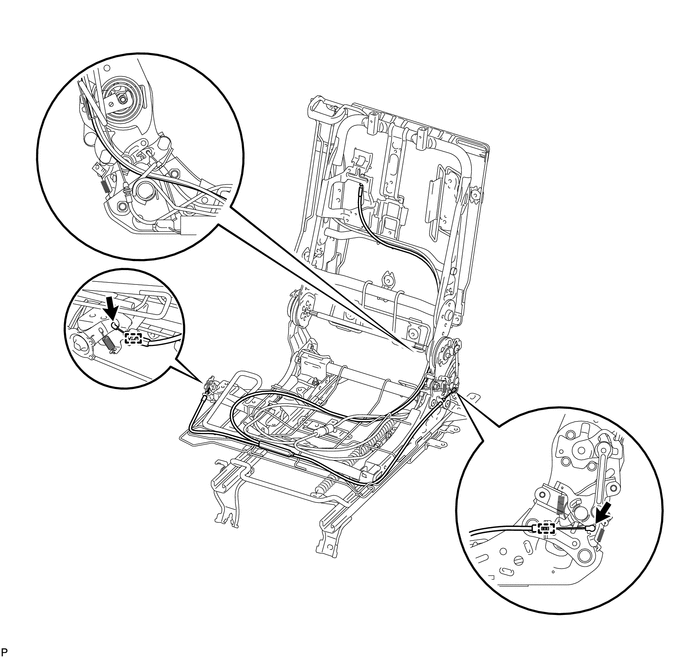
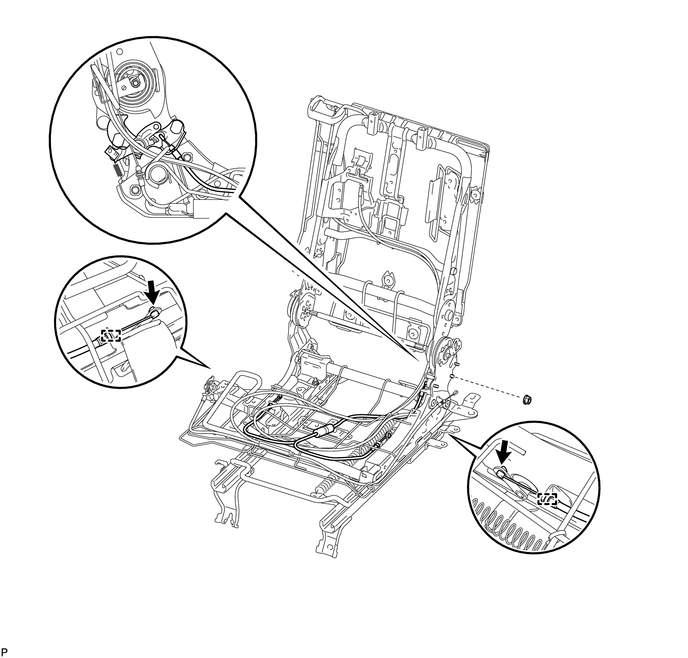
REMOVE REAR SEAT RECLINING CONTROL CABLE
-
Cut off the 3 cable ties.
-
Detach the 2 cable clamps and disconnect the rear seat reclining control cable, and then remove the rear seat reclining control cable.
-
-
REMOVE REAR NO. 2 SEAT RECLINING CONTROL CABLE
-
Detach the cable clamp and disconnect the rear No. 2 seat reclining control cable, and then remove the rear No. 2 seat reclining control cable.
-
-
REMOVE SEAT HEATER CONTROL SUB-ASSEMBLY (w/ Seat Heater System)
-
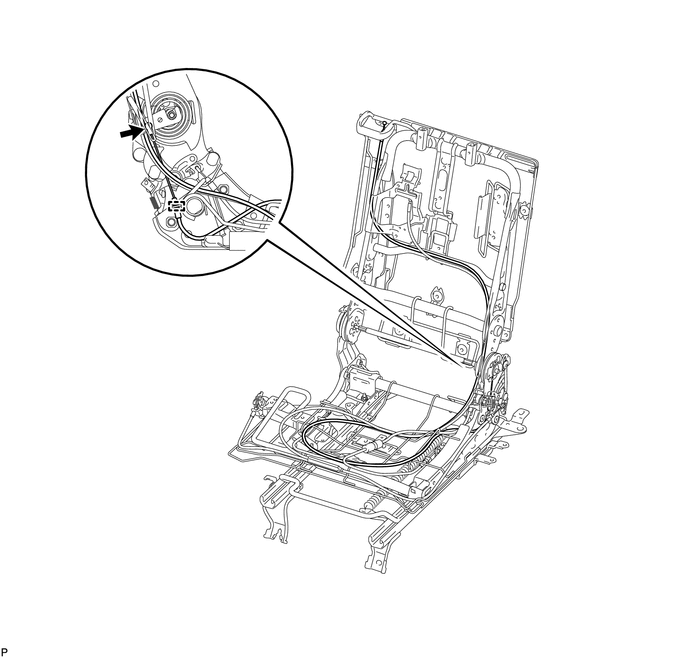
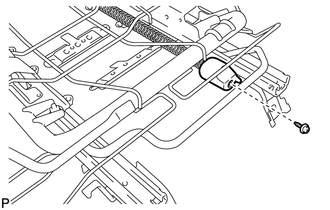
REMOVE REAR SEAT WIRE RH (w/ Seat Heater System)
-
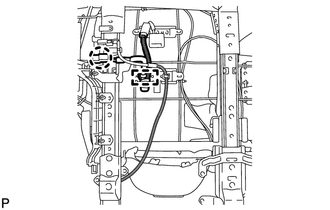
Detach the claw and disconnect the rear seat wire connector.
-
Detach the clamp and remove the rear seat wire RH.
-
-
REMOVE REAR SEAT CUSHION SET PLATE
-
Remove the 2 nuts and rear seat cushion set plate.
-
-
REMOVE REAR SEATBACK LOCK PLATE LH
-
Detach the 2 cable clamps and disconnect the cable.
-
Remove the nut and rear seatback lock plate LH.
-
-
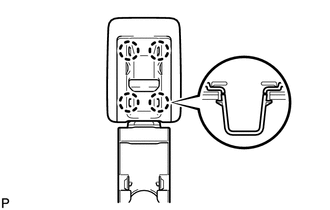
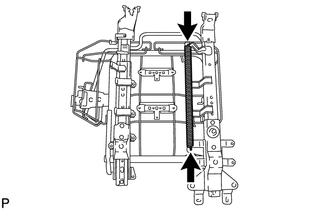
REMOVE REAR SEATBACK FRAME SUB-ASSEMBLY RH
-
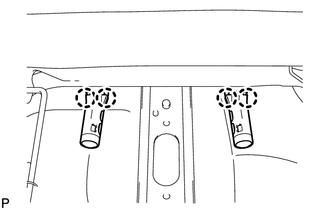
Using a T40 "TORX" socket wrench, remove the 4 "TORX" bolts and rear seatback frame sub-assembly RH.
-
-
REMOVE REAR SEAT COVER
-
Remove the screw and rear seat cover.
-
-
REMOVE REAR SEAT CUSHION SPRING
-
Detach the 2 hooks and remove the rear seat cushion spring.
-
-
REMOVE REAR SEAT CUSHION FRAME SUB-ASSEMBLY RH
Text in Illustration *1 No. 1 Seat Leg Plate
-
Remove the 6 nuts and rear seat cushion frame sub-assembly RH together with the No. 1 seat leg plate.
-
-
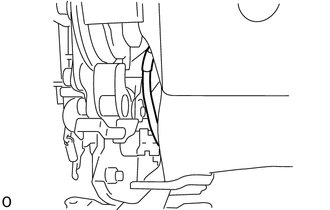
REMOVE REAR SEAT TRACK ADJUSTING HANDLE RH
-
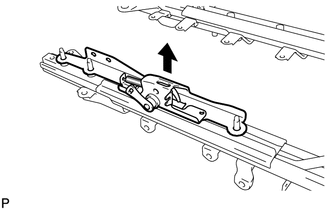
Remove the seat cushion side frame sub-assembly RH.
-
Slide the slide rail to the rearmost position.
-
Using a small screwdriver, push down the handle stopper to detach the claw and remove the rear seat track adjusting handle RH.
Tech Tips
Insert the screwdriver in the hole shown into the illustration while looking into the hole.
-