QUARTER TRIM SPEAKER(for 3 Door) REMOVAL
CAUTION / NOTICE / HINT
Tech Tips
-
Use the same procedure for the RH and LH sides.
-
The procedure listed below is for the LH side.
PROCEDURE
-
PRECAUTION
Note
After turning the ignition switch off, waiting time may be required before disconnecting the cable from the battery terminal. Therefore, make sure to read the disconnecting the cable from the battery terminal notice before proceeding with work Click here.
-
DISCONNECT CABLE FROM NEGATIVE BATTERY TERMINAL
Note
When disconnecting the cable, some systems need to be initialized after the cable is reconnected Click here.
-
REMOVE REAR NO. 1 SEAT ASSEMBLY
-
for 60/40 Split Tumble Seat Type LH Side:
-
for 60/40 Split Tumble Seat Type RH Side:
-
-
REMOVE DOOR SCUFF PLATE ASSEMBLY LH
-
REMOVE FRONT DOOR OPENING TRIM WEATHERSTRIP LH
-
REMOVE TONNEAU COVER ASSEMBLY (w/ Tonneau Cover)
-
REMOVE MAT SET PLATE COVER
-
REMOVE REAR FLOOR MAT REAR SUPPORT PLATE
-
REMOVE QUARTER TRIM COVER HOLE LH
-
REMOVE REAR FLOOR CARPET ASSEMBLY
-
REMOVE NO. 1 LUGGAGE COMPARTMENT TRIM HOOK
-
REMOVE NO. 1 TONNEAU COVER HOLDER CAP (w/o Tonneau Cover)
-
REMOVE FRONT DECK SIDE TRIM COVER (w/ Tonneau Cover)
-
REMOVE QUARTER TRIM POCKET TRAY
-
REMOVE OUTER LAP BELT ANCHOR COVER
-
REMOVE DECK TRIM SIDE PANEL ASSEMBLY LH
-
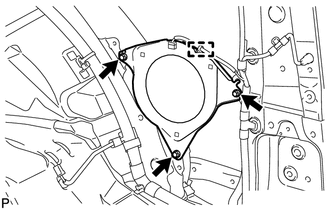
REMOVE REAR SPEAKER SET
-

Disconnect the speaker connector.
-
Remove the 3 screws.
-
Detach the 2 claws and remove the rear speaker set.
Note
Do not touch the cone of the speaker.
-
-
REMOVE NO. 2 SPEAKER BRACKET
-
Detach the clamp.
-
Remove the 3 bolts and No. 2 speaker bracket.
-