HEIGHT CONTROL DRYER INSTALLATION
PROCEDURE
-
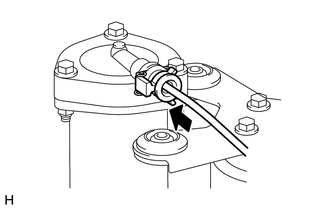
INSTALL HEIGHT CONTROL DRYER ASSEMBLY
-
Install a new O-ring.
-
Install the height control dryer with the bolt.
- Torque:
- 6.4 N*m { 65 kgf*cm, 57 in.*lbf }
-
Connect the No. 2 height control tube Click here.
Tech Tips
For the connection procedure of the tube (type 2), refer to Precaution of the Suspension Control System section.
-
-
INSTALL HEIGHT CONTROL COMPRESSOR ASSEMBLY
-
Install the height control compressor to the bracket with the 3 bolts.
- Torque:
- 5.9 N*m { 60 kgf*cm, 52 in.*lbf }
-
Connect the connector.
-
Attach the clamp.
-
Attach the 3 clamps.
-
Connect the connector.
-
Attach the No. 2 height control tube.
-
-
CONNECT NO. 2 HEIGHT CONTROL TUBE
-
INSTALL HEIGHT CONTROL FILTER
-
CHECK CONNECTION OF TUBES FOR AIR LEAK
-
INSTALL REAR BUMPER PROTECTOR SUB-ASSEMBLY LH (for 5 Door)
-
INSTALL HEIGHT CONTROL COMPRESSOR COVER
-
INSTALL REAR QUARTER PANEL MUDGUARD SUB-ASSEMBLY LH
-
INSTALL REAR WHEEL LH
-
CONNECT CABLE TO NEGATIVE BATTERY TERMINAL
Note
When disconnecting the cable, some systems need to be initialized after the cable is reconnected Click here.