STARTER(for 2.7 kW Type) INSTALLATION
PROCEDURE
-
INSTALL STARTER ASSEMBLY
-
w/ Urea SCR System:
-
Temporarily install the starter assembly.
Note
Be careful not to drop the starter assembly.
Tech Tips
Tie the starter assembly with a string.
-
-
w/o Urea SCR System:
-
for Manual Transmission:
Install the starter assembly with the bolt and nut.
- Torque:
- 68 N*m { 693 kgf*cm, 50 ft.*lbf }
-
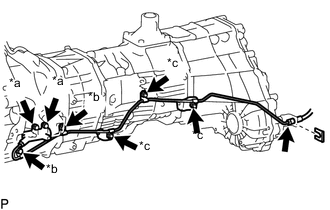
Text in Illustration *a Bolt A *b Bolt B *c Nut for Manual Transmission:
Connect the clutch release cylinder assembly with the 4 bolts, 3 nuts and a new clip.
- Torque:
- for bolt A
- 12 N*m { 120 kgf*cm, 9 ft.*lbf }
- for bolt B, nut
- 19 N*m { 194 kgf*cm, 14 ft.*lbf }
-
for Automatic Transmission:
Install the starter assembly with the bolt and 2 nuts.
- Torque:
- 68 N*m { 693 kgf*cm, 50 ft.*lbf }
-
Connect the starter wire with the nut.
- Torque:
- 21 N*m { 215 kgf*cm, 16 ft.*lbf }
-
Connect the starter connector.
-
Close the terminal cap.
-
-
-
INSTALL TRANSMISSION ASSEMBLY (w/ Urea SCR System)
-
for Manual Transmission:
-
for Automatic Transmission:
-
-
INSTALL FRONT PROPELLER SHAFT ASSEMBLY
-
INSTALL FRONT NO. 1 FENDER APRON TO FRAME SEAL LH
-
Install the front No. 1 fender apron to frame seal LH with the 5 clips.
-
-
CONNECT CABLE TO NEGATIVE BATTERY TERMINAL
Note
When disconnecting the cable, some systems need to be initialized after the cable is reconnected Click here.