PERSONAL LIGHT(for Front Door) REMOVAL
CAUTION / NOTICE / HINT
Tech Tips
-
Use the same procedure for LHD and RHD vehicles.
-
The procedure listed below is for LHD vehicles.
-
Use the same procedure for the RH side and LH side.
-
The procedure listed below is for the LH side.
PROCEDURE
-
REMOVE FRONT DOOR LOWER FRAME BRACKET GARNISH LH
-
REMOVE NO. 2 DOOR INSIDE HANDLE BEZEL LH
-
REMOVE ASSIST GRIP COVER LH
-
REMOVE FRONT DOOR TRIM BOARD SUB-ASSEMBLY LH
-
REMOVE FRONT DOOR INNER GLASS WEATHERSTRIP LH
-
REMOVE FRONT DOOR INSIDE HANDLE ILLUMINATION LIGHT ASSEMBLY LH
-
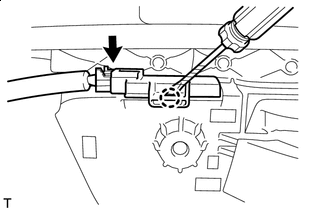

Protective Tape Disconnect the connector.
-
Using a screwdriver, detach the claw and remove the front door inside handle illumination light assembly LH.
Tech Tips
Tape the screwdriver tip before use.
-
-
REMOVE NO. 1 INTERIOR ILLUMINATION LIGHT ASSEMBLY LH
-
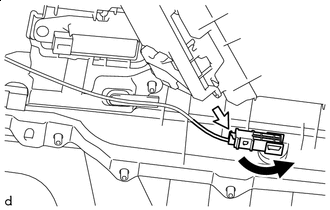

Remove in this Direction 
Connector Disconnect the connector.
-
Turn the No. 1 interior illumination light assembly LH in the direction indicated by the arrow and remove it.
-