CYLINDER BLOCK REPLACEMENT

PROCEDURE
-
REPLACE TIGHT PLUG
Note
If water leaks from the tight plug or the plug is corroded, replace it.
-
Remove the tight plugs.
-
Apply adhesive to new tight plugs.
Adhesive Toyota Genuine Adhesive 1324, Three Bond 1324 or equivalent Note
Do not start the engine for 1 hour after installation.
-
Position A:
Using a 14 mm steel bar and hammer, tap in the tight plug as shown in the illustration.
-
Other Positions:
Using SST and a hammer, tap in the tight plugs as shown in the illustration.
Position B
- SST
- 09950-60010 ( 09951-00180 )
- 09950-70010 ( 09951-07100 )
Position C
- SST
- 09950-60010 ( 09951-00190 )
- 09950-70010 ( 09951-07100 )
Position D
- SST
- 09950-60010 ( 09951-00200 )
- 09950-70010 ( 09951-07100 )
Position E and H
- SST
- 09950-60010 ( 09951-00350 )
- 09950-70010 ( 09951-07100 )
Position F
- SST
- 09950-60010 ( 09951-00400, 09951-00450 )
- 09950-70010 ( 09951-07100 )
Position G
- SST
- 09950-60010 ( 09951-00450 )
- 09950-70010 ( 09951-07100 )
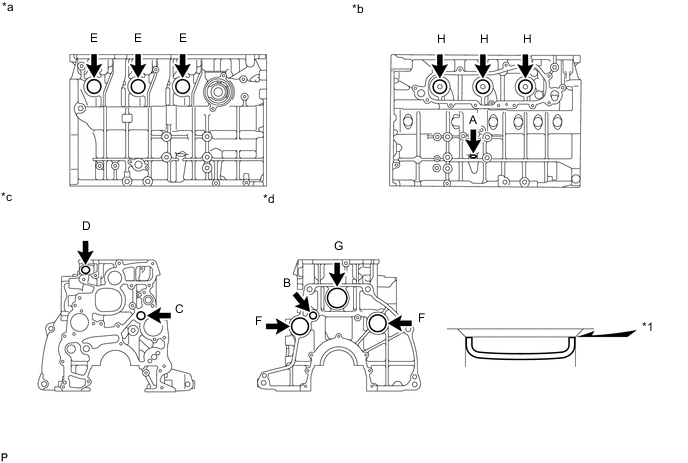
Text in Illustration *1 Stops - - *a for Right Side *b for Left Side *c for Front Side *d for Rear Side
-
-
REPLACE STRAIGHT PIN
Note
It is not necessary to remove the straight pin unless it is being replaced.
-
Remove the straight pins.
-
Using a plastic-faced hammer, tap in new straight pins to the cylinder block.
Standard Protrusion Height Item Specified Condition Pin A 6 mm (0.234 in.) or less Pin B 7.5 mm (0.295 in.) or less Pin C 12 mm (0.472 in.) or less Pin D 5 to 8 mm (0.197 to 0.315 in.) or less 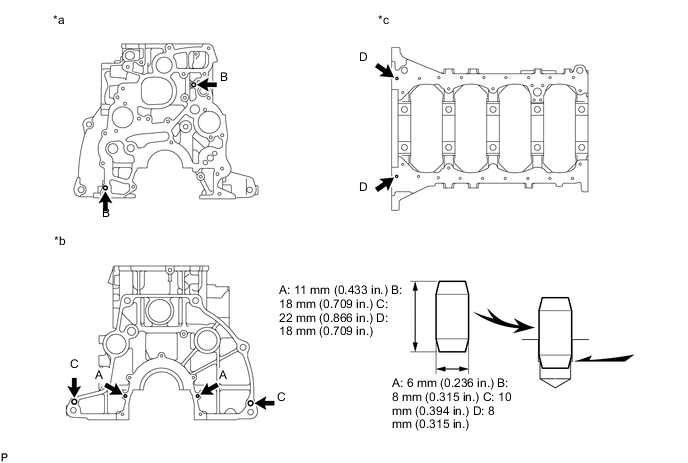
Text in Illustration *a for Front Side *b for Rear Side *c for Oil Pan Side - -
-
-
REPLACE RING PIN
Note
It is not necessary to remove the ring pin unless it is being replaced.
-
Remove the ring pins.
-
Using a plastic-faced hammer, tap in new ring pins to the cylinder block.
Standard Protrusion 6 mm (0.236 in.) or less 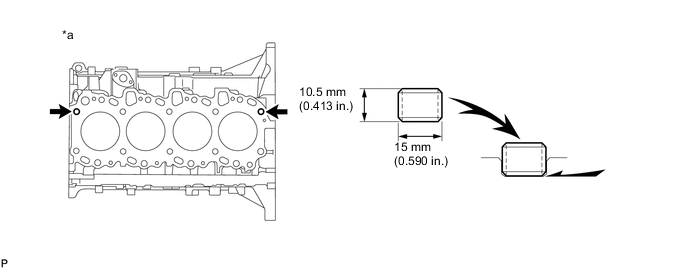
Text in Illustration *a Cylinder Head Side - -
-