OIL AND OIL FILTER REPLACEMENT

PROCEDURE
-
REMOVE REAR ENGINE UNDER COVER ASSEMBLY
-
DRAIN ENGINE OIL
-
Remove the oil filler cap assembly.
-
Remove the oil pan drain plug and gasket, and then drain the engine oil into a container.
-
Clean and install a new gasket and the oil pan drain plug.
- Torque:
- 40 N*m { 408 kgf*cm, 30 ft.*lbf }
-
-
REMOVE WIRING HARNESS CLAMP BRACKET (w/ Urea SCR System)
-
REMOVE OIL FILTER SUB-ASSEMBLY
-
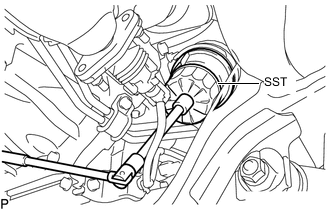
Using SST, remove the oil filter sub-assembly.
- SST
- 09228-07501
Tech Tips
-
Before removing the oil filter sub-assembly, place cloth where the oil may splash.
-
Use a container to catch the draining engine oil.
-
-
INSTALL OIL FILTER SUB-ASSEMBLY
-
Check and clean the oil filter sub-assembly installation surface.
-
Apply clean engine oil to the gasket of a new oil filter sub-assembly.
-
Lightly screw the oil filter sub-assembly into place by hand. Tighten it until the gasket contacts the seat.
-
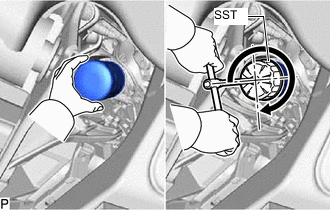
Using SST, tighten the oil filter sub-assembly.
Text in Illustration 
3/4 Turn - SST
- 09228-07501
-
Depending on the space available, choose from the following.
If enough space is available, use a torque wrench to tighten the oil filter sub-assembly.
- Torque:
- 12 N*m { 122 kgf*cm, 9 ft.*lbf }
-
If enough space is not available to use a torque wrench, tighten the oil filter sub-assembly 3/4 of a turn by hand or with a common wrench.
-
-
INSTALL WIRING HARNESS CLAMP BRACKET (w/ Urea SCR System)
-
ADD ENGINE OIL
-
Add new engine oil and install the oil filler cap assembly.
Oil Grade Oil Grade Oil Viscosity (SAE) ACEA C2
(Using engine oil other than ACEA C2 may damage the catalytic converter)
- 0W-30
- 5W-30
Standard Capacity Item Specified Condition Drain and refill without oil filter sub-assembly change 7.0 liters (7.4 US qts, 6.2 Imp. qts) Drain and refill with oil filter sub-assembly change 7.5 liters (7.9 US qts, 6.6 Imp. qts) Dry fill 8.0 liters (8.5 US qts, 7.0 Imp. qts)
-
-
INSPECT FOR OIL LEAK
-
Start the engine. Make sure that there are no oil leaks from the areas that were worked on.
-
-
INSPECT ENGINE OIL LEVEL
-
INSTALL REAR ENGINE UNDER COVER ASSEMBLY