RADIATOR INSTALLATION
PROCEDURE
-
INSTALL NO. 1 RADIATOR SUPPORT BUSH
-
Install the 6 No. 1 radiator support bushes to the radiator assembly.
-
-
INSTALL NO. 2 RADIATOR SUPPORT BUSH
-
Install the 2 No. 2 radiator support bushes to the radiator assembly.
-
-
INSTALL RADIATOR COLLAR
-
Install the 4 radiator collars to the radiator assembly.
-
-
INSTALL OIL RETURN PIPE SUB-ASSEMBLY
-
Attach the 2 clamps to install the oil return pipe sub-assembly to the radiator assembly.
-
-
INSTALL INTERCOOLER ASSEMBLY
-
INSTALL NO. 2 RADIATOR TO SUPPORT SEAL
-
INSTALL NO. 1 RADIATOR AIR GUIDE
-
Install the No. 1 radiator air guide with the 2 bolts.
- Torque:
- 11 N*m { 112 kgf*cm, 8 ft.*lbf }
-
-
INSTALL NO. 3 RADIATOR TO SUPPORT SEAL
-
Install a new No. 3 radiator to support seal to the No. 1 radiator guide.
-
-
INSTALL RADIATOR ASSEMBLY
-
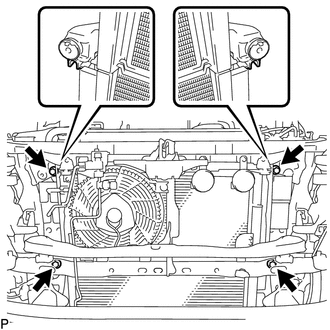
Insert the tabs of the radiator collar into the radiator service holes.
-
Install the radiator assembly the 4 bolts.
- Torque:
- 18 N*m { 184 kgf*cm, 13 ft.*lbf }
-
-
INSTALL RADIATOR SIDE DEFLECTOR LH
-
Attach the 3 claws to install the radiator side deflector LH, and install the clip.
-
-
INSTALL RADIATOR SIDE DEFLECTOR RH
-
Attach the 3 claws to install the radiator side deflector RH, and install the clip.
-
-
INSTALL FRONT BUMPER CENTER UPPER RETAINER
-
INSTALL FRONT BUMPER COVER
-
INSTALL FRONT BUMPER LOWER COVER
-
INSTALL FAN SHROUD
-
Install the fan pulley.
-
Place the fan shroud together with the fan with fluid coupling assembly between the engine and radiator assembly.
Note
Be careful not to damage the radiator core.
-
Attach the 2 guides and install the fan shroud with the 2 bolts.
- Torque:
- 5.0 N*m { 51 kgf*cm, 44 in.*lbf }
-
Temporarily install the fan with fluid coupling assembly to the engine water pump assembly with the 4 nuts.
Note
-
Make sure to match the paint mark colors on the fan with fluid coupling assembly with the stud bolts of the same color on the engine water pump assembly.
-
When installing the fan and generator V belt, make sure to securely tighten the nuts of the fan with fluid coupling assembly so that the fan pulley is properly aligned.
-
-
Install the fan and generator V belt.
-
Tighten the 4 nuts holding the fan with fluid coupling assembly.
- Torque:
- 23 N*m { 235 kgf*cm, 17 ft.*lbf }
-
-
INSTALL VISCOUS HEATER V BELT (w/ Viscous Heater)
-
CONNECT OIL COOLER HOSE (for Automatic Transmission)
-
Connect the oil cooler hose to the radiator assembly and slide the 2 hose clamps to secure the hose.
-
Attach the 2 clamps and connect the oil cooler hose to the fan shroud with the bolt.
- Torque:
- 5.5 N*m { 56 kgf*cm, 49 ft.*lbf }
-
-
INSTALL RADIATOR RESERVOIR ASSEMBLY
-
Install the radiator reservoir assembly with the 3 bolts.
- Torque:
- 5.0 N*m { 51 kgf*cm, 44 in.*lbf }
-
Attach the 2 clamps to connect the No. 1 water by-pass hose to the fan shroud.
-
Connect the No. 1 water by-pass hose to the radiator assembly and slide the hose clamp to secure the hose.
-
Connect the No. 2 water by-pass hose to the water inlet and slide the hose clamp to secure the hose.
-
Attach the 2 clamps to connect the No. 2 water by-pass hose to the fan shroud.
-
-
INSTALL INTERCOOLER AIR HOSE
-
Install the intercooler air hose and tighten the 2 hose bands to secure the hose.
- Torque:
- 5.0 N*m { 51 kgf*cm, 44 in.*lbf }
-
-
INSTALL NO. 2 RADIATOR HOSE
-
Install the No. 2 radiator hose and slide the 2 hose clamps to secure the hose.
-
-
INSTALL NO. 2 INTERCOOLER AIR HOSE
-
INSTALL NO. 1 RADIATOR HOSE
-
Install the No. 1 radiator hose and slide the 2 hose clamps to secure the hose.
-
-
INSTALL NO. 3 ENGINE WIRE (for Cold Area Specification Vehicles)
-
Attach the 3 wire harness clamps to connect the No. 3 engine wire to the fan shroud.
-
Connect the 2 cables to the positive battery terminals.
-
-
CONNECT CABLE TO NEGATIVE BATTERY TERMINAL (for Cold Area Specification Vehicles)
Note
When disconnecting the cable, some systems need to be initialized after the cable is reconnected.
-
ADD ENGINE COOLANT
-
INSPECT FOR COOLANT LEAK
-
INSTALL NO. 1 ENGINE UNDER COVER SUB-ASSEMBLY
-
INSTALL UPPER RADIATOR SUPPORT SEAL
-
Install the upper radiator support seal with the 13 clips.
-