EXHAUST PIPE REMOVAL
PROCEDURE
-
REMOVE TAILPIPE ASSEMBLY
-
Remove the 2 bolts and disconnect the tailpipe assembly from the exhaust pipe support.
-
Remove the gasket.
-
-
REMOVE NO. 3 SENSOR BRACKET (w/ Urea SCR System)
-
REMOVE NITROGEN OXIDES SENSOR (w/ Urea SCR System)
-
REMOVE NO. 4 EXHAUST GAS TEMPERATURE SENSOR (w/ Urea SCR System)
-
REMOVE CENTER EXHAUST PIPE ASSEMBLY
-
for 3 Door:
Remove the 2 bolts and then disconnect the center exhaust pipe assembly from the 2 exhaust pipe supports.
-
for 5 Door:
Remove the 2 bolts and then disconnect the center exhaust pipe assembly from the 3 exhaust pipe supports.
-
Remove the gasket.
-
-
REMOVE UREA INJECTOR SET (w/ Urea SCR System)
-
REMOVE FRONT EXHAUST PIPE ASSEMBLY
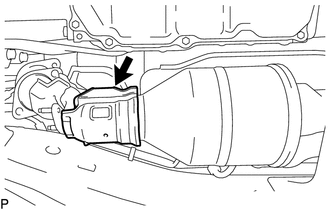
Note
w/ Urea SCR System:
Do not hold the front exhaust pipe assembly at the location shown in the illustration. Otherwise, it may become deformed or damaged, adversely affecting its thermal insulation capabilities.
-
Remove the exhaust pipe supports.
-
w/ Urea SCR System:
Using a 14 mm union nut wrench, loosen the 2 bolts, 2 compression springs and front exhaust pipe assembly.
-
w/o Urea SCR System:
Remove the 2 bolts, 2 compression springs and front exhaust pipe assembly.
-
Remove the gasket.
-