UREA TANK INSTALLATION

PROCEDURE
-
INSTALL NO. 2 UREA TANK BRACKET
-
Install the No. 2 urea tank bracket to the urea tank sub-assembly with the bolt.
- Torque:
- 14.3 N*m { 146 kgf*cm, 11 ft.*lbf }
-
-
INSTALL NO. 1 UREA TANK BRACKET
-
Install the No. 1 urea tank bracket to the urea tank sub-assembly with the bolt.
- Torque:
- 14.3 N*m { 146 kgf*cm, 11 ft.*lbf }
-
-
INSTALL UREA PUMP
-
INSTALL UREA TUBE WITH HEATER ASSEMBLY
-
INSTALL UREA TANK BREATHER TUBE SUB-ASSEMBLY
Note
Check for dirt or mud on the urea tank sub-assembly and around the urea tank breather tube connector before connection. Clean if necessary.
-
Attach the clamp and install the urea tank breather tube sub-assembly to the urea tank sub-assembly.
Tech Tips
If there is any solidified urea solution (white solids) on the connection areas of the urea tank breather tube sub-assembly and urea tank sub-assembly, clean the solids off with water. Otherwise, they may prevent the O-ring from sealing properly.
-
Wash the connection area of the urea tank breather tube connector with water to remove all solidified urea solution (white solids).
-
Wipe off the connection area of the urea tank sub-assembly with water to remove all solidified urea solution (white solids).
-
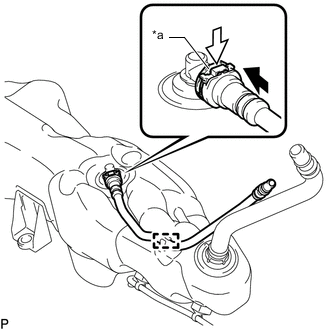
*a Retainer 
Push 
Push Down Align the axis of the connector with the axis of the urea tank sub-assembly. Push the urea tank breather tube connector into the urea tank sub-assembly until the urea tank breather tube connector makes a "click" sound.
-
Push down the retainer.
-
After connecting the urea tank sub-assembly and the urea tank breather tube connector, check that the urea tank sub-assembly and urea tank breather tube connector are securely connected by trying to pull them apart.
-
-
-
INSTALL UREA TANK SUB-ASSEMBLY
-
Install the urea tank sub-assembly to the frame LH with the 2 bolts.
- Torque:
- 14.3 N*m { 146 kgf*cm, 11 ft.*lbf }
-
-
CONNECT UREA TANK FILLER PIPE WITH SUPPORT ASSEMBLY
Note
Check for dirt or mud on the urea tank breather tube sub-assembly, urea tank sub-assembly and around the urea tank filler pipe with support connector before connection. Clean if necessary.
-
Connect the urea tank filler pipe with support assembly to the urea tank breather tube sub-assembly.
Tech Tips
If there is any solidified urea solution (white solids) on the connection areas of the urea tank filler pipe with support assembly and urea tank breather tube sub-assembly, clean the solids off with water. Otherwise, they may prevent the O-ring from sealing properly.
-
Wash the connection area of the urea tank filler pipe with support connector with water to remove all solidified urea solution (white solids).
-
Wipe off the connection area of the urea tank breather tube sub-assembly with water to remove all solidified urea solution (white solids).
-
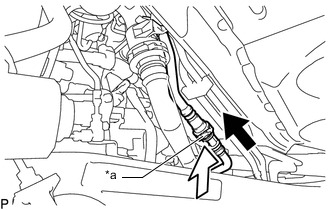
*a Retainer Push Push Down Align the axis of the connector with the axis of the urea tank breather tube sub-assembly. Push the urea tank filler pipe with support connector into the urea tank breather tube sub-assembly until the urea tank filler pipe with support connector makes a "click" sound.
-
Push down the retainer.
-
After connecting the urea tank breather tube sub-assembly and the urea tank filler pipe with support connector, check that the urea tank breather tube sub-assembly and urea tank filler pipe with support connector are securely connected by trying to pull them apart.
-
-
Connect the urea tank filler pipe with support assembly to the urea tank sub-assembly.
Tech Tips
If there is any solidified urea solution (white solids) on the connection areas of the urea tank filler pipe with support assembly and urea tank sub-assembly, clean the solids off with water. Otherwise, they may prevent the O-ring from sealing properly.
-
Wash the connection area of the urea tank filler pipe with support connector with water to remove all solidified urea solution (white solids).
-
Wipe off the connection area of the urea tank sub-assembly with water to remove all solidified urea solution (white solids).
-
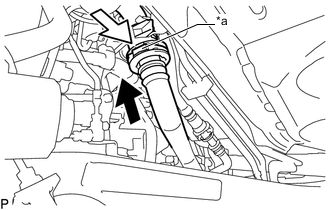
*a Retainer Push Push Down Align the axis of the connector with the axis of the urea tank sub-assembly. Push the urea tank filler pipe with support connector into the urea tank sub-assembly until the urea tank filler pipe with support connector makes a "click" sound.
-
Push down the retainer.
-
After connecting the urea tank sub-assembly and the urea tank filler pipe with support connector, check that the urea tank sub-assembly and urea tank filler pipe with support connector are securely connected by trying to pull them apart.
-
-
-
CONNECT UREA TUBE WITH HEATER ASSEMBLY
-
Attach the 4 clamps and connect the urea tube with heater assembly to the frame crossmember and urea tank sub-assembly.
-
Connect the urea tube with heater assembly to the urea injector set Click here.
-
-
CONNECT NO. 3 FRAME WIRE
-
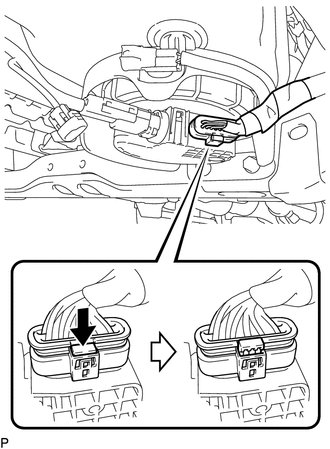
Connect the connector to the urea pump as shown in the illustration.
-
Attach the clamp to the urea pump.
-
Connect the connector to the urea tube with heater assembly.
-
-
INSTALL NO. 1 FRONT FENDER APRON TO FRAME SEAL LH
-
Install the No. 1 front fender apron to frame seal LH to the body with the 5 clips.
-
-
INSTALL AUTOMATIC TRANSMISSION ASSEMBLY (for Automatic Transmission)
-
REMOVE MANUAL TRANSMISSION UNIT ASSEMBLY (for Manual Transmission)