UREA TANK REMOVAL

PROCEDURE
-
REMOVE MANUAL TRANSMISSION UNIT ASSEMBLY (for Manual Transmission)
-
REMOVE AUTOMATIC TRANSMISSION ASSEMBLY (for Automatic Transmission)
-
REMOVE NO. 1 FRONT FENDER APRON TO FRAME SEAL LH
-
Remove the 5 clips and No. 1 front fender apron to frame seal LH from the body.
-
-
DISCONNECT NO. 3 FRAME WIRE
-
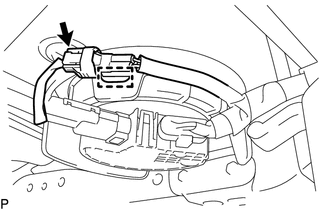
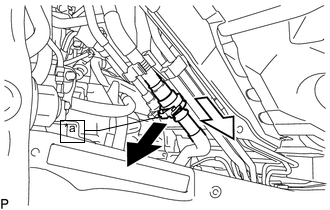
Disconnect the connector from the urea tube with heater assembly.
-
Detach the clamp from the urea tank sub-assembly.
-
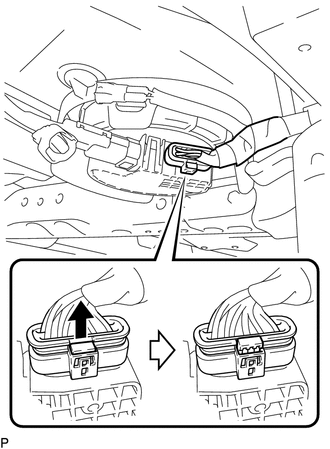
Pull the tabs of the connector as shown in the illustration and disconnect the connector from the urea pump
-
-
DISCONNECT UREA TUBE WITH HEATER ASSEMBLY
-
Disconnect the urea tube with heater assembly from the urea injector set Click here.
-
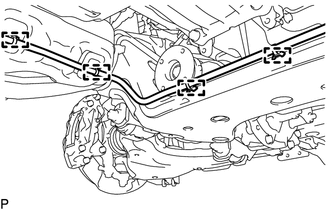
Detach the 4 clamps and disconnect the urea tube with heater assembly from the frame crossmember and urea tank sub-assembly.
-
-
DISCONNECT UREA TANK BREATHER TUBE SUB-ASSEMBLY
Note
Check for dirt or mud on the urea tank filler pipe and around the urea tank breather tube connector before disconnection. Clean if necessary.
-
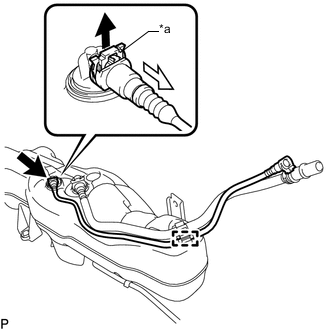
Disconnect the urea tank breather tube sub-assembly from the urea tank filler pipe assembly.
-
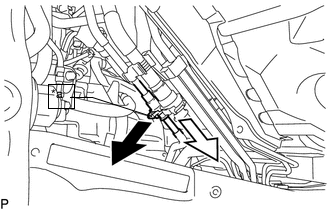
Text in Illustration *a Retainer 
Pull 
Pull Out Detach the claw of the retainer of the urea tank breather tube connector, pull up the retainer and disconnect the urea tank breather tube connector from the urea tank filler pipe assembly.
Note
-
If there is any solidified urea solution (white solids) on the connection area, clean the solids off with a damp cloth, etc., before disconnecting the connector.
-
Be sure to disconnect the urea tank breather tube connector by hand.
-
Check for foreign matter in the urea tank filler pipe assembly and around the urea tank breather tube connector. Clean if necessary. Foreign matter may damage the O-ring or cause leaks in the seal between the urea tank filler pipe assembly and urea tank breather tube connector.
-
Put the urea tank filler pipe assembly and urea tank breather tube connector ends in plastic bags to prevent damage and foreign matter contamination.
-
-
-
-
DISCONNECT UREA TANK FILLER TUBE SUB-ASSEMBLY
Note
Check for dirt or mud on the urea tank filler pipe and around the urea tank filler tube connector before disconnection. Clean if necessary.
-
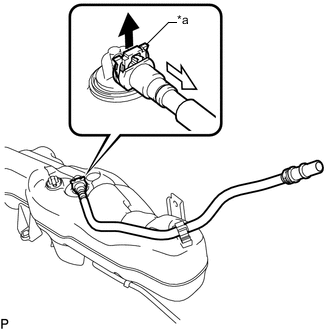
Disconnect the urea tank filler tube sub-assembly from the urea tank filler pipe assembly.
-
Text in Illustration *a Retainer Push Pull Out Detach the claw of the retainer of the urea tank filler tube connector, pull up the retainer and disconnect the urea tank filler tube connector from the urea tank filler pipe assembly.
Note
-
If there is any solidified urea solution (white solids) on the connection area, clean the solids off with a damp cloth, etc., before disconnecting the connector.
-
Be sure to disconnect the urea tank filler tube connector by hand.
-
Check for foreign matter in the urea tank filler pipe assembly and around the urea tank filler tube connector. Clean if necessary. Foreign matter may damage the O-ring or cause leaks in the seal between the urea tank filler pipe assembly and urea tank filler tube connector.
-
Put the urea tank filler pipe assembly and urea tank filler tube connector ends in plastic bags to prevent damage and foreign matter contamination.
-
-
-
-
REMOVE UREA TANK SUB-ASSEMBLY
-
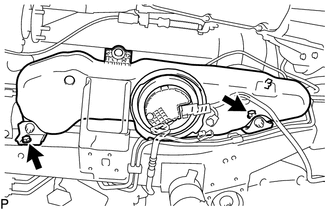
Remove the 2 bolts and urea tank sub-assembly from the flame LH.
-
-
REMOVE UREA TANK BREATHER TUBE SUB-ASSEMBLY
Note
Check for dirt or mud on the urea tank sub-assembly and around the urea tank breather tube connector before disconnection. Clean if necessary.
-
Detach the clamp and remove the urea tank breather tube sub-assembly from the urea tank sub-assembly.
-
Text in Illustration *a Retainer Pull Pull Out Detach the claw of the retainer of the urea tank breather tube connector, pull up the retainer and disconnect the urea tank breather tube connector from the urea tank sub-assembly.
Note
-
If there is any solidified urea solution (white solids) on the connection area, clean the solids off with a damp cloth, etc., before disconnecting the connector.
-
Be sure to disconnect the urea tank breather tube connector by hand.
-
Check for foreign matter in the urea tank sub-assembly and around the urea tank breather tube connector. Clean if necessary. Foreign matter may damage the O-ring or cause leaks in the seal between the urea tank sub-assembly and urea tank breather tube connector.
-
Put the urea tank sub-assembly and urea tank breather tube connector ends in plastic bags to prevent damage and foreign matter contamination.
-
-
-
-
REMOVE UREA TANK FILLER TUBE SUB-ASSEMBLY
Note
Check for dirt or mud on the urea tank sub-assembly and around the urea tank filler tube connector before disconnection. Clean if necessary.
-
Detach the clamp and remove the urea tank filler tube sub-assembly from the urea tank sub-assembly.
-
Text in Illustration *a Retainer Pull Pull Out Detach the claw of the retainer of the urea tank filler tube connector, pull up the retainer and disconnect the urea tank filler tube connector from the urea tank sub-assembly.
Note
-
If there is any solidified urea solution (white solids) on the connection area, clean the solids off with a damp cloth, etc., before disconnecting the connector.
-
Be sure to disconnect the urea tank filler tube connector by hand.
-
Check for foreign matter in the urea tank sub-assembly and around the urea tank filler tube connector. Clean if necessary. Foreign matter may damage the O-ring or cause leaks in the seal between the urea tank sub-assembly and urea tank filler tube connector.
-
Put the tank sub-assembly and urea tank filler tube connector ends in plastic bags to prevent damage and foreign matter contamination.
-
-
-
-
REMOVE UREA TUBE WITH HEATER ASSEMBLY
-
REMOVE UREA PUMP
-
REMOVE NO. 1 UREA TANK BRACKET
-
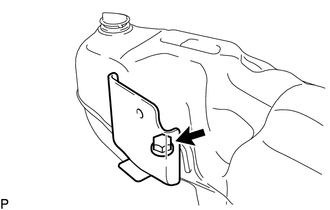
Remove the bolt and No. 1 urea tank bracket from the urea tank sub-assembly.
-
-
REMOVE NO. 2 UREA TANK BRACKET
-

Remove the bolt and No. 2 urea tank bracket from the urea tank sub-assembly.
-