REAR BODY SIDE PANEL PROTECTOR INSTALLATION

Tech Tips
-
Use the same procedure for the RH side and LH side.
-
The following procedure is for the LH side.
-
INSTALL REAR OUTER PILLAR GARNISH SUB-ASSEMBLY
Tech Tips
When installing the rear outer pillar garnish sub-assembly, heat the vehicle body and rear outer pillar garnish sub-assembly using a heat light.
Heating Temperature Item Temperature Vehicle Body 40 to 60°C (104 to 140°F) Rear Outer Pillar Garnish Sub-assembly 20 to 30°C (68 to 86°F) Note
Do not heat the vehicle body, rear outer pillar garnish sub-assembly excessively.
-
Clean the vehicle body.
-
Remove any remaining double-sided tape from the vehicle body.
-
Wipe off any tape adhesive residue with cleaner.
-
-
Remove the release paper from a new rear outer pillar garnish sub-assembly.
Tech Tips
After removing the release paper, keep the exposed adhesive free from foreign matter.
-
Engage the 5 clips.
-
Install the rear outer pillar garnish sub-assembly with the nut.
- Torque:
- 3.5 N*m { 36 kgf*cm, 31 in.*lbf }
-
Install the grommet.
-
-
INSTALL ROOF SIDE INNER GARNISH
-
Engage the guide.
-
Engage the 5 clips to install the roof side inner garnish LH.
-
-
INSTALL REAR SIDE SEATBACK ASSEMBLY
-
Engage the hook.
-
Install the rear side seatback assembly LH with the 2 bolts.
- Torque:
- 18 N*m { 184 kgf*cm, 13 ft.*lbf }
-
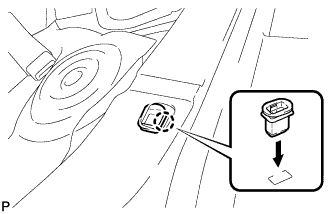
Connect the connector.
-
Connect the rear seat outer belt to the rear seat shoulder belt guide.
-
-
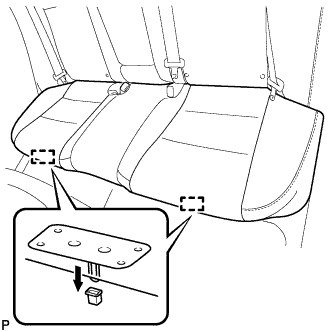
INSTALL REAR SEAT CUSHION LOCK HOOK
-
Engage the claw to install a new rear seat cushion lock hook.
Note
Rear seat cushion lock hooks must not be reused.
Tech Tips
Use the same procedure for the RH side and the LH side.
-
-
INSTALL REAR SEAT CUSHION ASSEMBLY
-
Place the rear seat cushion assembly in the cabin.
Note
Be careful not to damage the vehicle body.
-
Engage the 2 hooks of the seat cushion to the vehicle body as shown in the illustration.
-
Confirm that the seat cushion is firmly installed.
Note
When installing the seat cushion, make sure that the seat belt buckles are not under the seat cushion.
-