BACK DOOR GARNISH(w/ Tire Carrier) REMOVAL
PROCEDURE
-
REMOVE REAR LIGHT ASSEMBLY LH
-
REMOVE REAR LIGHT ASSEMBLY RH
Tech Tips
Use the same procedure described for the LH side.
-
REMOVE BACK DOOR OUTSIDE GARNISH SUB-ASSEMBLY
-

Text in Illustration *a Protective Tape Put protective tape around the back door outside garnish sub-assembly.
-
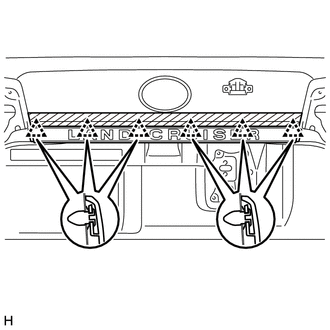
Detach the 6 clips and remove the back door outside garnish sub-assembly.
-
-
REMOVE REAR FLOOR MAT REAR SUPPORT PLATE
-
REMOVE BACK DOOR TRIM COVER LH
-
REMOVE BACK DOOR TRIM COVER RH
-
REMOVE BACK DOOR TRIM PANEL ASSEMBLY
-
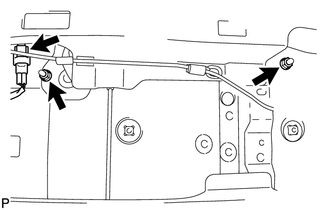
REMOVE NO. 2 BACK DOOR OUTSIDE GARNISH SUB-ASSEMBLY
-
Remove the 2 nuts and disconnect the connector.
-
Put protective tape around the No. 2 back door outside garnish sub-assembly.
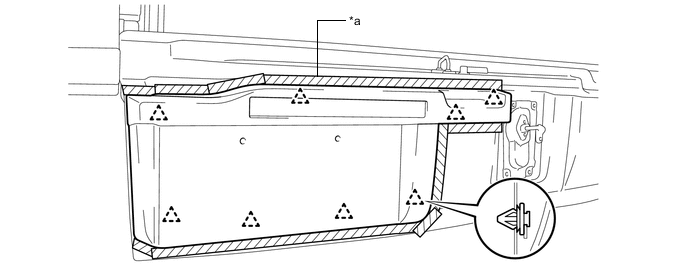
Text in Illustration *a Protective Tape - - -
Detach the 8 clips.
-
Pull out the wire harness of the license plate light from the tail gate, and remove the No. 2 back door outside garnish sub-assembly.
-
-
REMOVE LICENSE PLATE LIGHT ASSEMBLY
-
REMOVE REAR LICENSE LIGHT COVER