Click here
-
CHECK ILLUMINATED ENTRY SYSTEM OPERATION
-
The illuminated entry system controls the following lights:
-
Ignition switch illumination*1
-
Map light*2
-
Room light
-
*1: except Double Swing Out Type
-
*2: w/ Map Light
-
-
Check the illuminated entry system with the ignition switch off.
-
Check that the lights turn on when unlocking any of the doors that are closed and locked with the ignition switch off. Then check that the lights fade out under the following conditions:
-
Leave the doors unlocked for 15 seconds.
-
Turn the ignition switch to ACC or ON.
-
Lock all the doors.
-
-
Check that the lights stay on for at least 15 seconds after opening any of the doors before fading out. Then check that the lights fade out 15 seconds after closing all the doors.
-
-
Check the illuminated entry system with the ignition switch to ACC or ON.
-
Check that the lights stay lit after turning the ignition switch off with all the doors closed and the ignition switch to ACC or ON. Then check that the lights fade out under the following conditions:
-
Leave the doors unlocked for 15 seconds.
-
Turn the ignition switch to ACC or ON.
-
Lock all the doors.
-
-
Check that the lights stay on for at least 15 seconds after opening any of the doors. Then check that the lights fade out 15 seconds after closing all the doors.
-
Check that the lights turn on when opening any of the doors and fade out when closing and locking all the doors or turning the ignition switch to ACC or ON.
-
-
-
CHECK BATTERY SAVER OPERATION
-
Basic function inspection
-
Check that the applicable lights are turned off approximately 20 minutes after the ignition switch is turned off with any door left open or ajar.
-
-
Interior light auto cut function inspection (w/ Dome Cut Relay)
-
Check that the applicable lights are turned off approximately 20 minutes after the ignition switch is turned off regardless of the open/close status of the doors or the position of the map light switch.
-
-
-
CHECK LIGHT AUTO TURN OFF OPERATION
-
Prepare the vehicle so that the ignition switch is ON and the driver door is closed.
-
Set the headlight dimmer switch assembly to TAIL, HEAD or AUTO to illuminate the lights.
-
Turn the ignition switch off and open the driver door. When the headlight dimmer switch is on AUTO, check that the headlights, fog lights, and taillights turn off. When the headlight dimmer switch is on head or tail, check that the headlights and front fog lights turn off.
-
-
AUTOMATIC HEADLIGHT BEAM LEVEL CONTROL SYSTEM OPERATION CHECK (w/ Static Headlight Auto Leveling)
-
Check that the initialization (determination of the initial position) of the headlight leveling motor is performed when the ignition switch is turned to ON.
-
Check that the headlight beam level control system warning light in the combination meter assembly comes on for approximately 3 seconds when the ignition switch is turned to ON, and then turns off.
-
Check that the headlight moves when all of the following conditions are met: 1) the rear of the vehicle is moved up or down, 2) the engine is running, 3) the vehicle is stopped, and 4) the light control switch is in the head position.
Note:Make sure to change the vehicle height slowly.
-
-
AUTOMATIC HEADLIGHT BEAM LEVEL CONTROL SYSTEM OPERATION CHECK (w/ Dynamic Headlight Auto Leveling)
-
Check that the initialization (determination of the initial position) of the headlight leveling motor is performed after the engine is started.
-
Check that the headlight beam level control system warning light in the combination meter comes on for approximately 3 seconds and then goes off when the ignition switch is turned to ON.
-
-
INSPECT AUTOMATIC HIGH BEAM SYSTEM (w/o Pre-crash System)
-
Check the operation of the inner rear view mirror indicator light.
-
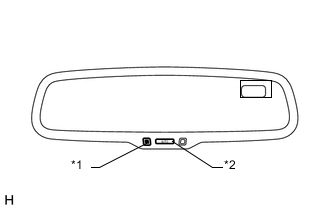
Turn the ignition switch ON.
Table 1. Text in Illustration *1 Indicator *2 Auto switch -
Check that the inner rear view mirror indicator light comes on.
-
Press the inner rear view mirror assembly AUTO switch once.
-
Check that the inner rear view mirror indicator light goes off.
-
Press the inner rear view mirror assembly AUTO switch once again.
-
Check that the inner rear view mirror indicator light comes on.
Tip:If the inner rear view mirror indicator light flashes, turn the ignition switch off, and then turn the ignition switch ON. If the inner rear view mirror indicator light flashes continuously, replace the inner rear view mirror assembly.
-
-

Check the operation of the automatic high beam indicator light.
Table 2. Text in Illustration *a Automatic High Beam Indicator Light
-
Turn the ignition switch ON.
-
Move the shift lever to any position except R.
-
Turn the light control switch to the AUTO position.
-
Cover the automatic light control sensor to turn the low beam headlights on.
-
Turn the dimmer switch to the high position.
-
Check that the automatic high beam indicator comes on.
-
-
Check the operation of the automatic high beam function.
-
At night, when driving the vehicle with the automatic high beam system in standby mode, check that the headlights are changed from the low beams to the high beams automatically after a short delay when all of the following conditions are met:
-
The vehicle speed is more than 34 km/h (21 mph).
-
The area in front of the vehicle is dark.
-
There are no oncoming vehicles with headlights on.
-
There are no preceding vehicles with taillights on.
-
There are few streetlights along the street ahead.
-
-
At night, when driving the vehicle with the high beams turned on by the automatic high beam system, check that the automatic high beam system turns off the high beams and returns to standby mode when any of the following conditions are met:
-
The vehicle speed is less than 27 km/h (17 mph).
-
The level of ambient light is higher than a specified threshold.
-
There are oncoming vehicles with headlights on.
-
There are preceding vehicles with taillights on.
-
Light from the streetlights ahead is higher than a specified threshold.
-
-
-
Using the following procedure, the automatic high beam operation can be checked without driving the vehicle.
-
Turn the ignition switch ON.
-
Using the GTS, follow the instructions to switch to the "AFS" screen and select "Active Test".
-
Select "Automatic High Beam Operation" on the screen and forcibly operate the automatic high beam system.
-
Check that the inner rear view mirror indicator light flashes.
-
Check that the low beams change to the high beams when the surrounding area is dark enough.
-
Shine a flashlight, white LED or red LED on the camera built into the inner rear view mirror.
-
Check that the high beams change to the low beams.
Note:The high beams may not change to the low beams when the surrounding area is bright or due to on other lighting conditions. Therefore, this function check should not be used as the only method of determining if a malfunction is present (if parts need to be replaced).
-
-
-
CHECK AUTOMATIC HIGH BEAM SYSTEM OPERATION (w/ Pre-crash System)
-
The automatic high beam system detects light in front of the vehicle using the camera built into the Forward recognition camera and switches between high and low beams automatically.
Note:The automatic high beam system may not operate normally due to the following factors.
Cause Details Weather Bad weather (fog, snow, sandstorm, heavy rain, etc.). Windshield
-
Windshield is dirty (dirt, water spots, insects) or fogged up.
-
Windshield is cracked or damaged.
Automatic high beam sensor
-
Forward recognition camera is deformed or dirty.
-
Forward recognition camera is not installed correctly.
Nearby vehicles and light
-
Oncoming or preceding vehicle lights are not illuminated.
-
Oncoming or preceding vehicle lights are dirty or discolored.
-
Only one of the oncoming or preceding vehicle lights is illuminated, or the vehicle is a motorcycle.
-
Beam axis of oncoming vehicle lights is not aligned.
-
Ambient light is similar to headlights or taillights.
-
A highly reflective object is in the rear of the preceding vehicle (shipping container, etc.).
-
A light vehicle, such as a bicycle, has been detected.
-
Continual sudden changes in brightness.
Road conditions
-
Repeated driving on a road with large differences in elevation.
-
Repeated driving on a road with many curves or driving on a road with sharp curves.
-
Driving on a rough road (gravel road, unpaved road, etc.)
-
There is a sign, mirror, or other highly reflective object in front of the vehicle.
Driver's vehicle
-
Driver's vehicle has damaged or dirty headlights.
-
Vehicle is not level due to the number of passengers, load weight, flat tire or towing.
Automatic high beam system Auto high beam switch is not pressed and automatic high beam indicator light in the combination meter assembly is off. -
-
Basic operation
Table 3. Text in Illustration *a Automatic High Beam Indicator Light
-
When all of the following conditions are met, the automatic high beam system enters standby mode, and the automatic high beam indicator light in the combination meter assembly illuminates in green.
-
Turn the ignition switch ON.
-
Low beam headlights are illuminated with the light control switch set to AUTO
-
Dimmer switch set to HI BEAM
-
Auto high beam switch pressed
Note:If the forward recognition camera cannot correctly recognize the area in front of the vehicle due to bad weather (dense fog, etc.) or obstructions, the automatic high beam indicator light in the combination meter assembly may not illuminate, and the automatic high beam system may not operate.
-
-
When all of the following conditions are met in automatic high beam system standby mode, the low beams change to high beams automatically after a slight delay.
-
Vehicle speed 34 km/h (21 mph) or higher
-
Front of vehicle is dark
-
No oncoming vehicle with illuminated headlights
-
No preceding vehicle with illuminated taillights
-
Low city lighting
Note:The low beams may not change to high beams due to illumination from city lighting, traffic lights or billboards, or due to reflective surfaces, such as signs or signboards.
-
-
When any of the following conditions are met during operation of the automatic high beam system (high beams illuminated), the high beams change to low beams automatically.
-
Vehicle speed below 27 km/h (17 mph)
-
Front of vehicle is bright
-
Oncoming vehicle with illuminated headlights
-
Preceding vehicle with illuminated taillights
-
Abundant city lighting
Note:
-
The high beams may change to low beams due to illumination from city lighting, traffic lights or billboards, or due to reflective surfaces, such as signs or signboards.
-
The high beams may change to low beams due to the fog lights of an oncoming vehicle.
-
Under the following conditions, the high beams may not change to the low beams.
-
-
Passing an oncoming vehicle on a curve.
-
Preceding or oncoming vehicle appears and disappears on continuous curves.
-
Preceding or oncoming vehicle appears and disappears due to the median, roadside trees, or other obstacles.
-
Another vehicle cuts in front of the vehicle.
-
-
-
-
When any of the following conditions are met, the automatic high beam system is canceled, and the automatic high beam indicator light in the combination meter assembly turns off.
-
Ignition switch off
-
Light control switch not in AUTO position
-
Low beam headlights are not illuminated
-
Dimmer switch set to LO BEAM
-
-
-