BACK DOOR(for Double Swing Out Type) REASSEMBLY
CAUTION / NOTICE / HINT
Tech Tips
A bolt without a torque specification is shown in the standard bolt chart Click here.
PROCEDURE
-
INSTALL BACK DOOR CHECK ASSEMBLY LH (for LH Side)
-
Apply MP grease to the sliding areas of the door check.
-
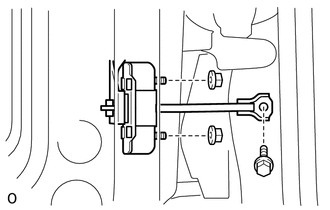
Install the back door check to the door panel with the 2 nuts.
- Torque:
- 8.0 N*m { 82 kgf*cm, 71 in.*lbf }
-
Apply adhesive to the threads of the bolt.
Adhesive Toyota Genuine Adhesive 1324, Three Bond 1324 or equivalent -
Install the bolt.
- Torque:
- 27 N*m { 275 kgf*cm, 20 ft.*lbf }
-
Attach the clamp of the wire harness.
-
-
INSTALL DOOR DUST PROOF SEAL LH (for LH Side)
Tech Tips
Use the same procedure for both door dust proof seals.
-
Install the door dust proof seal.
-
-
INSTALL BACK DOOR NO. 2 STOPPER CUSHION (for LH Side)
-
Install a new back door No. 2 stopper cushion.
-
-
INSTALL BACK DOOR NO. 3 WEATHERSTRIP (for LH Side)
Tech Tips
When installing the back door No. 3 weatherstrip, heat the back door panel using a heat light.
Standard Item Temperature Back Door Panel 40 to 60°C (104 to 140°F) Note
Do not heat the back door panel excessively.
-
Clean the back door panel surface.
-
Using a heat light, heat the back door panel surface.
-
Remove the double-sided tape from the back door panel surface.
-
Wipe off any tape adhesive residue with cleaner.
-
-
Install a new back door No. 3 weatherstrip.
-
Remove the peeling paper from the face of the back door No. 3 weatherstrip.
Tech Tips
After removing the peeling paper, keep the exposed adhesive free from foreign matter.
-
Attach the 16 clips to install the back door No. 3 weatherstrip.
Tech Tips
Press the back door No. 3 weatherstrip firmly to install it.
-
-
-
INSTALL REAR DOOR CHILD LOCK PROTECTION COVER (for LH Side)
-
Install the rear door child lock protection cover.
-
-
INSTALL BACK DOOR OUTSIDE GARNISH SUB-ASSEMBLY (for LH Side)
-
INSTALL BACK DOOR OUTSIDE HANDLE (for LH Side)
-
Install the back door outside handle with the 2 bolts.
- Torque:
- 5.0 N*m { 51 kgf*cm, 44 in.*lbf }
-
-
INSTALL BACK DOOR LOCK ASSEMBLY (for LH Side)
-
Apply MP grease to the sliding parts of the back door lock.
-
Using a T30 "TORX" socket wrench, install the back door lock with the 4 bolts.
- Torque:
- 5.0 N*m { 51 kgf*cm, 44 in.*lbf }
-
Connect the 2 connectors.
-
-
INSTALL BACK DOOR REMOTE CONTROL ASSEMBLY (for LH Side)
-
Connect the cable to the back door remote control and attach the guide.
-
Connect the cable to the back door outside handle and attach the guide.
-
Using a T30 "TORX" socket wrench, install the back door remote control with the bolt.
- Torque:
- 5.0 N*m { 51 kgf*cm, 44 in.*lbf }
-
Attach the clamp.
-
-
INSTALL BACK DOOR LOCK CONTROL ASSEMBLY (for LH Side)
-
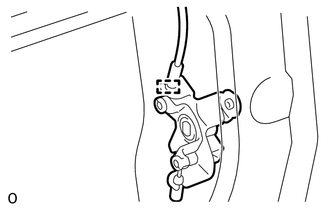
Attach a new clip to the back door panel.
-
Install the back door lock control with a new clip.
-
Connect the link to the back door lock control.
-
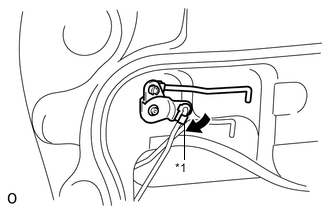
Text in Illustration *1 Snap Rotate the snap in the direction indicated by the arrow in the illustration to attach the snap to the link.
-
-
INSTALL BACK DOOR SERVICE HOLE COVER LH (for LH Side)
-
Apply new butyl tape to the back door panel.
-
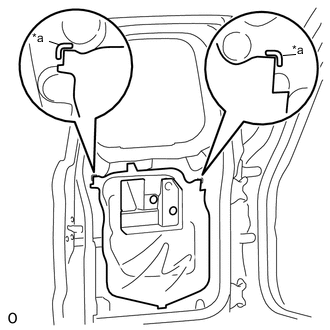
Text in Illustration *a Reference Point Pass the 2 links and wire harness through a new back door service hole cover, and then install the back door service hole cover using the reference points on the back door panel.
-
Attach the 3 clamps and connect the 2 connectors.
-
-
INSTALL BACK DOOR INSIDE HANDLE ASSEMBLY LH (for LH Side)
-
Connect the 2 links to the back door inside handle.
-
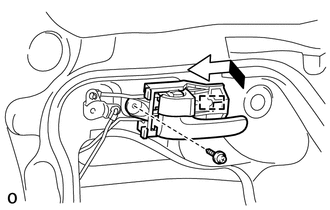
Attach the guide in the direction indicated by the arrow in the illustration to install the back door inside handle.
-
Install the screw.
-
-
INSTALL REAR ASSIST GRIP REINFORCEMENT LH (for LH Side)
-
Install the rear assist grip reinforcement with the 3 bolts.
-
-
INSTALL BACK DOOR TRIM PANEL ASSEMBLY LH (for LH Side)
-
Attach the 10 clips to install the back door trim panel.
-
-
INSTALL DOOR INSIDE HANDLE BEZEL LH (for LH Side)
-
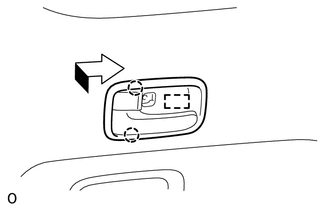
Attach the guide in the direction indicated by the arrow in the illustration, and then attach the 2 claws to install the door inside handle bezel.
-
Install the screw.
-
Attach the claw to close the cover.
-
-
INSTALL ASSIST GRIP LH (for LH Side)
-
Install the assist grip with the 2 bolts.
-
Attach the 2 claws to close the 2 covers.
-
-
INSTALL BACK DOOR CHECK ASSEMBLY RH (for RH Side)
-
Apply MP grease to the sliding areas of the door check.
-

Install the back door check to the door panel with the 2 nuts.
- Torque:
- 8.0 N*m { 82 kgf*cm, 71 in.*lbf }
-
Apply adhesive to the threads of the bolt.
Adhesive Toyota Genuine Adhesive 1324, Three Bond 1324 or equivalent -
Install the bolt.
- Torque:
- 27 N*m { 275 kgf*cm, 20 ft.*lbf }
-
Attach the clamp of the wire harness.
-
-
INSTALL BACK DOOR LOCK STRIKER PLATE ASSEMBLY (for RH Side)
-
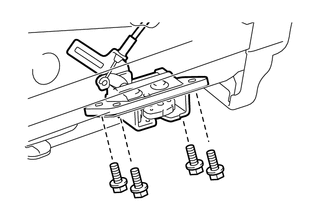
Using a T40 "TORX" socket wrench, install the back door lock striker plate with the 2 bolts.
- Torque:
- 23 N*m { 235 kgf*cm, 17 ft.*lbf }
-
-
INSTALL DOOR DUST PROOF SEAL RH (for RH Side)
Tech Tips
Use the same procedure for both door dust proof seals.
-
Install the door dust proof seal.
-
-
INSTALL BACK DOOR NO. 2 STOPPER SUB-ASSEMBLY (for RH Side)
-
Install the back door No. 2 stopper with the 2 bolts.
- Torque:
- 27 N*m { 275 kgf*cm, 20 ft.*lbf }
-
-
INSTALL BACK DOOR CENTER WEATHERSTRIP (for RH Side)
Tech Tips
When installing the back door center weatherstrip, heat the back door panel using a heat light.
Standard Item Temperature Back Door Panel 40 to 60°C (104 to 140°F) Note
Do not heat the back door panel excessively.
-
Clean the back door panel surface.
-
Using a heat light, heat the back door panel surface.
-
Remove the double-sided tape from the back door panel surface.
-
Wipe off any tape adhesive residue with cleaner.
-
-
Install a new back door center weatherstrip.
-
Remove the peeling paper from the face of the back door center weatherstrip.
Tech Tips
After removing the peeling paper, keep the exposed adhesive free from foreign matter.
-
Attach the 5 clips to install the back door center weatherstrip.
Tech Tips
Press the back door center weatherstrip firmly to install it.
-
-
-
INSTALL UPPER BACK DOOR LOCK ASSEMBLY (for RH Side)
-
Apply MP grease to the sliding parts of the upper back door lock.
-
Pass the cable through the back door panel.
-
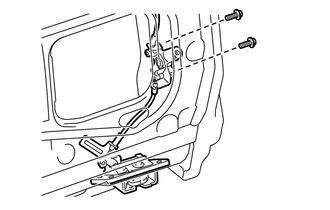
Install the upper back door lock with the 2 bolts.
- Torque:
- 18 N*m { 184 kgf*cm, 13 ft.*lbf }
-
-
INSTALL LOWER BACK DOOR LOCK ASSEMBLY (for RH Side)
-
Apply MP grease to the sliding parts of the lower back door lock.
-
Install the lower back door lock with the 4 bolts.
- Torque:
- 18 N*m { 184 kgf*cm, 13 ft.*lbf }
-
Connect the cable and attach the clamp.
-
Install the 2 screws.
- Torque:
- 5.0 N*m { 51 kgf*cm, 44 in.*lbf }
-
-
INSTALL BACK DOOR HANDLE GROMMET (for RH Side)
-
Install the back door handle grommet.
-
-
INSTALL BACK DOOR INSIDE HANDLE ASSEMBLY RH (for RH Side)
-
Using a T30 "TORX" socket wrench, install the back door inside handle with the bolt.
- Torque:
- 5.0 N*m { 51 kgf*cm, 44 in.*lbf }
-
-
INSTALL BACK DOOR SERVICE HOLE COVER RH (for RH Side)
-
Apply new butyl tape to the back door panel.
-
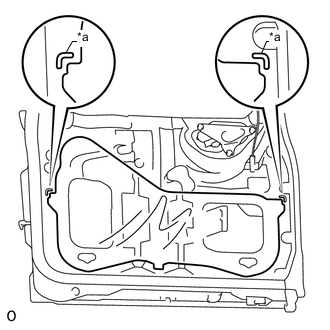
Text in Illustration *a Reference Point Install the back door service hole cover using the reference points on the back door panel.
-
-
INSTALL REAR ASSIST GRIP REINFORCEMENT RH (for RH Side)
-
Install the rear assist grip reinforcement with 3 the bolts.
-
-
INSTALL REAR WASHER NOZZLE (w/ Rear Wiper)
-
INSTALL REAR WIPER MOTOR GROMMET (w/ Rear Wiper)
-
INSTALL REAR WIPER MOTOR ASSEMBLY (w/ Rear Wiper)
-
INSTALL REAR WIPER ARM AND BLADE ASSEMBLY (w/ Rear Wiper)
-
INSTALL BACK DOOR TRIM PANEL ASSEMBLY RH (for RH Side)
-
Attach the 13 clips to install the back door trim panel.
-
-
INSTALL CENTER STOP LIGHT ASSEMBLY (for RH Side)
-
INSTALL BACK DOOR TRIM COVER RH (for RH Side)
-
Attach the 2 claws and clamp.
-
Attach the 5 clips and 2 claws to install the back door trim cover.
-
-
INSTALL ASSIST GRIP RH (for RH Side)
-
Install the assist grip with the 2 bolts.
-
Attach the 2 claws to close the 2 covers.
-