FRONT CONSOLE BOX(w/ Cool Box) INSTALLATION
CAUTION / NOTICE / HINT
Tech Tips
-
Use the same procedures for LHD and RHD vehicles.
-
The procedures listed below are for LHD vehicles.
-
A bolt without a torque specification is shown in the standard bolt chart Click here.
PROCEDURE
-
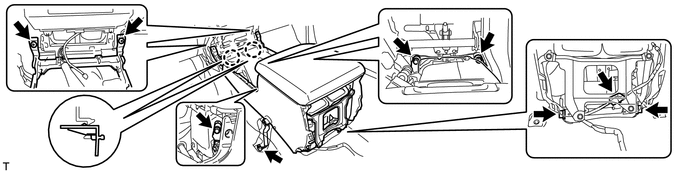
INSTALL COOLING BOX ASSEMBLY
-
Attach the 2 claws.
-
Connect the connector.
-
Sufficiently apply compressor oil to 2 new O-rings.
Compressor oil ND-OIL 8 or equivalent -
Install the 2 O-rings on the 2 cooler pipes.
-
Connect the 2 cooler pipes with the 2 bolts.
- Torque:
- 5.4 N*m { 55 kgf*cm, 48 in.*lbf }
-
Install the cooling box assembly with the 4 bolts and 2 screws.
-
-
INSTALL REAR CONSOLE END PANEL SUB-ASSEMBLY
-
INSTALL NO. 1 COOLER COVER
-

Attach the claw on the upper part of the cooler cover, and then attach the clamp on the lower part of the cooler cover to install it.
-
-
INSTALL UPPER CONSOLE PANEL SUB-ASSEMBLY
-
INSTALL REAR UPPER CONSOLE PANEL SUB-ASSEMBLY
-
INSTALL UPPER CONSOLE PANEL
-
INSTALL CONSOLE CUP HOLDER BOX SUB-ASSEMBLY
-
INSTALL LOWER CENTER INSTRUMENT CLUSTER FINISH PANEL SUB-ASSEMBLY
-
INSTALL SHIFT LEVER KNOB SUB-ASSEMBLY
-
INSTALL LOWER INSTRUMENT PANEL PAD SUB-ASSEMBLY RH
-
INSTALL NO. 1 INSTRUMENT PANEL FINISH CUSHION
-
INSTALL LOWER INSTRUMENT PANEL PAD SUB-ASSEMBLY LH
-
INSTALL NO. 2 INSTRUMENT PANEL FINISH PANEL CUSHION
-
INSTALL FRONT SEAT ASSEMBLY LH (for Manual Seat)
-
INSTALL FRONT SEAT ASSEMBLY LH (for Power Seat)
-
CHARGE REFRIGERANT
-
WARM UP ENGINE
-
CHECK FOR REFRIGERANT GAS LEAK
-
INSTALL UPPER RADIATOR SUPPORT SEAL