REAR NO. 1 SEAT ASSEMBLY(for Bench Seat Type) REASSEMBLY
CAUTION / NOTICE / HINT
CAUTION:
Wear protective gloves. Sharp areas on the parts may injure your hands.
PROCEDURE
-
INSTALL REAR SEAT CUSHION SPACER
Tech Tips
Use the same procedure to install the rear seat cushion spacer on the other side.
-
Install the rear seat cushion spacer to the rear seat cushion support spring.
-
-
INSTALL REAR SEAT CUSHION SUPPORT SPRING
Tech Tips
Use the same procedure to install the rear seat cushion support spring on the other side.
-
Install the rear seat cushion support spring to the rear seat cushion frame sub-assembly with the 2 rear seat hinge set plates.
-
-
INSTALL REAR SEAT HINGE SUB-ASSEMBLY LH
-
Install the rear seat hinge sub-assembly LH to the rear seat cushion frame sub-assembly with the 2 rear seat hinge pins.
-
Install 2 new E-rings.
-
-
INSTALL REAR SEAT HINGE SUB-ASSEMBLY RH
Tech Tips
Use the same procedure described for the LH side.
-
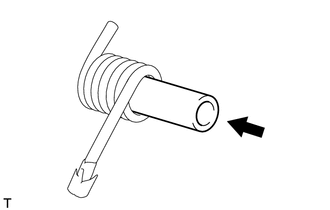
INSTALL FOLD SEAT LOCK COLLAR
Tech Tips
Use the same procedure to install the fold seat lock collar on the other side.
-
Install the fold seat lock collar to the rear seat lock assembly LH.
-
-
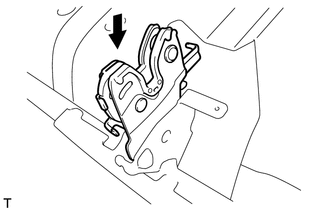
INSTALL REAR SEAT LOCK ASSEMBLY LH
-
Install the rear seat lock assembly LH to the rear seat cushion frame sub-assembly.
-
Install the rear seat No. 1 cushion spring.
-
-
INSTALL REAR NO. 1 SEAT INNER BELT ASSEMBLY LH
-
INSTALL REAR SEAT INNER BELT ASSEMBLY
-
INSTALL REAR SEAT LOCK ASSEMBLY RH
Tech Tips
Use the same procedure described for the LH side.
-
INSTALL REAR NO. 1 SEAT INNER BELT ASSEMBLY RH
-
INSTALL REAR SEAT OUTER BELT ASSEMBLY
-
INSTALL REAR SEAT LOCK CONTROL CABLE
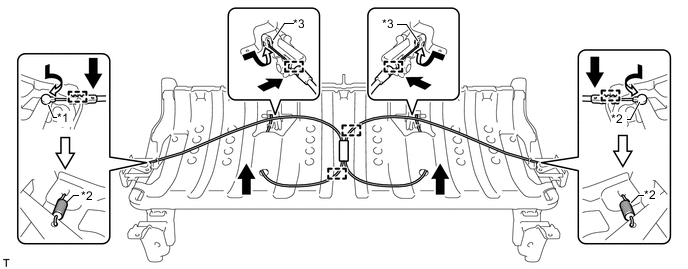
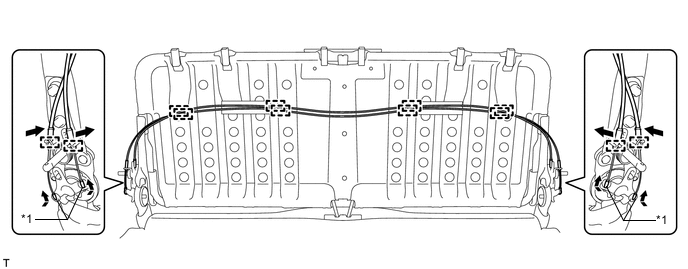
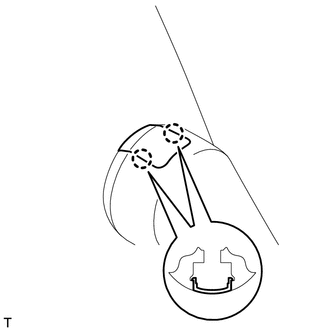
Text in Illustration *1 Cable End A *2 Tension Spring *3 Cable End B - -
-
Attach the 2 cable clamps to install the rear seat lock control cable to the rear seat cushion frame sub-assembly.
-
Pass the 2 cable ends B through the 2 holes of the rear seat cushion frame sub-assembly as shown in the illustration.
-
Insert and twist the 2 cable ends B to connect them to both sides of the rear seat lock assembly as shown in the illustration.
-
Attach the 2 cable clamps.
-
Insert and twist the 2 cable ends A to connect them to both sides of the rear seat cushion frame sub-assembly as shown in the illustration.
-
Attach the 2 cable clamps.
-
Install the 2 tension springs to both sides of the rear seat cushion frame sub-assembly as shown in the illustration.
-
-
INSTALL REAR SEAT HINGE COVER
Tech Tips
Use the same procedure to install the rear seat hinge cover on the other side.
-
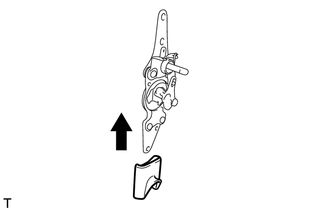
Install the rear seat hinge cover to the rear seat reclining adjuster assembly LH.
-
-
INSTALL REAR SEAT RECLINING ADJUSTER ASSEMBLY LH
-
Install the rear seat reclining adjuster assembly LH to the rear seat cushion frame sub-assembly with the 2 bolts.
- Torque:
- 37 N*m { 377 kgf*cm, 27 ft.*lbf }
-
-
INSTALL REAR SEAT RECLINING ADJUSTER ASSEMBLY RH
Tech Tips
Use the same procedure described for the LH side.
-
INSTALL REAR SEATBACK LOCK COVER
Tech Tips
Use the same procedure to install the rear seatback lock cover on the other side.
-
Install the rear seatback lock cover to the rear seat lock assembly LH with the 2 screws.
-
-
INSTALL BENCH TYPE REAR SEAT CUSHION COVER
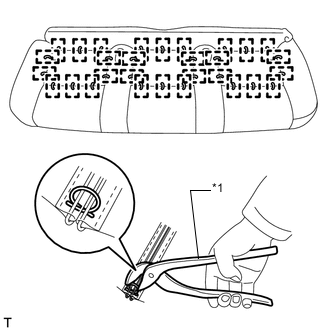
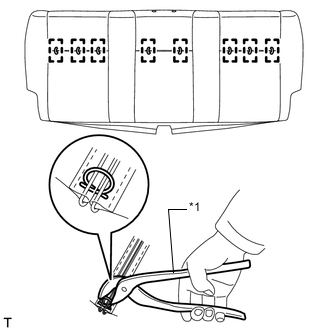
Text in Illustration *1 Hog Ring Pliers
-
Temporarily install the bench type rear seat cushion cover to the rear No. 1 seat cushion pad.
-
Using hog ring pliers, install new hog rings.
Note
-
Be careful not to damage the cover.
-
When installing the hog rings, avoid wrinkling the cover.
-
-
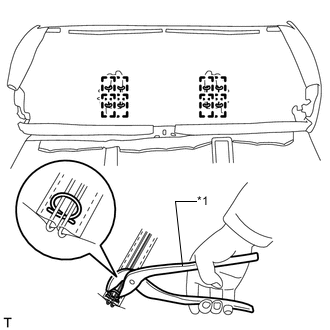
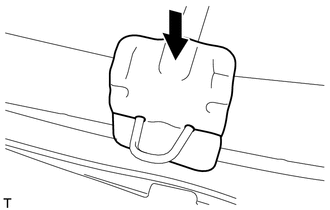
Text in Illustration *1 Hog Ring Pliers Using hog ring pliers, install new hog rings.
Note
-
Be careful not to damage the cover.
-
When installing the hog rings, avoid wrinkling the cover.
-
-
-
INSTALL SEAT CUSHION COVER WITH PAD
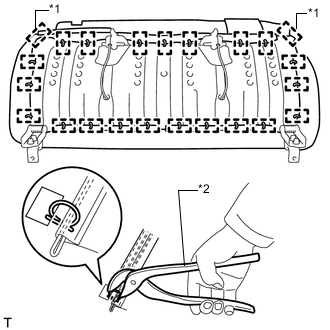
Text in Illustration *1 Hook *2 Hog Ring Pliers
-
Set the seat cushion cover with pad in place.
-
Using hog ring pliers, install the seat cushion cover with pad to the rear seat cushion frame sub-assembly with new hog rings.
Note
-
Be careful not to damage the cover.
-
When installing the hog rings, avoid wrinkling the cover.
-
-
Attach the 2 hooks.
-
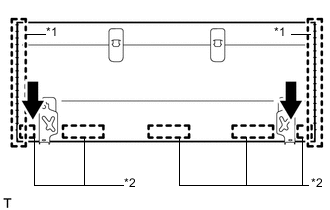
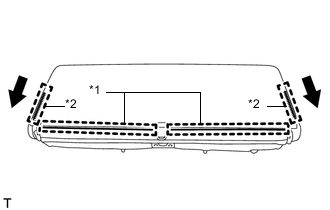
Text in Illustration *1 Fastener *2 Fastening Tape Attach the fastening tape and close the 2 fasteners.
-
-
INSTALL REAR SEAT TURN LOCK COVER
-
Install the rear seat turn lock cover with the 2 screws.
-
-
INSTALL FOLD SEAT STOPPER BAND ASSEMBLY
-
Install the fold seat stopper band assembly together with the rear seat cushion with the screw.
-
-
INSTALL REAR SEAT CUSHION
-
Install the rear seat cushion with the screw.
-
-
INSTALL REAR SEATBACK FRAME SUB-ASSEMBLY
-
Install the rear seatback frame sub-assembly with the 4 bolts.
- Torque:
- 37 N*m { 377 kgf*cm, 27 ft.*lbf }
-
-
INSTALL NO. 2 SEAT ADJUSTER CONTROL CABLE ASSEMBLY
Text in Illustration *1 Cable End - -
-
Attach the 8 cable clamps to install the No. 2 seat adjuster control cable assembly.
-
Connect the 4 cable ends to both sides of the rear seat reclining adjuster assembly as shown in the illustration.
-
Attach the 4 cable clamps to both sides of the rear seat reclining adjuster assembly as shown in the illustration.
-
-
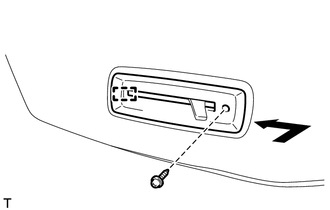
INSTALL REAR SEAT NO. 1 RECLINING COVER LH
-
Attach the guide to install the rear seat No. 1 reclining cover LH.
-
Install the screw.
-
-
INSTALL REAR SEAT NO. 1 RECLINING COVER RH
Tech Tips
Use the same procedure described for the LH side.
-
INSTALL BENCH TYPE REAR SEATBACK COVER
Text in Illustration *1 Hog Ring Pliers
-
Temporarily install the bench type rear seatback cover to the bench type rear seatback pad.
-
Using hog ring pliers, install new hog rings.
Note
-
Be careful not to damage the cover.
-
When installing the hog rings, avoid wrinkling the cover.
-
-
-
INSTALL SEATBACK COVER WITH PAD
-
Set the seatback cover with pad in place.
-
Install the seatback cover.
-
Install the 2 clips.
-
Attach the 4 claws to install the 2 rear seat headrest supports.
Tech Tips
Use the same procedure to install the 2 rear seat headrest supports on the other side.
-
Text in Illustration *1 Hook *2 Fastener Close the 2 fasteners and attach the 2 hooks.
-
-
INSTALL NO. 1 RECLINING ADJUSTER RELEASE HANDLE LH
-

Install the No. 1 reclining adjuster release handle LH with the screw.
-
-
INSTALL NO. 1 RECLINING ADJUSTER RELEASE HANDLE RH
Tech Tips
Use the same procedure described for the LH side.
-
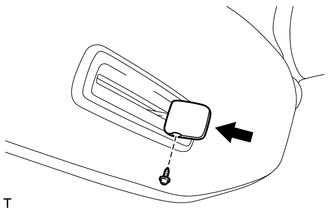
INSTALL SEAT ADJUSTER COVER
Tech Tips
Use the same procedure to install the seat adjuster cover on the other side.
-
Attach the 2 claws to install the seat adjuster cover to the No. 1 reclining adjuster release handle LH.
-
-
INSTALL RECLINING REMOTE CONTROL BEZEL
Tech Tips
Use the same procedure to install the reclining remote control bezel on the other side.
-
Attach the hook to install the reclining remote control bezel.
-
Install the screw.
-
-
INSTALL RECLINING REMOTE CONTROL LEVER KNOB
Tech Tips
Use the same procedure to install the reclining remote control lever knob on the other side.
-
Install the reclining remote control lever knob with the screw.
-
-
INSTALL REAR SEAT HEADREST ASSEMBLY
Tech Tips
Use the same procedure to install the rear seat headrest assembly on the other side.
-
Install the rear seat headrest assembly.
-