ENTRY LOCK AND UNLOCK SWITCH(for Rear) REMOVAL
CAUTION / NOTICE / HINT
Tech Tips
-
Use the same procedures for the LH side and RH side.
-
The procedures listed below are for the LH side.
PROCEDURE
-
DISCONNECT CABLE FROM NEGATIVE BATTERY TERMINAL
Note
When disconnecting the cable, some systems need to be initialized after the cable is reconnected Click here.
-
REMOVE REAR DOOR UPPER ARMREST BASE PANEL LH
-
REMOVE REAR DOOR INSIDE HANDLE BEZEL LH
-
REMOVE ASSIST GRIP COVER LH
-
REMOVE COURTESY LIGHT ASSEMBLY (w/ Courtesy Light)
-
REMOVE REAR DOOR TRIM BOARD SUB-ASSEMBLY LH
-
REMOVE REAR DOOR SERVICE HOLE COVER LH
-
REMOVE REAR DOOR LOCK ASSEMBLY LH
-
REMOVE REAR DOOR OUTSIDE HANDLE COVER LH
-
REMOVE REAR DOOR OUTSIDE HANDLE ASSEMBLY LH
-
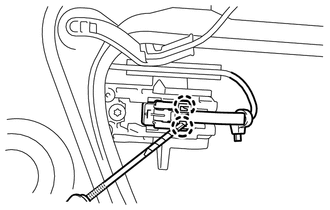
Using a thin-bladed screwdriver, detach the 2 claws.
Tech Tips
Tape the thin-bladed screwdriver tip before use.
Text in Illustration 
Protective Tape -
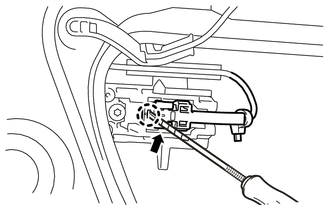
Using a thin-bladed screwdriver, detach the claw and disconnect the connector cover and connector.
Text in Illustration Protective Tape -
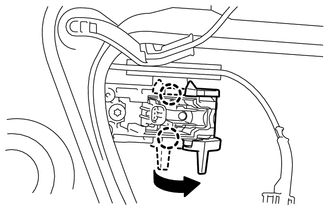
Detach the 2 claw and disconnect the holder.
-
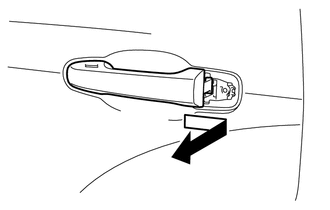
Remove the rear door outside handle assembly LH by sliding and pulling it in the direction indicated by the arrow in the illustration.
-