ENGINE IMMOBILISER SYSTEM(w/o Entry and Start System) Engine does not Start but Initial Combustion Occurs
DESCRIPTION
The key ID code of the transponder chip inside the IG key is compared against the key ID code registered in the transponder key ECU assembly. While checking the code, the transponder key ECU assembly supplies electrical power to the transponder chip in the key by means of the transponder key amplifier. If the codes match, the immobiliser is then UNSET (released), and after the engine start permission signal is sent to the ECM, if communication is functioning properly, engine start can be performed.
WIRING DIAGRAM

CAUTION / NOTICE / HINT
Note
When replacing the key and transponder key ECU assembly, refer to the Service Bulletin.
PROCEDURE
-
CHECK FOR DTC
-
Check for DTCs Click here.
Tech Tips
Before checking for DTCs, perform the "DTC Output Confirmation Operation" procedure.
Result Result Proceed to No DTC output A DTC output B
B 
GO TO DIAGNOSTIC TROUBLE CODE CHART Click here
A 
-
-
CONFIRM ENGINE MODEL
-
Check the vehicle specifications.
Result Result Proceed to 1GR-FE A 1VD-FTV B
B 
CHECK WHETHER ENGINE STARTS Click here
A
-
-
READ VALUE USING INTELLIGENT TESTER
-
Turn the ignition switch off.
-
Connect the intelligent tester to the DLC3.
-
Turn the ignition switch to ON.
-
Turn the intelligent tester on.
-
Enter the following menus: Powertrain / Engine and ECT / Data List.
Engine and ECT Tester Display Measurement Item/Range Normal Condition Stored as Freeze Frame Data Immobiliser Fuel Cut Status of immobiliser fuel cut/
ON or OFF
- Yes OK The item in the Data List indicates "OFF".
OK
GO TO SFI SYSTEM Click here
NG
-
-
CHECK WHETHER ENGINE STARTS
-
Turn the ignition switch to ON, wait for 5 seconds, and then attempt to start the engine.
Result Result Proceed to Engine cannot be started A Engine can be started B
B
USE SIMULATION METHOD TO CHECK Click here
A
-
-
CHECK ECM (TERMINAL IMI)
-
Using an oscilloscope, check the waveform.

Text in Illustration *A for LHD *B for RHD *a Component with harness connected
(ECM)
*b Component with harness connected
(Transponder Key ECU Assembly)
*c Waveform 1 *d Waveform 2 *e Waveform A - - Measurement Condition Item Content Tester Connection A38-11 (IMI) - E96-13 (EFIO)*1
A52-11 (IMI) - E96-13 (EFIO)*2
Tool Setting 2 V/DIV., 500 ms./DIV. Condition Within 3 seconds after starter operates and initial combustion occurs, or within 3 seconds after ignition switch first turned to ON after battery disconnected and reconnected
-
*1: for LHD
-
*2: for RHD
Tech Tips
The waveform shown in the illustration is an example for reference only. Noise, chattering, etc. are not shown.
OK Waveform is output normally (refer to illustration). Result Result Proceed to Normal waveform A Waveform 1 or 2 (Waveform A) not output, or has abnormal wavelength or shape B -
B
CHECK HARNESS AND CONNECTOR (ECM - TRANSPONDER KEY ECU ASSEMBLY) Click here
A
-
-
CHECK ECM (TERMINAL IMO)
-
Using an oscilloscope, check the waveform.
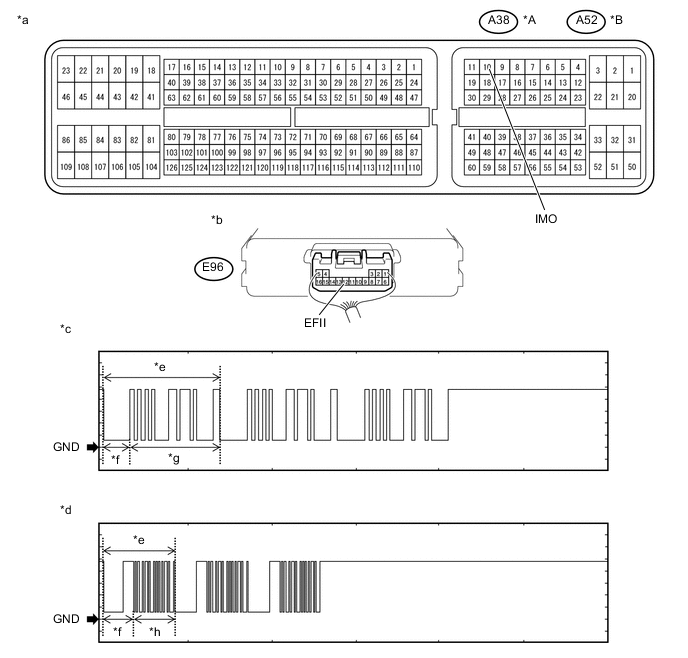
Text in Illustration *A for LHD *B for RHD *a Component with harness connected
(ECM)
*b Component with harness connected
(Transponder Key ECU Assembly)
*c Waveform 1 *d Waveform 2 *e Waveform B *f 160 ms *g 510 ms *h 270 ms Measurement Condition Item Content Tester Connection A38-10 (IMO) - E96-12 (EFII)*1
A52-10 (IMO) - E96-12 (EFII)*2
Tool Setting 2 V/DIV., 500 ms./DIV. Condition Within 3 seconds after starter operates and initial combustion occurs, or within 3 seconds after ignition switch first turned to ON after battery disconnected and reconnected
-
*1: for LHD
-
*2: for RHD
Tech Tips
The waveform shown in the illustration is an example for reference only. Noise, chattering, etc. are not shown.
OK Waveform is output normally (refer to illustration). Result Result Proceed to Normal waveform A Waveform 1 or 2 (Waveform B) not output, or has abnormal wavelength or shape (for 1GR-FE) B Waveform 1 or 2 (Waveform B) not output, or has abnormal wavelength or shape (for 1VD-FTV) C -
B
REPLACE ECM Click here
C
REPLACE ECM Click here
A
-
-
CHECK ECM (TERMINAL IMI)
-
Using an oscilloscope, check the waveform.
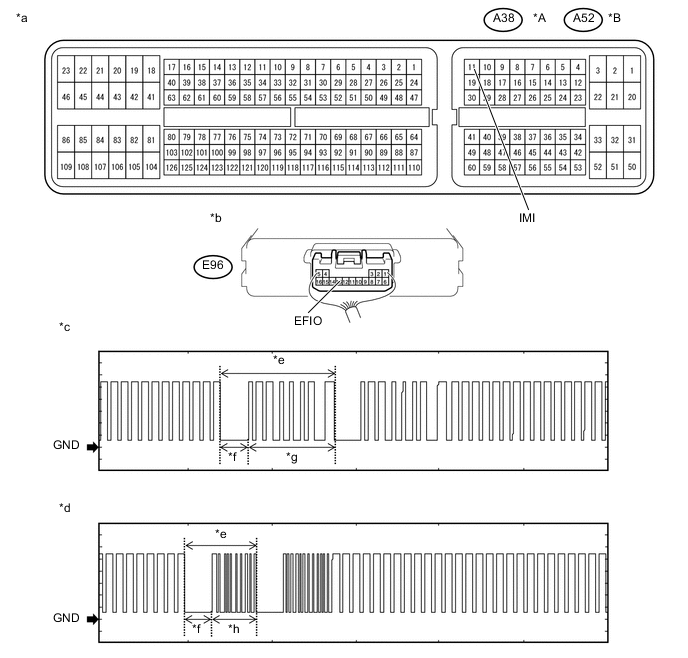
Text in Illustration *A for LHD *B for RHD *a Component with harness connected
(ECM)
*b Component with harness connected
(Transponder Key ECU Assembly)
*c Waveform 1 *d Waveform 2 *e Waveform C *f 160 ms *g 510 ms *h 270 ms Measurement Condition Item Content Tester Connection A38-11 (IMI) - E96-13 (EFIO)*1
A52-11 (IMI) - E96-13 (EFIO)*2
Tool Setting 2 V/DIV., 500 ms./DIV. Condition Within 3 seconds after starter operates and initial combustion occurs, or within 3 seconds after ignition switch first turned to ON after battery disconnected and reconnected
-
*1: for LHD
-
*2: for RHD
Tech Tips
The waveform shown in the illustration is an example for reference only. Noise, chattering, etc. are not shown.
OK Waveform is output normally (refer to illustration). Result Result Proceed to Normal waveform A Waveform 1 or 2 (Waveform C) not output, or has abnormal wavelength or shape B -
B
REPLACE TRANSPONDER KEY ECU ASSEMBLY Click here
A
-
-
REGISTER ECU COMMUNICATION ID
-
Register the ECU communication ID (refer to the Service Bulletin).
NEXT
-
-
CHECK WHETHER ENGINE STARTS
-
Check that the engine starts with the key.
OK Engine starts normally.
OK
END
NG
REPLACE TRANSPONDER KEY ECU ASSEMBLY Click here
-
-
CHECK HARNESS AND CONNECTOR (ECM - TRANSPONDER KEY ECU ASSEMBLY)
-
for LHD:
-
Disconnect the A38 ECM connector.
-
Disconnect the E96 transponder key ECU assembly connector.
-
Measure the resistance according to the value(s) in the table below.
Standard Resistance Tester Connection Condition Specified Condition A38-11 (IMI) - E96-13 (EFIO) Always Below 1 Ω E96-13 (EFIO) - Body ground Always 10 kΩ or higher
-
-
for RHD:
-
Disconnect the A52 ECM connector.
-
Disconnect the E96 transponder key ECU assembly connector.
-
Measure the resistance according to the value(s) in the table below.
Standard Resistance Tester Connection Condition Specified Condition A52-11 (IMI) - E96-13 (EFIO) Always Below 1 Ω E96-13 (EFIO) - Body ground Always 10 kΩ or higher
-
NG
REPAIR OR REPLACE HARNESS OR CONNECTOR
OK
-
-
REPLACE TRANSPONDER KEY ECU ASSEMBLY
-
Replace the transponder key ECU assembly.
-
Check that the engine starts with the key.
OK Engine starts normally. Result Result Proceed to OK A NG (for 1GR-FE) B NG (for 1VD-FTV) C
A
END
B
GO TO SFI SYSTEM Click here
C
GO TO ECD SYSTEM Click here
-