BRAKE PEDAL(for RHD) INSTALLATION
PROCEDURE
-
INSTALL BRAKE PEDAL SUPPORT ASSEMBLY
-
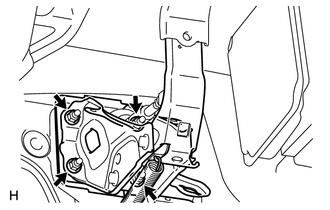
Install the brake pedal support assembly with the 4 nuts.
- Torque:
- 14 N*m { 145 kgf*cm, 10 ft.*lbf }
-
Install the brake pedal support reinforcement set bolt.
- Torque:
- 16 N*m { 163 kgf*cm, 12 ft.*lbf }
-
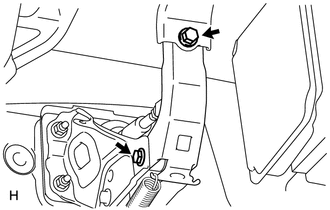
Tighten the hexagon bolt.
- Torque:
- 23 N*m { 239 kgf*cm, 17 ft.*lbf }
Tech Tips
Hold the bolt in place and tighten the nut.
-
-
INSTALL PUSH ROD PIN
-
Apply a light coat lithium soap base glycol grease to the inner surface of the hole on the brake pedal lever.
-
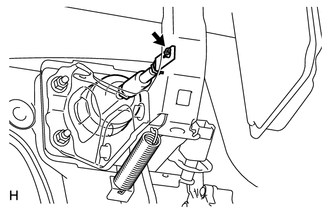
Set the master cylinder push rod clevis in place, insert the push rod pin from the outside of the vehicle and then install a new clip.
-
-
INSTALL STOP LIGHT SWITCH ASSEMBLY
-
Install the stop light switch Click here.
-
Connect the stop light switch connector.
-
-
INSTALL DRIVER SIDE KNEE AIRBAG ASSEMBLY
-
INSTALL LOWER NO. 1 INSTRUMENT PANEL FINISH PANEL
-
INSTALL NO. 1 INSTRUMENT PANEL UNDER COVER SUB-ASSEMBLY
-
INSTALL COWL SIDE TRIM BOARD RH
-
INSTALL FRONT DOOR SCUFF PLATE RH
-
WARM UP CABLE TO NEGATIVE BATTERY TERMINAL
Note
When disconnecting the cable, some systems need to be initialized after the cable is reconnected Click here.
-
CHECK BRAKE PEDAL HEIGHT
-
CHECK PEDAL FREE PLAY
-
CHECK PEDAL RESERVE DISTANCE