REAR SHOCK ABSORBER INSTALLATION

CAUTION / NOTICE / HINT
Tech Tips
-
Use the same procedures for the RH side and LH side.
-
The procedures listed below are for the LH side.
-
A bolt without a torque specification is shown in the standard bolt chart Click here.
PROCEDURE
-
TEMPORARILY INSTALL REAR SHOCK ABSORBER ASSEMBLY LH (w/ Active Height Control)
-
Install the lower bracket to the shock absorber.
-
Temporarily install the rear shock absorber and upper bracket with the nut.
-
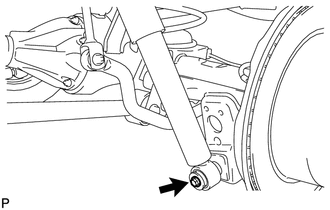
Temporarily install the lower side of the shock absorber with the bolt.
-
-
TEMPORARILY INSTALL REAR SHOCK ABSORBER ASSEMBLY LH (w/o Active Height Control)
-
Install the lower bracket to the shock absorber.
-
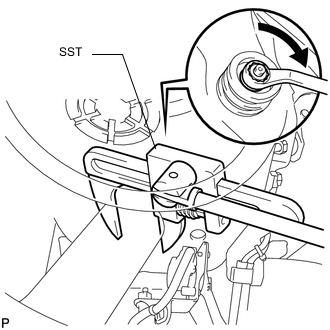
Using SST, hold the rear shock absorber in place.
- SST
- 09922-10010
-
Temporarily install the rear shock absorber and upper bracket with the nut.
-
Temporarily install the lower side of the shock absorber with the bolt.
-
-
TEMPORARILY INSTALL REAR SHOCK ABSORBER ASSEMBLY RH
-
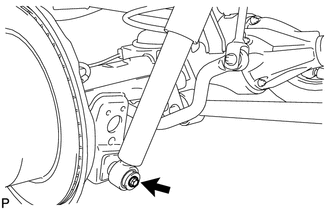
Temporarily install the lower side of the shock absorber with the bolt.
-
-
TEMPORARILY INSTALL REAR LATERAL CONTROL ROD ASSEMBLY
-
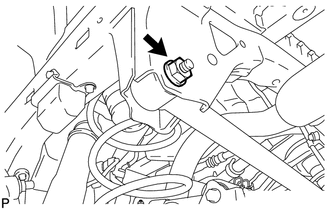
Temporarily install the lateral control rod with the nut and bolt.
-
-
STABILIZE SUSPENSION
-
Install the rear wheels.
- Torque:
- for aluminum wheel
- 131 N*m { 1336 kgf*cm, 97 ft.*lbf }
- for steel wheel
- 209 N*m { 2131 kgf*cm, 154 ft.*lbf }
-
Lower the vehicle.
-
Press down on the vehicle several times to stabilize the suspension.
-
-
TIGHTEN REAR SHOCK ABSORBER ASSEMBLY LH
-
w/o Active Height Control:
-
Tighten the bolt and nut.
- Torque:
- for Nut
- 53 N*m { 540 kgf*cm, 39 ft.*lbf }
- for Bolt
- 98 N*m { 999 kgf*cm, 72 ft.*lbf }
-
-
w/ Active Height Control:
-
Tighten the bolt.
- Torque:
- 98 N*m { 999 kgf*cm, 72 ft.*lbf }
Note
Perform this procedure with all 4 wheels on the ground.
-
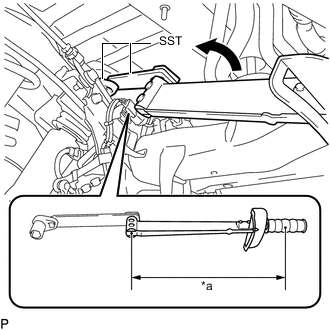
Text in Illustration *a Torque Wrench Fulcrum Length Using SST, Tighten the nut.
- SST
- 09224-00011
- 09961-01270
- Torque:
- Specified tightening torque
- 53 N*m { 540 kgf*cm, 39 ft.*lbf }
Note
Perform this procedure with all 4 wheels on the ground.
Tech Tips
-
Calculate the torque wrench reading when changing the fulcrum length of the torque wrench Click here.
-
When using SST (fulcrum length of 30 mm (1.181 in.)) + SST (fulcrum length of 200 mm (7.874 in.)) + torque wrench (fulcrum length of 380 mm (14.961 in.)): 33 N*m (337 kgf*cm, 24 ft.*lbf)
-
-
-
TIGHTEN REAR SHOCK ABSORBER ASSEMBLY RH
-
Tighten the bolt.
- Torque:
- 98 N*m { 999 kgf*cm, 72 ft.*lbf }
Note
Perform this procedure with all 4 wheels on the ground.
-
-
CONNECT NO. 4 SUSPENSION CONTROL PRESSURE HOSE (w/ Active Height Control)
-
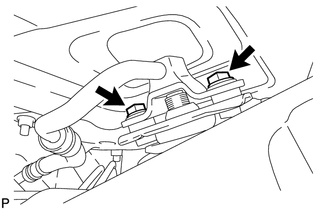
Install the pressure hose with the 2 bolts.
- Torque:
- 18 N*m { 184 kgf*cm, 13 ft.*lbf }
-
-
TIGHTEN REAR LATERAL CONTROL ROD ASSEMBLY
-
Tighten the nut.
- Torque:
- 150 N*m { 1530 kgf*cm, 111 ft.*lbf }
Note
Perform this procedure with all 4 wheels on the ground.
-
-
INSTALL FUEL TANK (w/ Active Height Control)
for 1GR-FE: Click here
for 1UR-FE: Click here
for 1VD-FTV: Click here
for 3UR-FE: Click here
-
INSTALL REAR NO. 1 FLOOR HEAT INSULATOR (w/ Active Height Control)
-
Install the rear No. 1 floor heat insulator with the 3 bolts.
- Torque:
- 5.0 N*m { 51 kgf*cm, 44 in.*lbf }
-
-
INSTALL EXHAUST PIPE ASSEMBLY (w/ Active Height Control)
for 1GR-FE: Click here
for 1UR-FE: Click here
for 1VD-FTV: Click here
for 3UR-FE: Click here
-
BLEED AIR FROM SUSPENSION FLUID (w/ Active Height Control)
-
CHECK FLUID LEVEL IN RESERVOIR (w/ Active Height Control)
-
INSPECT FOR SUSPENSION FLUID LEAK (w/ Active Height Control)
-
CONNECT NO. 3 PARKING BRAKE CABLE ASSEMBLY
-
Connect the No. 3 parking brake cable with the bolt.
- Torque:
- 13 N*m { 127 kgf*cm, 9 ft.*lbf }
-
-
CONNECT NO. 2 PARKING BRAKE CABLE ASSEMBLY
-
Connect the No. 2 parking brake cable with the bolt.
- Torque:
- 13 N*m { 127 kgf*cm, 9 ft.*lbf }
-
-
CONNECT REAR AXLE BREATHER HOSE SUB-ASSEMBLY
-
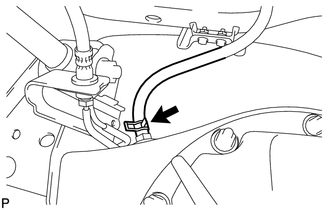
Connect the breather hose to the rear axle housing.
-
-
MEASURE VEHICLE HEIGHT (w/ KDSS)
-
CLOSE STABILIZER CONTROL WITH ACCUMULATOR HOUSING SHUTTER VALVE (w/ KDSS)
-
INSTALL STABILIZER CONTROL VALVE PROTECTOR (w/ KDSS)