SUSPENSION CONTROL ECU INSTALLATION
PROCEDURE
-
INSTALL SUSPENSION CONTROL ECU
-
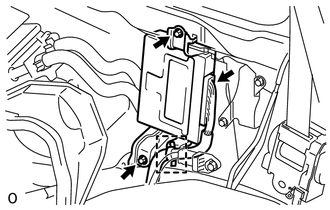
Attach the wire harness clamp and connect the connector.
-
Install the ECU with the 2 bolts.
- Torque:
- 8.0 N*m { 82 kgf*cm, 71 in.*lbf }
-
-
INSTALL REAR SIDE NO. 2 AIR DUCT (w/ Heater)
-
INSTALL FRONT QUARTER TRIM PANEL ASSEMBLY LH
-
INSTALL REAR SEAT COVER CAP (w/ Rear No. 2 Seat, except Face to Face Seat Type)
-
INSTALL NO. 1 TONNEAU COVER HOLDER CAP (w/ Tonneau Cover)
-
INSTALL REAR FLOOR MAT REAR SUPPORT PLATE
-
INSTALL REAR DOOR SCUFF PLATE LH
-
INSTALL REAR STEP COVER
-
INSTALL REAR NO. 2 SEAT ASSEMBLY LH (except Face to Face Seat Type)
-
Install the rear No. 2 seat assembly LH Click here.
-
-
INSTALL REAR NO. 2 SEAT ASSEMBLY RH (except Face to Face Seat Type)
Tech Tips
Use the same procedures described for the LH side.
-
INSTALL REAR NO. 2 SEAT ASSEMBLY LH (for Face to Face Seat Type)
-
Install the rear No. 2 seat assembly LH Click here.
-
-
INSTALL REAR NO. 2 SEAT ASSEMBLY RH (for Face to Face Seat Type)
Tech Tips
Use the same procedures described for the LH side.
-
INSTALL TONNEAU COVER ASSEMBLY (w/ Tonneau Cover)
-
CONNECT CABLE TO NEGATIVE BATTERY TERMINAL
Note
When disconnecting the cable, some systems need to be initialized after the cable is reconnected Click here.
-
PERFORM VEHICLE HEIGHT OFFSET CALIBRATION
-
Perform the vehicle height offset calibration Click here.
-
-
PERFORM ZERO POINT CALIBRATION OF G SENSOR
-
Perform the zero point calibration of G sensor Click here.
-
-
ADJUST HEADLIGHT ASSEMBLY
-
for Standard:
Adjust the headlight Click here.
-
for HID Headlight:
Adjust the headlight Click here.
-