HEIGHT CONTROL ACCUMULATOR INSTALLATION
PROCEDURE
-
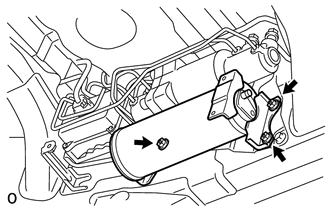
INSTALL SUSPENSION CONTROL PUMP ACCUMULATOR ASSEMBLY
-
Install the accumulator with the 3 nuts.
- Torque:
- 31 N*m { 316 kgf*cm, 23 ft.*lbf }
-
-
INSTALL NO. 7 HEIGHT CONTROL TUBE
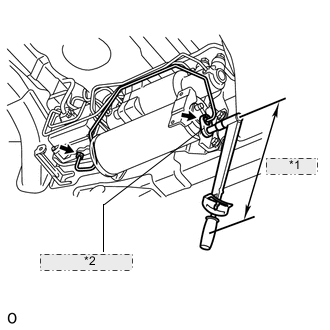
*1 Fulcrum Length *2 Union Nut Wrench
-
Using a union nut wrench, install the No. 7 control tube to the control valve and accumulator.
- Torque:
- without union nut wrench
- 15 N*m { 155 kgf*cm, 11 ft.*lbf }
- with union nut wrench
- 14 N*m { 143 kgf*cm, 10 ft.*lbf }
Tech Tips
-
Use a torque wrench with a fulcrum length of 300 mm (11.8 in.).
-
The torque value for use with a union nut wrench is effective when the union nut wrench is parallel to the torque wrench.
-
-
INSTALL CENTER EXHAUST PIPE ASSEMBLY
-
for 1GR-FE:
Install the center exhaust pipe Click here.
-
for 1UR-FE:
Install the center exhaust pipe Click here.
-
for 3UR-FE:
Install the center exhaust pipe Click here.
-
for 1VD-FTV:
Install the center exhaust pipe Click here.
-
-
INSTALL TAILPIPE ASSEMBLY
-
for 1GR-FE:
Install the tailpipe Click here.
-
for 1UR-FE:
Install the tailpipe Click here.
-
for 3UR-FE:
Install the tailpipe Click here.
-
for 1VD-FTV:
Install the tailpipe Click here.
-
-
BLEED AIR FROM SUSPENSION FLUID
-
CHECK FLUID LEVEL IN RESERVOIR
-
INSPECT FOR SUSPENSION FLUID LEAK
-
INSTALL HEIGHT CONTROL UNIT INSULATOR
-
CHECK FOR EXHAUST GAS LEAK
-
If gas is leaking, tighten the areas necessary to stop the leak. Replace damaged parts as necessary.
-