TRANSFER ASSEMBLY REMOVAL

PROCEDURE
-
REMOVE FRONT FENDER SPLASH SHIELD SUB-ASSEMBLY LH (for AE80F)
-
REMOVE FRONT FENDER SPLASH SHIELD SUB-ASSEMBLY RH (for AE80F)
-
REMOVE NO. 1 ENGINE UNDER COVER SUB-ASSEMBLY (for AE80F)
-
REMOVE NO. 2 ENGINE UNDER COVER (for AE80F)
-
REMOVE OIL PAN PROTECTOR ASSEMBLY (for AE80F)
-
DRAIN TRANSFER OIL
-
DISCONNECT FLOOR SHIFT GEAR SHIFTING ROD SUB-ASSEMBLY (for AE80F)
-
REMOVE FRONT PROPELLER SHAFT ASSEMBLY (for AE80F)
-
REMOVE PROPELLER SHAFT ASSEMBLY (for AE80F)
-
REMOVE FRONT EXHAUST PIPE ASSEMBLY (for AE80F)
-
DISCONNECT OIL COOLER TUBE (for AE80F)
-
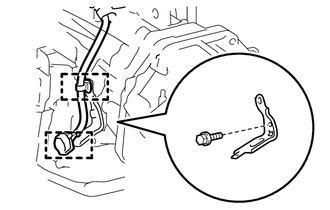
REMOVE GROUND WIRE (for AE80F)
-
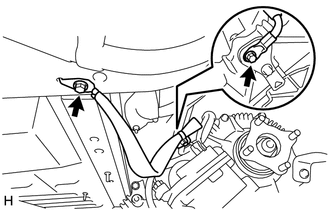
Remove the 2 bolts and ground wire.
-
-
SUPPORT AUTOMATIC TRANSMISSION ASSEMBLY (for AE80F)
-
REMOVE NO. 2 FRAME CROSSMEMBER SUB-ASSEMBLY (for AE80F)
-
REMOVE REAR NO. 1 ENGINE MOUNTING INSULATOR (for AE80F)
-
REMOVE TRANSFER ASSEMBLY (for AE80F)
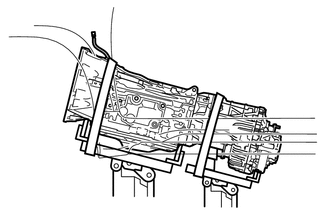
-
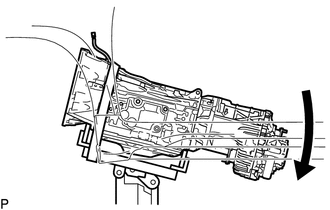
Tilt the transmission downward.
Note
Make sure the cooling fan does not contact the fan shroud.
-
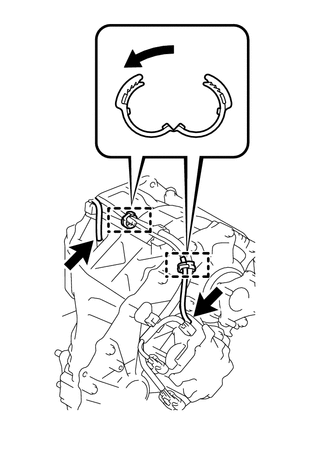
Detach the 2 clamps and disconnect the transfer breather hose sub-assembly.
-
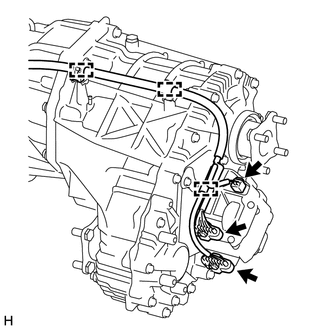
w/ Temperature Sensor:
Detach the 3 clamps and disconnect the 3 connectors.
-
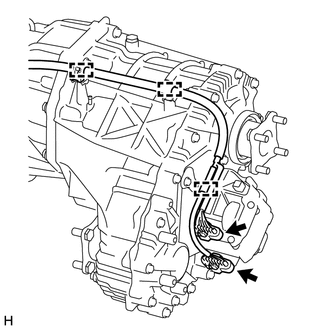
w/o Temperature Sensor:
Detach the 3 clamps and disconnect the 2 connectors.
-
Detach the 2 clamps.
-
Remove the bolt and bracket.
-
Support the transfer assembly with a transmission jack.
Note
Secure the transfer assembly to the transmission jack using a belt, etc. to prevent it from falling.
-
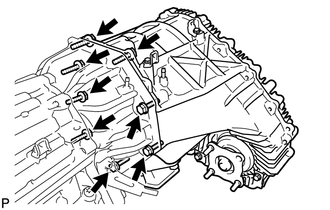
Remove the 8 bolts.
CAUTION:
Be sure to perform this procedure with several people as the transfer assembly is very heavy.
-
Pull the transfer assembly straight up and remove it from the transmission.
Note
Take care not to damage the adaptor oil seal with the transfer input shaft spline.
-
-
REMOVE AUTOMATIC TRANSMISSION WITH TRANSFER ASSEMBLY (for AC60F)
-
REMOVE AUTOMATIC TRANSMISSION WITH TRANSFER ASSEMBLY (for AB60F)
-
for 1VD-FTV: Click here
-
for 1UR-FE: Click here
-
-
REMOVE MANUAL TRANSMISSION WITH TRANSFER ASSEMBLY (for H150F)
-
REMOVE TRANSFER ASSEMBLY (for AB60F, AC60F, H150F)
-
Remove the 8 bolts.
-
Pull the transfer assembly straight up and remove it from the transmission.
Note
Take care not to damage the adaptor oil seal with the transfer input shaft spline.
-