CLUTCH MASTER CYLINDER(for LHD) INSTALLATION
PROCEDURE
-
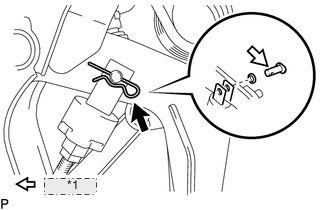
INSTALL CLUTCH MASTER CYLINDER ASSEMBLY
-

Install the clutch master cylinder with the 2 bolts.
- Torque:
- 12 N*m { 120 kgf*cm, 9 ft.*lbf }
-
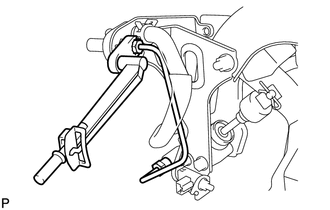
*1 MP grease Apply MP grease to the contact surface of the clevis pin and clevis bush.
-
Install the wave washer to the clevis pin.
-
Connect the clevis of the master cylinder to the clutch pedal with the clevis pin.
-
Install a new clip to the clevis pin.
-
-
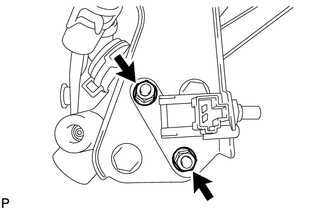
INSTALL CLUTCH START SWITCH ASSEMBLY
-
Install the clutch start switch to the clutch pedal bracket, and then temporarily install the 2 nuts.
Tech Tips
The 2 nuts will be tightened to a torque specification in the "Adjust Clutch Start Switch Assembly" procedure.
-
-
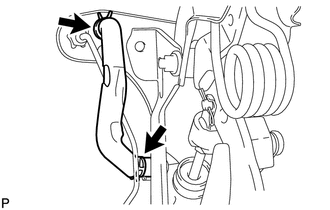
INSTALL CLUTCH MASTER CYLINDER TO WAY TUBE
-
Using a union nut wrench, install the tube to the clutch master cylinder and clutch pedal support way.
- Torque:
- 15 N*m { 155 kgf*cm, 11 ft.*lbf }
Note
Use the formula to calculate special torque values for situations where a union nut wrench is combined with a torque wrench Click here.
-
-
INSTALL CLUTCH RESERVOIR HOSE
-
Install the clutch reservoir hose to the clutch master cylinder and clutch pedal support way with 2 new clips.
Note
Connect the clutch reservoir hose so that it will not be twisted.
-
-
INSTALL CLUTCH PEDAL SUPPORT ASSEMBLY WITH CLUTCH MASTER CYLINDER
-
CONNECT CLUTCH MASTER CYLINDER TO FLEXIBLE HOSE TUBE AND CLUTCH RESERVOIR TUBE
-
INSTALL MAIN BODY ECU (COWL SIDE JUNCTION BLOCK LH)
-
FILL RESERVOIR WITH BRAKE FLUID
-
BLEED CLUTCH LINE
-
INSPECT AND ADJUST CLUTCH PEDAL SUB-ASSEMBLY
-
ADJUST CLUTCH START SWITCH ASSEMBLY
-

While depressing the clutch pedal, tighten the 2 nuts so that the clearance between the clutch pedal and clutch start switch is within the specification.
Standard clearance between clutch pedal and clutch start switch 4.1 to 6.1 mm (0.162 to 0.240 in.) - Torque:
- 5.0 N*m { 51 kgf*cm, 44 in.*lbf }
-
-
CHECK FLUID LEVEL IN RESERVOIR
-
INSPECT FOR CLUTCH FLUID LEAK
-
INSTALL LOWER INSTRUMENT PANEL SUB-ASSEMBLY (w/o Driver Side Knee Airbag)
-
INSTALL DRIVER SIDE KNEE AIRBAG ASSEMBLY (w/ Driver Side Knee Airbag)