REAR TRAILING ARM INSTALLATION
CAUTION / NOTICE / HINT
Tech Tips
-
Use the same procedure for the RH side and LH side.
-
The procedure listed below is for the LH side.
PROCEDURE
-
INSTALL REAR TRAILING ARM ASSEMBLY
-
Use a jack and wooden block to keep the rear No. 2 suspension arm assembly level.
CAUTION:
Do not jack up the rear No. 2 suspension arm assembly too high as the vehicle may fall.
Note
-
When jacking up the rear No. 2 suspension arm assembly, be sure to jack it up slowly.
-
Make sure to perform this operation with the vehicle kept as low as possible.
-
-
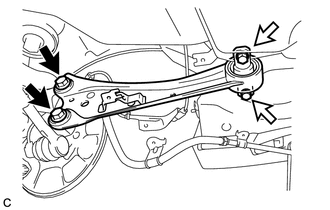
Install the rear trailing arm assembly with the 2 bolts (B) and 2 bolts (A).
Text in Illustration 
Bolt (A) 
Bolt (B) - Torque:
- Bolt (A)
- 200 N*m { 2039 kgf*cm, 148 ft.*lbf }
- Bolt (B)
- 90 N*m { 918 kgf*cm, 66 ft.*lbf }
-
-
TEMPORARILY TIGHTEN REAR NO. 1 SUSPENSION ARM ASSEMBLY
-
Using the rear suspension toe adjust cam sub-assembly, No. 2 camber adjust cam and nut, temporarily install the rear No. 1 suspension arm assembly to the rear suspension member sub-assembly.
Note
-
Insert the rear suspension toe adjust cam sub-assembly from the rear of the vehicle.
-
Hold the rear suspension toe adjust cam sub-assembly while rotating the nut.
-
-
-
INSTALL REAR SPEED SENSOR WIRE
-
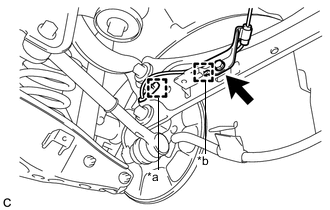
Text in Illustration *a Clamp *b Guide Install the rear speed sensor wire to the rear trailing arm assembly with the bolt and clamp.
- Torque:
- 8.0 N*m { 82 kgf*cm, 71 in.*lbf }
Note
-
Do not twist the rear speed sensor wire when installing it.
-
Make sure that the guide of the rear speed sensor wire is inserted.
-
-
INSTALL NO. 3 PARKING BRAKE CABLE ASSEMBLY
-
Install the No. 3 parking brake cable assembly with the 3 bolts.

- Torque:
- 6.0 N*m { 61 kgf*cm, 53 in.*lbf }
Note
-
Do not twist the No. 3 parking brake cable assembly when installing it.
-
Make sure that the 3 guides of the No. 3 parking brake cable assembly are inserted.
-
-
INSTALL REAR FLOOR SIDE MEMBER COVER (w/ Floor Under Cover)
-
INSTALL REAR SUSPENSION ARM COVER
-
INSTALL REAR WHEEL
- Torque:
- 103 N*m { 1050 kgf*cm, 76 ft.*lbf }
-
FULLY TIGHTEN REAR NO. 1 SUSPENSION ARM ASSEMBLY
-
INSPECT AND ADJUST REAR WHEEL ALIGNMENT