NOISE FILTER REMOVAL
PROCEDURE
-
REMOVE REAR NO. 2 FLOOR BOARD (for Quarter)
-
REMOVE REAR DECK FLOOR BOX (for Quarter)
-
REMOVE REAR NO. 3 FLOOR BOARD (for Quarter)
-
REMOVE DECK FLOOR BOX RH (for Quarter)
-
REMOVE REAR NO. 4 FLOOR BOARD (for Quarter)
w/o Woofer: Click here
w/ Woofer: Click here
-
REMOVE DECK FLOOR BOX LH (for Quarter)
w/o Woofer: Click here
-
REMOVE TONNEAU COVER ASSEMBLY (for Quarter)
w/ Tonneau Cover: Click here
-
REMOVE REAR NO. 1 FLOOR BOARD SUB-ASSEMBLY (for Quarter)
-
REMOVE REAR NO. 2 FLOOR BOARD SUB-ASSEMBLY (for Quarter)
-
REMOVE REAR NO. 1 FLOOR BOARD (for Quarter)
-
REMOVE DECK TRIM SERVICE HOLE COVER (for Quarter)
-
REMOVE REAR DECK TRIM COVER (for Quarter)
-
REMOVE REAR DOOR SCUFF PLATE LH (for Quarter)
-
REMOVE REAR DOOR OPENING TRIM WEATHERSTRIP LH (for Quarter)
-
REMOVE REAR SEAT CUSHION ASSEMBLY (for Quarter)
-
REMOVE REAR SEAT CUSHION LOCK HOOK (for Quarter)
-
REMOVE REAR SEATBACK ASSEMBLY LH (for Quarter)
-
REMOVE REAR SEAT SIDE GARNISH LH (for Quarter)
-
REMOVE ROPE HOOK ASSEMBLY (for Quarter)
-
REMOVE LUGGAGE HOLD BELT STRIKER ASSEMBLY (for Quarter)
-
REMOVE TONNEAU COVER HOOK (for Quarter)
-
REMOVE TONNEAU COVER HOLDER CAP (for Quarter)
-
REMOVE DECK TRIM SIDE PANEL ASSEMBLY LH (for Quarter)
-
REMOVE RADIO SETTING CONDENSER (for Quarter)
Note
When the terminal cover is removed, the radio setting condenser must be replaced because the terminal cover and condenser are supplied as a set.
-
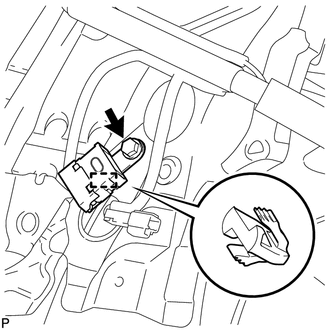
Remove the bolt.
-
Disengage the clamp and disconnect the radio setting condenser with wire harness from the vehicle body.
-
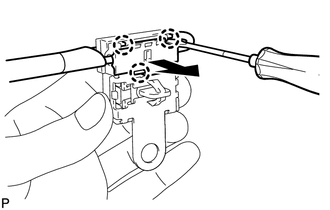
Using a screwdriver, disengage the 3 claws and remove the terminal cover with wire harness from the condenser.
-
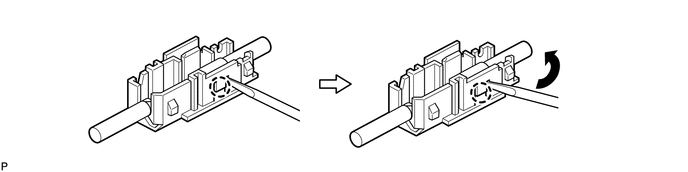
Using a screwdriver, bend back and break off the claw as shown in the illustration.
-
Remove the terminal cover from the wire harness.
-
-
REMOVE UPPER BACK DOOR TRIM PANEL ASSEMBLY (for Back Door)
-
REMOVE BACK DOOR SIDE GARNISH LH (for Back Door)
-
REMOVE BACK DOOR SIDE GARNISH RH (for Back Door)
-
REMOVE BACK DOOR TRIM BOARD ASSEMBLY (for Back Door)
-
REMOVE RADIO SETTING CONDENSER (for Back Door)
Note
When the terminal cover is removed, the radio setting condenser must be replaced because the terminal cover and condenser are supplied as a set.
-
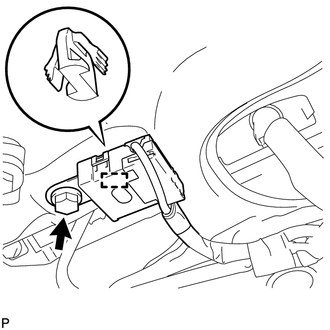
Remove the bolt.
-
Disengage the clamp and disconnect the radio setting condenser with wire harness from the vehicle body.
-
Using a screwdriver, disengage the 3 claws and remove the terminal cover with wire harness from the condenser.
-
Using a screwdriver, bend back and break off the claw as shown in the illustration.
-
Remove the terminal cover from the wire harness.
-