BRAKE FLUID BLEEDING
CAUTION / NOTICE / HINT
CAUTION:
The intelligent tester or GTS must be used with air bleeding and fluid replacement. If not used, the air bleeding and fluid replacement will be incomplete, which is hazardous and may lead to an accident.
Note
-
When replacing the brake fluid, replace the front and rear brake fluid as a set.
-
Perform fluid replacement with the shift lever on P and the parking brake set.
-
Perform fluid replacement while maintaining the brake fluid level between the MIN/MAX levels on the brake master cylinder reservoir.
-
As brake fluid may overflow when bleeding air, do not place the fluid can on the reservoir filler opening.
-
Air bleeding will be difficult if the following occurs: 1) the brake master cylinder reservoir's No. 2 brake actuator hose (the hose between the brake accumulator pump and brake master cylinder reservoir) is lowered into the fluid and air enters the hose; and 2) during the fluid replacement procedure, air enters the brake accumulator pump while operating the pump motor.
-
While performing fluid replacement, the accumulator pressure drop may cause a buzzer to sound. As there is no problem, continue with the fluid replacement.
-
During fluid replacement, DTCs for pressure sensor malfunctions, etc. may be stored. After fluid replacement and if instructed in the procedures, clear the DTCs.
-
Do not allow brake fluid to contact the vehicle's paint surfaces. If contact occurs, clean it off immediately.
Tech Tips
-
For air bleeding, refer to the PRECAUTION Click here.
-
Air bleeding with the intelligent tester or GTS cannot be performed when the power switch is on (IG) or when the parking brake is not operating (electric parking brake operation signal is not input into skid control ECU).
-
While performing air bleeding, a display and navigation assembly (with HDD navigation system) or multi-display (without HDD navigation system) malfunction warning is displayed. However, there is no malfunction. After performing air bleeding, erase the warning using the screen's menus.
PROCEDURE
-
FILL RESERVOIR WITH BRAKE FLUID
Note
-
As brake fluid may overflow when bleeding air, do not place the fluid can on the reservoir filler opening.
-
If brake fluid leaks onto any painted surface, clean it off completely.
-
Add brake fluid into the reservoir.
Fluid SAE J1703 or FMVSS No. 116 DOT 3
-
-
REPLACE BRAKE FLUID
CAUTION:
The intelligent tester or GTS must be used during fluid replacement. If not used, the fluid replacement will be incomplete, which is hazardous and may lead to an accident.
Note
-
Perform fluid replacement while maintaining the brake fluid level between the MIN/MAX levels on the brake master cylinder reservoir.
-
As brake fluid may overflow, do not place the fluid can on the reservoir filler opening.
-
Connect the intelligent tester or GTS to the DLC3 with the power switch off.
-
Check that the parking brake is set, and turn the power switch on (IG).
-
Enter the following menus: Chassis / ABS/VSC/TRC / Air Bleeding.
-
Select the menu on the intelligent tester or GTS display based on the following list.
Bleeding work list
-
Brake fluid (replacement)
-
Front brake (removal, installation or replacement)
-
Front brake flexible hose (removal, installation or replacement)
-
Rear brake (removal, installation or replacement)
-
Rear brake flexible hose (removal, installation or replacement)
Select "Usual air bleeding" on the intelligent tester or GTS display. Air bleeding (no part replacement) Select "Actuator has been removed" on the intelligent tester or GTS display.
-
Brake master cylinder (removal, installation or replacement)
-
Stroke Simulator (removal, installation or replacement)
-
Work to be performed before replacement
-
Disconnect the 2 brake booster pump connectors.
-
Disconnect the 2 brake booster pump connectors.
-
Select "Master Cylinder or Stroke Simulator has been removed" on the intelligent tester or GTS display.
Brake master cylinder reservoir (removal, installation or replacement)
-
Work to be performed before replacement
-
Disconnect the 2 brake booster pump connectors.
-
Using the intelligent tester or GTS, perform accumulator zero down.
-
Work to be performed before air bleeding
-
Using the intelligent tester or GTS, perform accumulator zero down.
-
Select "Master Cylinder or Stroke Simulator has been removed" on the intelligent tester or GTS display.
-
Brake actuator (removal, installation or replacement)
-
Brake booster pump (removal, installation or replacement)
-
Work to be performed before replacement
-
Disconnect the 2 brake booster pump connectors.
-
Disconnect the 2 brake booster pump connectors.
-
Work to be performed before air bleeding
-
Using the intelligent tester or GTS, perform accumulator zero down.
-
Select "Actuator has been removed" on the intelligent tester or GTS display.
-
-
After air bleeding or replacement, tighten the bleeder plug.
- Torque:
- for Front Brake (except 6-pot caliper)
- 11 N*m { 110 kgf*cm, 8 ft.*lbf }
- for Front Brake (6-pot caliper)
- 19 N*m { 194 kgf*cm, 14 ft.*lbf }
- for Rear Brake
- 11 N*m { 110 kgf*cm, 8 ft.*lbf }
-
-
DISCONNECT AND CONNECT BRAKE ACCUMULATOR PUMP CONNECTORS
Note
-
If the brake accumulator pump operates while air remains inside the No. 2 brake actuator hose, air will enter the brake accumulator pump, resulting in difficulty in bleeding. Keep the 2 brake accumulator pump connectors disconnected before bleeding.
-
When disconnecting or connecting the brake accumulator pump connector, turn the power switch off.
-
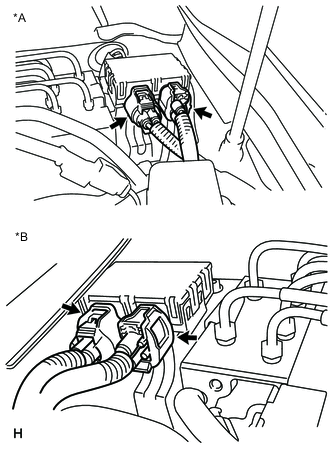
Text in Illustration *A for LHD *B for RHD Disconnect or connect the 2 brake accumulator pump connectors as shown in the illustration.
-
-
PERFORM ACCUMULATOR ZERO DOWN
Tech Tips
Using the intelligent tester or GTS to perform accumulator zero down causes the pressurized fluid in the actuator's accumulator to be returned to the brake master cylinder reservoir.
-
Drain the brake fluid in the reservoir tank near the MIN line.
-
Connect the intelligent tester or GTS to the DLC3 with the power switch off.
-
Check that the parking brake is set, and turn the power switch on (IG).
-
Enter the following menus: Chassis / ABS/VSC/TRC / Utility / Electronically Controlled Brake system Utility / Zero Down.
-
When the buzzer sounds, turn the power switch off.
-
-
DISABLE BRAKE CONTROL
Tech Tips
Using the intelligent tester or GTS to disable brake control causes the master pressure cut solenoid to turn OFF and the line from the master cylinder to the front disc brake caliper to open.
-
Check that the parking brake is set.
-
Connect the intelligent tester or GTS to the DLC3 with the power switch off.
-
Turn the power switch on (IG).
Note
Do not start the engine.
-
Enter the following menus: Chassis / ABS/VSC/TRC / Utility / Electronically Controlled Brake system Utility / Electronically Controlled Brake system Invalid. Then brake control is disabled.
-