HEIGHT CONTROL SENSOR(for Front LH) ADJUSTMENT
PROCEDURE
-
ADJUST STANDARD VEHICLE HEIGHT
-
Adjust the pressure of the tires.
-
Stabilize the suspension by releasing the parking brake and bouncing the corners of the vehicle up and down.
-
Move the shift lever to N and move the vehicle forward and rearward.
-
Turn the engine switch off.
-
Connect the Techstream to the DLC3.
-
Start the engine.
-
Turn the Techstream on.
-
Enter the following menus: Chassis / Air suspension / Data List.
-
Press the height control switch and adjust the vehicle height to "HEIGHT HIGH".
-
Press the height control switch and return the vehicle height to normal.
-
Using the Data List, confirm that the vehicle height control operation is complete.
-
-
INSPECT VEHICLE HEIGHT
Note
The possible vehicle height automatic adjustment value is 20 mm. If the "Height Adjust value + (Standard value - Measurement value - After Height Adjust value)" is 20 mm or more, first perform the standard vehicle height adjustment (height control link adjustment).
-
for Front 2WD:
Inspect the vehicle height Click here.
-
for Front AWD:
Inspect the vehicle height Click here.
-
for Rear:
Inspect the vehicle height Click here.
-
-
ADJUST HEIGHT CONTROL SENSOR LINK SUB-ASSEMBLY (for Front)
Note
-
First adjust the height control sensor link that has the highest deviation from the standard value.
-
If the deviation of the front and rear link is the same, adjust the front link first.
-
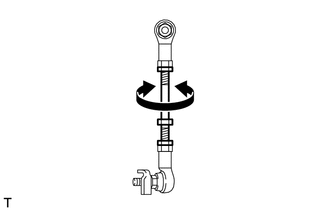
Loosen the 2 lock nuts on the height control sensor link.
-
Turn the bolt of the height control sensor link to adjust the length.
Tech Tips
-
If raising the vehicle height, lengthen the link.
-
If lowering the vehicle height, shorten the link.
-
Turning the bolt of the height control sensor link 1 revolution changes the vehicle height by about 7.3 mm (0.287 in.).
-
-
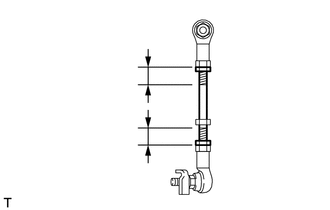
Check if the height control sensor link dimension shown in the illustration is less than the maximum value.
Maximum dimension 18 mm (0.71 in.) -
Tighten the lock nuts.
- Torque:
- 5.4 N*m { 55 kgf*cm, 48 in.*lbf }
Note
Make sure the ball joint and bracket are parallel when tightening the lock nuts.
-
-
ADJUST HEIGHT CONTROL SENSOR LINK SUB-ASSEMBLY (for Rear)
-
Adjust the rear vehicle height by moving the installation position of the link on the lower arm.
- Torque:
- 5.4 N*m { 55 kgf*cm, 48 in.*lbf }
Tech Tips
When the link is moved 1.0 mm (0.039 in.), the vehicle height is adjusted by about 1.5 mm (0.059 in.).
-
Perform vehicle height offset calibration once again.
-
Inspect the vehicle height once again.
-
-
INSPECT WHEEL ALIGNMENT
-
for Front 2WD:
Inspect the wheel alignment Click here.
-
for Front AWD:
Inspect the wheel alignment Click here.
-
for Rear:
Inspect the wheel alignment Click here.
-