HEIGHT CONTROL COMPRESSOR PRECAUTION
-
WHEN USING JACK OR LIFT
-
When work is performed under the vehicle or when jacking the vehicle up, make sure to turn the engine switch off.
-

Front view of DLC3 *1 OPA If the vehicle must be raised with its engine running, connect terminals 11 (OPA) and 4 (CG) of the DLC3 to stop the vehicle height control operation of the suspension control ECU.
-
-
WHEN ADDING AIR
Note
-
Only operate the height control compressor to add air for less than 3 minutes. In order to protect the height control compressor, if it is operated for 3 minutes continuously, its operation is prohibited for 10 minutes.
-
If the height control compressor is operated continuously, its operation is automatically stopped after 3 minutes and its operation is prohibited for 10 minutes to protect the height control compressor.
-
-
DISCONNECT AND CONNECT HEIGHT CONTROL TUBE (Type 1)
-
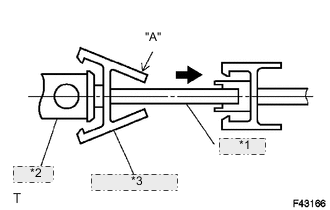
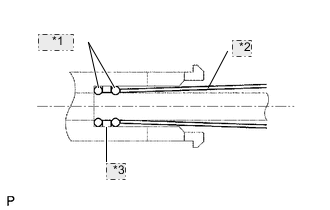
*1 Air Tube *2 Housing *3 No. 1 Connector Disconnect the height control tube.
-
for Except Front Pneumatic Cylinder:
Pinch "A" to disconnect the No. 1 connector and pull it out from the housing.
-
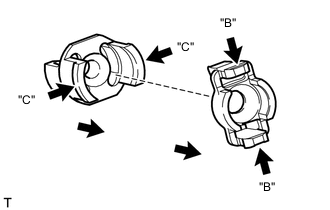
for Front Pneumatic Cylinder:
Pinch "B" to disconnect the holder air connector clip and pull it out from the No. 1 connector. Pinch "C" to disconnect the No. 1 connector and pull it out from the housing.
-

*1 Air Tube Set SST to the tube.
- SST
- 09730-00010
-
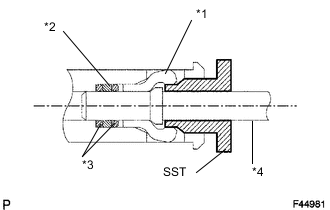
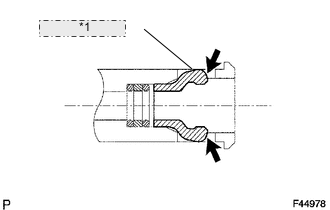
*1 No. 2 Connector *2 Plate *3 O-Ring *4 Air Tube Insert SST into the housing to expand the claw of the plug or tube connector in the housing.
-
Pull out the tube with SST inserted.
Note
Do not force the tube.
-
Insert a screwdriver into the circular hole on the housing, and remove the No. 2 connector, 2 O-rings and plate from the housing.
Tech Tips
The O-rings, plate and No. 2 connector are nonreusable parts.
-
-
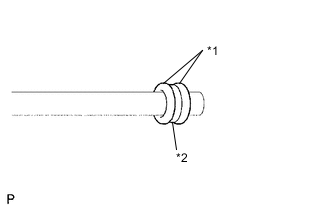
*1 O-Ring *2 Plate Install 2 new O-rings and a new plate.
Note
When replacing the parts onto which the tube is to be installed with new ones, it is not necessary to perform this installation procedure.
-
Apply MP grease to 2 new O-rings and a new plate, and then install them to a straight tube.
Note
-
Install the plate between the O-rings.
-
Air leaks may occur if dust or foreign objects come into contact with the O-rings.
-
-
*1 O-Ring *2 Cardboard *3 Plate Insert the tube onto which the 2 O-rings and plate are installed into the housing, and then lightly push them in with a piece of rolled up cardboard or equivalent.
-
*1 No. 2 Connector Push the No. 2 connector into the housing until a clicking sound is heard.
-
-
Install the height control tube.
-
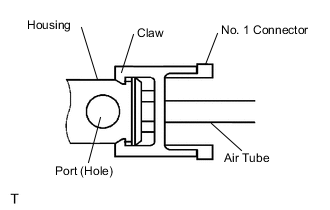
Push the tube and No. 1 connector to the housing until a clicking sound is heard.
Note
-
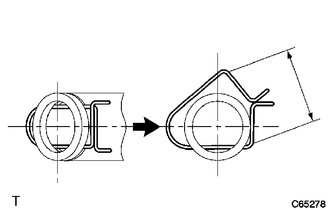
Turn the claw of the connector 90° so that the claw is aligned with the housing port as shown in the illustration.
-
Lightly pull on the tube to make sure that it is securely connected.
-
-
-
-
DISCONNECT AND CONNECT HEIGHT CONTROL TUBE (Type 2)

*1 Clip *2 Holder Note
-
Disconnecting and connecting the height control tube should be performed by hand to prevent dust or foreign objects from entering it.
-
Be careful not to damage the height control tube.
-
Disconnect the height control tube.
-
Remove the holder.
-
Spread the clip and slowly pull the height control tube straight out.
Note
Do not completely remove the clip except when replacing it.
-
Remove the 2 O-rings.
Tech Tips
Some tubes are equipped with only one O-ring.
-
-
Install the height control tube.
-
If replacing the clip:
Hook one side of the new clip around the union groove, and slide the other side into the opposite side of the union groove.
-
If not replacing the clip:
Install 2 new O-rings to the height control tube and coat them with MP grease No. 2.
Note
Air leaks may occur if dust or foreign objects come into contact with the O-rings.
Tech Tips
Some tubes are equipped with only one O-ring.
-
Securely connect the height control tube straight onto the connector until a clicking sound can be heard.
Note
Connect the height control tube straight in order to prevent air leaks.
-
Install the height control tube to the holder being careful not to apply excessive force to the clip.
-
-