CAMSHAFT TIMING CONTROL MOTOR ON-VEHICLE INSPECTION
PROCEDURE
-
INSPECT FUNCTION OF CAMSHAFT TIMING CONTROL MOTOR
-
Connect the intelligent tester to the DLC3.
-
Turn the engine switch on (IG) and turn the tester on.
-
Start the engine and warm it up.
-
Engine is idling.
-
Enter the following menus: Powertrain / Engine / Active Test / Control the VVT-iE Linear (Bank 1) or Control the VVT-iE Linear (Bank 2) / All Data / VVT-iE Aim Angle #1 and VVT Change Angle #1 or VVT-iE Aim Angle #2 and VVT Change Angle #2.
-
Perform the Active Test operation with the engine speed at 1500 rpm.
OK Active Test Movement Order Difference between "VVT-iE Aim Angle" and "VVT Change Angle" 0 deg → 10 deg → 20 deg → 40 deg → 10 deg → 0 deg → 10 deg → END Within 4 DegFR If not within the standard, inspect the camshaft timing control motor assembly and camshaft timing gear assembly.
-
-
INSPECT CAMSHAFT TIMING CONTROL MOTOR
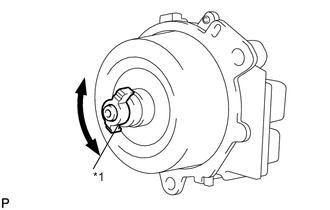
*1 Joint
-
Rotate the joint of the camshaft timing control motor assembly by hand.
Standard Rotates smoothly. Note
-
Do not drop the camshaft timing control motor assembly. If dropped, replace the camshaft timing control motor assembly.
-
Do not disassemble the camshaft timing control motor assembly. If disassembled, replace the camshaft timing control motor assembly.
-
Do not allow foreign matter to contact the oil seal face of the camshaft timing control motor (connecting surface with timing chain cover sub-assembly).
If not as specified, replace the camshaft timing control motor assembly.
-
-