AUTOMATIC TRANSMISSION FLUID ADJUSTMENT

PROCEDURE
-
BEFORE REFILLING TRANSMISSION
-
This transmission requires Toyota Genuine ATF WS transmission fluid.
-
After servicing the transmission, it is necessary to refill the transmission with the correct amount of fluid.
-
Maintain the vehicle in a horizontal position while adjusting the fluid level.
-
If the entire transmission, transmission pan, drain plug, valve body and/or torque converter is replaced, proceed to the "FILL TRANSMISSION PAN" procedures.
-
If the transmission hose, extension housing oil seal and/or radiator is replaced and/or a repair of an oil leak is performed, proceed to the "ADJUST FLUID LEVEL" procedures.
-
-
FILL TRANSMISSION PAN
-
Raise the vehicle while keeping it level.
-
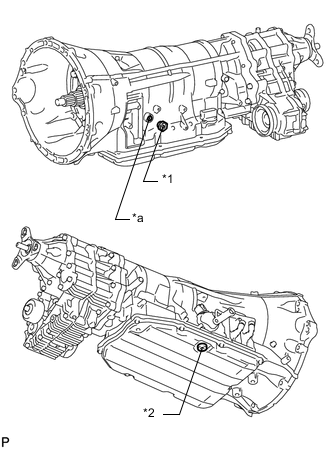
Text in Illustration *1 Refill Plug *2 Overflow Plug *a Refill Hole Remove the refill plug and overflow plug.
-
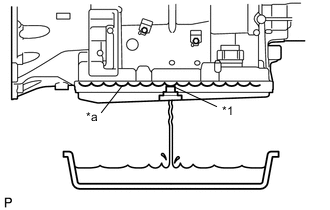
Text in Illustration *1 Overflow Tube *a Specified Fluid Level Fill the transmission through the refill hole until fluid begins to trickle out from the overflow tube.
-
Reinstall the overflow plug.
-
-
FILL TRANSMISSION
-
Fill the transmission with the amount of fluid listed in the table below.
Standard Capacity Repair Specified Condition Transmission pan and drain plug removal 3.2 liters (3.38 US qts, 2.82 Imp. qts) Transmission valve body removal 4.2 liters (4.44 US qts, 3.70 Imp. qts) Torque converter removal 6.7 liters (7.08 US qts, 5.90 Imp. qts) Entire transmission assembly 9.9 liters (10.46 US qts, 8.71 Imp. qts) -
Reinstall the refill plug.
-
-
ADJUST FLUID LEVEL
-
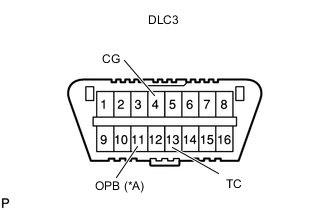
Text in Illustration *A w/ Air Suspension w/o Air Suspension:
Using SST, connect terminals 13 (TC) and 4 (CG) of the DLC3.
- SST
- 09843-18040
-
w/ Air Suspension:
Using SST, connect terminals 13 (TC), 11 (OPB) and 4 (CG) of the DLC3.
- SST
- 09843-18040
-
Start the engine.
Note
Make sure the air conditioning switch is turned off.
-
Slowly move the shift lever from P to S, and then change the gear from 1st to 8th. Then return the shift lever to P.
-
Move the shift lever to D, and quickly move the shift lever back and forth between N and D (perform each movement in less than 1.5 seconds) for at least 6 seconds.
This activates the fluid temperature detection mode.
Standard Indicator light (D) remains illuminated for 2 seconds and then turns off. -
w/o Air Suspension:
Return the shift lever to P and disconnect terminals 13 (TC) and 4 (CG).
-
w/ Air Suspension:
Return the shift lever to P and disconnect terminal 13 (TC).
-
Idle the engine to raise the temperature of the ATF.
-
When the indicator light (D) turns on, raise the vehicle immediately.
Indicator Light Indicates the ATF Temperature Below Proper Temperature Proper Temperature Higher than Proper Temperature Turns off Turns on Blinks Note
Perform the fluid level inspection while the indicator light is on.
-
Text in Illustration *1 Refill Plug *2 Overflow Plug *a Refill Hole
Text in Illustration *1 Overflow Tube *a Specified Fluid Level Remove the overflow plug. At the proper fluid inspection temperature, check the fluid amount.
If the ATF flows from the overflow tube in a thin stream, the fluid amount is normal.
If the ATF does not flow from the overflow tube, remove the refill plug, and then add ATF into the refill hole until ATF flows from the overflow tube.
-
Install a new gasket and the overflow plug.
- Torque:
- 20 N*m { 204 kgf*cm, 15 ft.*lbf }
-
Install a new O-ring and the refill plug.
- Torque:
- 39 N*m { 398 kgf*cm, 29 ft.*lbf }
-
Lower the vehicle.
-
Turn the engine switch off.
-
w/ Air Suspension:
Disconnect the terminals 11 (OPB) and 4 (CG) of the DLC3.
-