ТУРБОНАГНЕТАТЕЛЬ СНЯТИЕ
-
DISCONNECT CABLE FROM NEGATIVE BATTERY TERMINAL
Note
When disconnecting the cable, some systems need to be initialized after the cable is reconnected Click here.
-
DRAIN ENGINE COOLANT
CAUTION:
Не снимайте пробку радиатора, пока двигатель и радиатор не остынут. Выброс горячей охлаждающей жидкости и пара под давлением может стать причиной серьезных ожогов.
-
Подсоедините шланг с внутренним диаметром 9 мм (0,354 дюйма) к сливному крану радиатора.
-
Ослабьте пробку сливного крана радиатора.
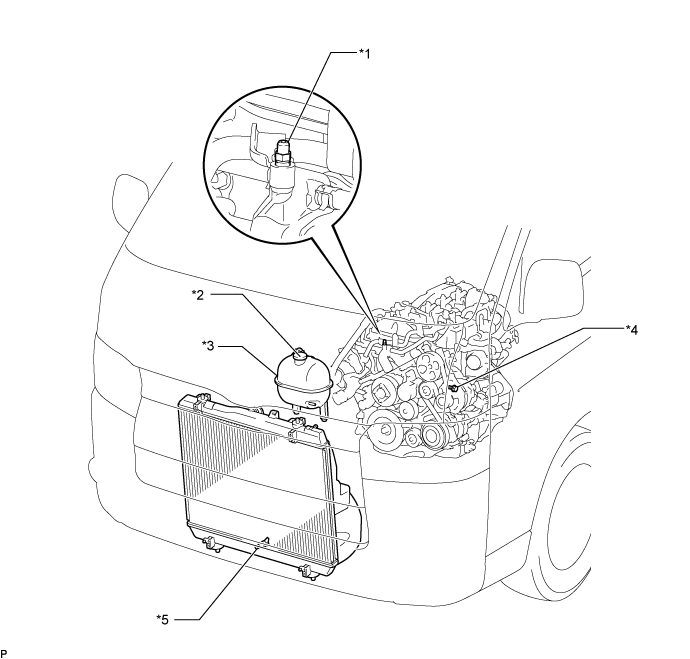
Обозначения на рисунке *1 Прокачной штуцер *2 Пробка радиатора *3 Расширительный бачок системы охлаждения в сборе *4 Пробка сливного крана блока цилиндров *5 Пробка сливного крана радиатора - - -
Снимите пробку радиатора.
-
Ослабьте пробку сливного крана блока цилиндров и слейте охлаждающую жидкость двигателя.
-
Затяните пробку сливного крана радиатора.
-
Затяните пробку сливного крана блока цилиндров.
- Torque:
- 13 Н*м { 130 кгс*см, 9 фунт-сила-футов }
-
Отсоедините шланг от сливного крана радиатора.
-
-
DRAIN ENGINE OIL
-
Remove the oil filler cap sub-assembly.
-
Remove the oil pan drain plug and gasket, and then drain the engine oil into a container.
-
Clean and install a new gasket and the oil pan drain plug.
- Torque:
- 40 N*m { 408 kgf*cm, 30 ft.*lbf }
-
-
REMOVE EXHAUST MANIFOLD CONVERTER SUB-ASSEMBLY
-
REMOVE PCV HOSE
-
Slide the 2 clips, detach the clamp and remove the PCV hose.
-
-
REMOVE PCV HOSE CLAMP
-
Detach the wire harness clamp and disconnect the 2 clamps.
-
Remove the 2 bolts and PCV hose clamp from the timing chain case assembly.
-
-
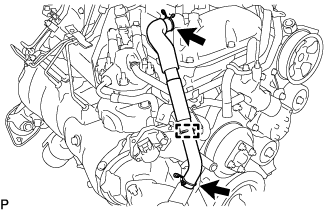
REMOVE NO. 2 WATER BY-PASS PIPE SUB-ASSEMBLY
-
Slide the 2 clips and disconnect the No. 3 water by-pass hose and No. 2 water by-pass hose from the oil cooler assembly and water outlet sub-assembly.
-
Remove the 2 bolts and No. 2 water by-pass pipe sub-assembly.
-
-
DISCONNECT TURBO WATER HOSE

-
Slide the clip and disconnect the No. 1 turbo water hose from the water pump assembly.
-
Slide the clip and disconnect the No. 2 turbo water hose from the water outlet sub-assembly.
-
-
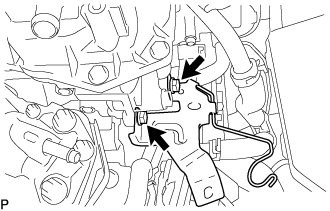
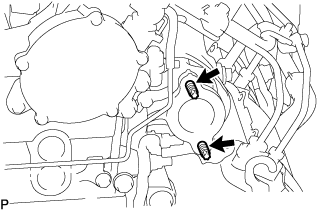
REMOVE OIL COOLER TUBE BRACKET AND WIRE HARNESS CLAMP BRACKET
-
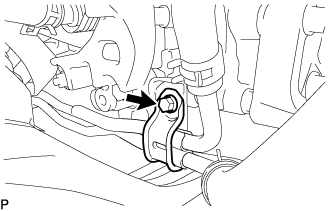
Remove the bolt and disconnect the oil cooler tube bracket.
-
-
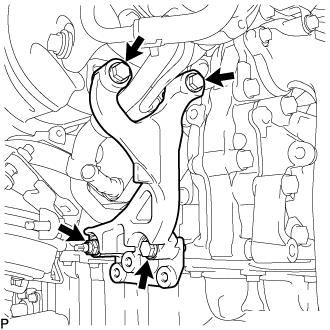
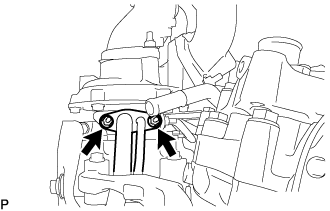
REMOVE TURBOCHARGER STAY
-
Remove the 3 bolts, nut and turbocharger stay.
-
-
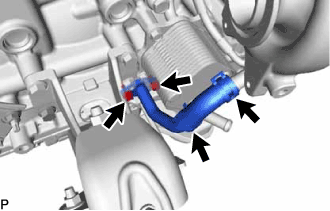
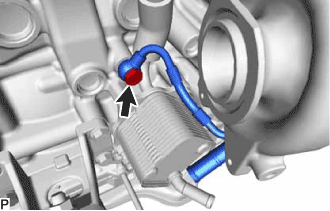
REMOVE TURBO OIL OUTLET PIPE
-
Slide the 2 clips and disconnect the turbo oil outlet hose from the turbo oil outlet pipe.
-
Remove the 2 bolts, turbo oil outlet pipe and gasket.
-
-
REMOVE TURBO OIL INLET PIPE SUB-ASSEMBLY
-
Remove the union bolt and gasket.
-
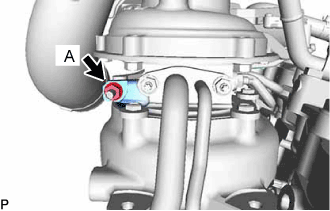
Remove the 2 nuts and turbo oil inlet pipe sub-assembly.
Note
Do not loosen the nut labeled A.
-
Remove the gasket.
-
-
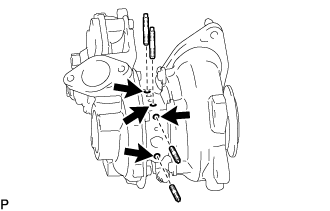
REMOVE TURBOCHARGER SUB-ASSEMBLY
-
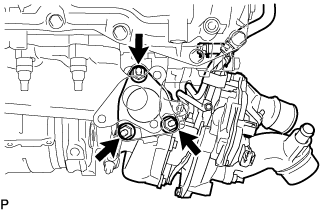
Remove the 3 nuts and turbocharger sub-assembly.
-
Remove the gasket from the turbocharger sub-assembly.
-
-
REMOVE NO. 1 EGR PIPE SUB-ASSEMBLY
-
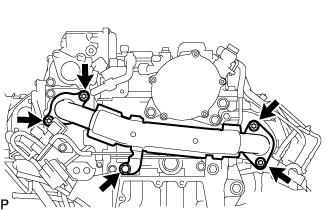
Remove the 4 nuts, bolt and No. 1 EGR pipe sub-assembly from the exhaust manifold, electric EGR control valve assembly and No. 1 vacuum transmitting pipe sub-assembly.
-
Remove the 2 gaskets from the exhaust manifold and electric EGR control valve assembly.
-
Using an E8 "TORX" socket wrench, remove the 2 stud bolts from the exhaust manifold.
-
-
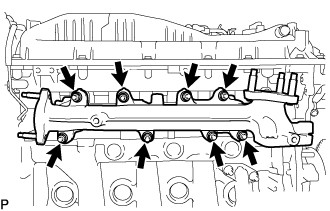
REMOVE EXHAUST MANIFOLD
-
Remove the 8 nuts, 8 plate washers, 8 collars and exhaust manifold.
-
Remove the gasket.
-
-
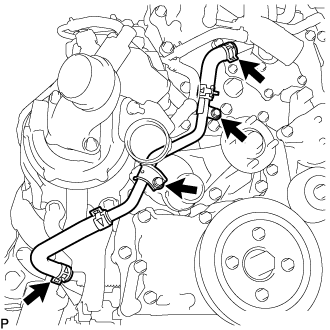
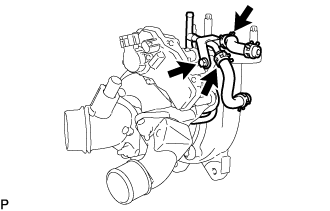
REMOVE NO. 1 TURBO WATER PIPE SUB-ASSEMBLY
-
Slide the 2 hose clips and disconnect the No. 1 turbo water hose and No. 2 turbo water hose from the turbo water pipe sub-assembly.
-
Remove the bolt.
-
Remove the 2 nuts, No. 1 turbo water pipe sub-assembly and gasket.
-
-
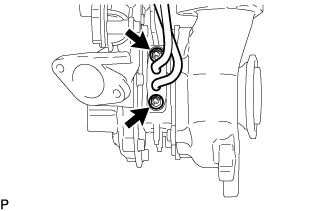
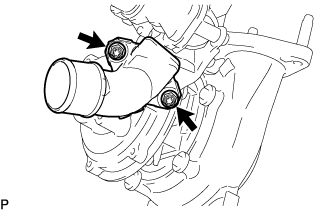
REMOVE COMPRESSOR INLET ELBOW
-
Remove the 2 nuts and compressor inlet elbow from turbocharger sub-assembly.
-
Remove the gasket.
-
-
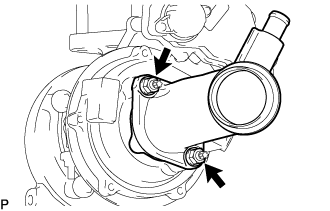
REMOVE COMPRESSOR OUTLET ELBOW
-
Remove the 2 nuts and compressor outlet elbow.
-
Remove the gasket.
-
-
REMOVE STUD BOLT
Note
If a stud bolt is deformed or its threads are damaged, replace it.
-
Using an E5 "TORX" socket wrench, remove the 4 stud bolts shown in the illustration.
-
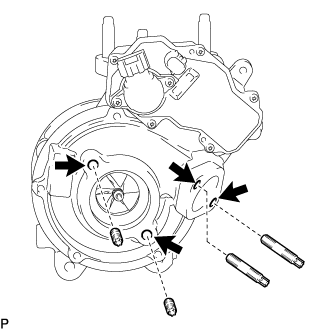
Using an E8 "TORX" socket wrench, remove the 4 stud bolts shown in the illustration.
-
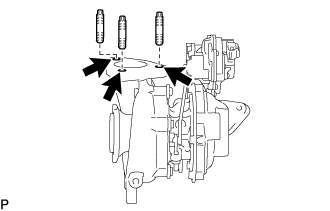
Using an E10 "TORX" socket wrench, remove the 3 stud bolts shown in the illustration.
-