СИСТЕМА СНИЖЕНИЯ ТОКСИЧНОСТИ ОТРАБОТАВШИХ ГАЗОВ ПРОВЕРКА БЕЗ СНЯТИЯ С АВТОМОБИЛЯ
-
CHECK SEATING OF EGR VALVE
-
Check that the engine starts and idles.
-
Stop the engine.
-
-
CHECK ELECTRIC EGR CONTROL VALVE ASSEMBLY OPERATION
-
Connect the GTS to the DLC3.
-
Turn the ignition switch to ON and turn the GTS on.
-
Enter the following menus: Powertrain / Engine and ECT / Active Test / Control the EGR Step Position.
-
Check the Data List.
Enter the following menus: Powertrain / Engine and ECT / Data List / Target EGR Valve Pos and Actual EGR Valve Pos
OK Control Range Condition Specified Condition Active Test performed (Set EGR position to 0% → 30% → 60% → 90% → 60% → 30% → 0%) Actual EGR valve opening percentage changes according to Active Test operation If the result is not as specified, refer to DTC P042E Click here.
-
-
INSPECT NO. 2 EGR VALVE ASSEMBLY
Note
-
Do not forcibly open the valve as it may be damaged or deformed.
-
When cleaning the No. 2 EGR valve assembly, use a piece of cloth soaked with cleaning solvent. Spraying the solvent directly onto this part or soaking the part in solvent may damage the part.
-
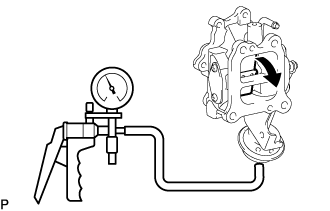
When a vacuum of 69.7 kPa (523 mmHg, 20.6 in.Hg) is applied to the diaphragm chamber, check that the valve turns and air flows out.
-
Maintaining the above conditions, check that there are no leaks and the valve does not return.
-
Check that the valve does not have heavy carbon deposits and is not stuck.
If necessary, replace the No. 2 EGR valve assembly.
-
-
VISUALLY INSPECT HOSES, CONNECTIONS AND GASKETS
-
Visually check that the hoses, connections and gaskets have no cracks, leaks or damage.
Note
-
Detachment or other problems with the engine oil dipstick, filler cap, PCV hose or other components may cause the engine to run improperly.
-
Air suction caused by disconnections, looseness or cracks in the parts of the air induction system between the diesel throttle body and cylinder head will cause engine failure or engine malfunctions.
If the result is not as specified, replace parts as necessary.
-
-
-
INSPECT VACUUM PUMP ASSEMBLY
-
Отсоедините вакуумный шланг от вакуумного насоса.
-
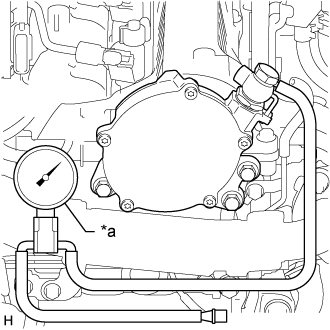
Обозначения на рисунке *a Датчик разрежения Подсоедините шланг датчика разрежения к вакуумному насосу.
-
Запустите двигатель и прогрейте его в течение не менее 2 минут.
-
Проверьте разрежение вакуумного насоса на холостом ходу двигателя.
Номинальное давление Выше 87 кПа (650 мм рт. ст., 25,6 дюйма рт. ст.) Tech Tips
-
Вакуумный насос необходимо менять каждые 200000 км (124000 миль) пробега.
-
Если результат не соответствует требованиям, замените электровакуумный клапан.
-
-
Снимите датчик разрежения с вакуумного насоса.
-
Подсоедините вакуумный шланг к вакуумному насосу.
-
-
DPF FORCIBLE REGENERATION PROCEDURE
Tech Tips
-
If the value recorded by the ECM for the PM volume stored is not initialized when the MIL illuminates during excessive PM buildup (P2458 or P2463), PM forcible regeneration cannot be performed using the GTS.
The value recorded by the ECM for the PM volume stored cannot be initialized using the GTS.
-
PM volume stored initialization:
Remove the EFI-MAIN No. 1 fuse or disconnect the cable from the battery terminal for 60 seconds or more, and then reinstall the EFI-MAIN No. 1 fuse or reconnect the cable to the battery terminal.
-
Connect the GTS to the DLC3.
-
Start the engine and idle it until the engine coolant temperature reaches 70°C (158°F) or higher.
-
Move the shift lever to P and set the parking brake.
-
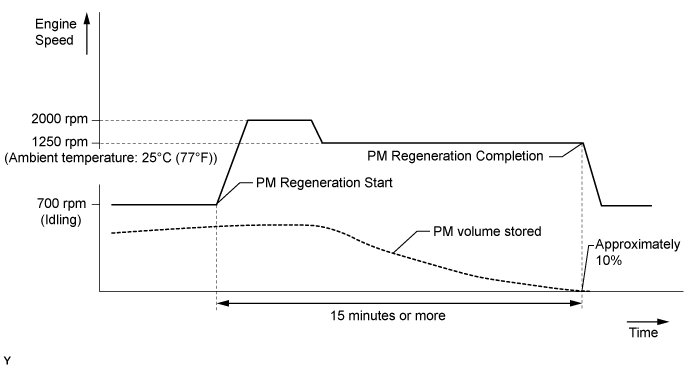
Maintain the maximum possible engine speed under no load for 10 seconds to blow out all soot from inside the exhaust pipe.
Tech Tips
-
If only a low engine speed is continuously maintained, soot may accumulate at the end of the catalyst.
-
When soot accumulates at the end of the catalyst, it may not be possible to perform PM forced regeneration control normally.
-
-
Turn the GTS on.
-
Enter the following menus: Powertrain / Engine and ECT / Active Test / Activate the DPF Rejuvenate (PM).
CAUTION:
Before performing the Active Test, make sure that there are no combustible materials around the DPF and tailpipe.
Tech Tips
-
During PM forced regeneration control the cooling fan motor is forcibly operated and cooling is performed.
-
When PM Accumulation Ratio is too low, Activate the DPF Rejuvenate (PM) cannot be performed. Therefore, rev the engine with no load at 3400 rpm for 5 to 10 minutes to increase PM Accumulation Ratio to 12% or more.
-
The engine speed differs depending on the ambient temperature.
-
The engine speed increases during the Active Test and the engine speed returns to idle when the Active Test is completed.
-
The time it takes to complete the Active Test varies depending on the PM volume stored. However, it usually takes approximately 15 to 40 minutes to complete the Active Test.
-
Do not cancel the Active Test unless absolutely necessary.
-
If the Active Test needs to be canceled, depress the accelerator pedal and race the engine or depress the clutch pedal to cancel the process.
-
If the differential pressure value increases too much during the Active Test, the fail-safe function activates and the Active Test is stopped.
-
Depending on various conditions, the Active Test may not be completed within 15 minutes. If 60 minutes elapse, the system stops the Active Test and illuminates the MIL. If this happens, an exhaust manifold converter (DPF) or exhaust fuel addition injector malfunction (low fuel addition volume) has occurred Click here.
-
-