- Click here
INSTALL FRONT CRANKSHAFT OIL SEAL
-
Apply MP grease to the lip of a new front crankshaft oil seal.
Note:
-
Do not allow foreign matter to contact the lip of the front crankshaft oil seal.
-
Do not allow MP grease to contact the dust seal.
-
-
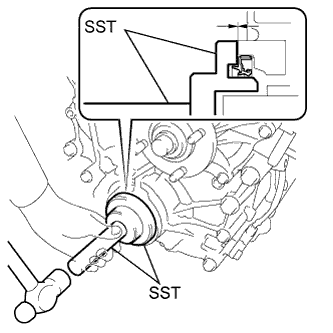
Temporarily install the front crankshaft oil seal to the timing chain or belt cover sub-assembly.
-
Using SST and a hammer, tap in the front crankshaft oil seal until its surface is flush with the chain cover edge.
09223-75010 09950-70010 09951-07100 Note:
-
Keep the lip free from foreign matter.
-
Do not tap the oil seal at an angle.
-
-
- Click here
INSTALL CRANKSHAFT PULLEY
-
Align the key groove of the pulley with the pulley set key and slide on the crankshaft pulley.
-
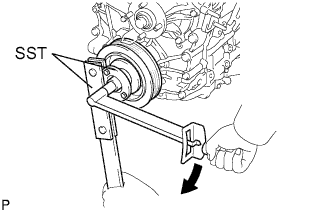
Using SST, install a new crankshaft pulley bolt.
260 N*m 2650 kgf*cm 192 ft.*lbf 09213-54015 91651-60855 09330-00021 Note:Do not reuse the crankshaft pulley bolt.
-
- Click here
INSTALL FAN AND GENERATOR V BELT
-
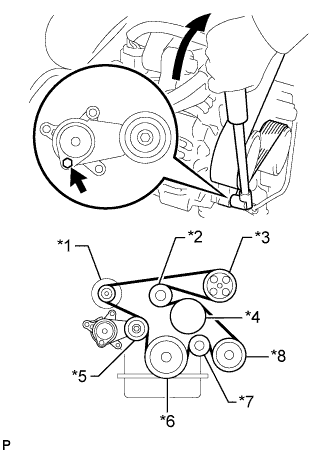
Установите поликлиновой ремень вентилятора и генератора на все шкивы, кроме шкива натяжителя поликлинового ремня.
Table 1. Обозначения на рисунке *1 Генератор *2 Опорный шкив № 1 *3 Лопастной насос *4 Шкив вентилятора *5 Шкив натяжителя *6 Шкив коленчатого вала *7 Опорный ролик *8 Компрессор системы кондиционирования -
С помощью шестигранника, указанного на рисунке стрелкой, сдвиньте шкив натяжителя вниз, а затем установите поликлиновой ремень вентилятора и генератора на шкив натяжителя.
Note:
-
Поликлиновой ремень вентилятора и генератора должен быть обращен к шкиву натяжителя тыльной стороной.
-
Проверьте правильность посадки поликлинового ремня вентилятора и генератора на шкиве и ролике.
-
-
- Click here
INSTALL ENGINE SERVICE HOLE SUB COVER SUB-ASSEMBLY
-
Установите крышку технологического отверстия двигателя и закрепите 5 болтами.
13 Н*м 133 кгс*см 10 фунт-сила-футов
-
- Click here
INSTALL FRONT DOOR SCUFF PLATE RH
- Click here
INSTALL FRONT SEAT ASSEMBLY RH
- Click here
INSPECT FOR OIL LEAK
-
Start the engine. Make sure that there are no oil leaks from the areas that were worked on.
-
- Click here
INSTALL NO. 1 ENGINE UNDER COVER
-
Install the No. 1 engine under cover with the 4 bolts.
13 N*m 133 kgf*cm 10 ft.*lbf
-