- Click here
INSTALL NO. 2 ECM BRACKET
-
Install the No. 2 ECM bracket with the 2 screws.
3.0 N*m 31 kgf*cm 27 in.*lbf
-
- Click here
INSTALL NO. 1 ECM BRACKET
-
Install the No. 1 ECM bracket with the 3 screws.
3.0 N*m 31 kgf*cm 27 in.*lbf
-
- Click here
INSTALL ECM
-
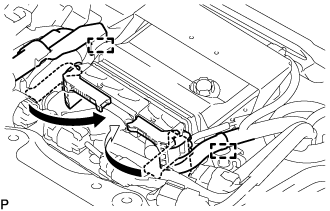
Install the ECM and connect the 2 ECM connectors and lower the 2 levers.
Note:
-
When connecting a ECM connector, make sure that dirt, water and other foreign matter is not stuck between the ECM connector and ECM.
-
Make sure that the 2 levers are securely lowered.
-
-
Attach the 2 wire harness clamps to the No. 1 ECM bracket and No. 2 ECM bracket.
-
Install the 3 bolts to the ECM.
5.5 N*m 56 kgf*cm 49 in.*lbf Note:Do not use an ECM that was dropped or received a strong impact.
-
Return the floor carpet to its original position.
-
- Click here
INSTALL FRONT SEAT ASSEMBLY RH
-
for Hi-back Seat Type (Click here)
-
for Low-back Seat Type (Click here)
-
for Split Bench Seat Type (Click here)
-
- Click here
INSTALL FRONT DOOR SCUFF PLATE RH
- Click here
CONNECT CABLE TO NEGATIVE BATTERY TERMINAL
- Click here
INSTALL BATTERY SERVICE HOLE COVER
- Click here
PERFORM INITIALIZATION