ДАТЧИК ОКСИДОВ АЗОТА УСТАНОВКА

-
INSTALL SENSOR BRACKET
-
Install the 2 sensor brackets with the 2 nuts and bolt.
- Torque:
- 30 N*m { 306 kgf*cm, 22 ft.*lbf }
-
-
INSTALL NITROGEN OXIDES SENSOR
-
Temporarily install the nitrogen oxides sensor.
-
Install the controller portion with the 2 nuts, and then attach the connector and clamp.
- Torque:
- 8.0 N*m { 82 kgf*cm, 71 in.*lbf }
-
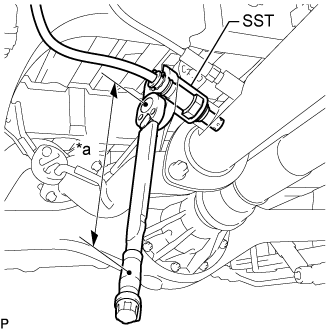
Text in Illustration *a Torque Wrench Fulcrum Length Using SST, install the nitrogen oxides sensor.
- SST
- 09224-00012
- Torque:
- Specified tightening torque
- 55 N*m { 561 kgf*cm, 41 ft.*lbf }
Note
-
Replace with a new part if it is dropped or if it receives a strong impact.
-
Complete the installation so that there is no tension or slack in the harness of the nitrogen oxides sensor, and there is no interference.
Tech Tips
-
Calculate the torque wrench reading when changing the fulcrum length of the torque wrench Click here.
-
When using SST (fulcrum length of 30 mm (1.181 in.)) + torque wrench (fulcrum length of 255 mm (10.039 in.)): 49 N*m (502 kgf*cm, 36 ft.*lbf)
-
-
INSTALL NO. 1 FRONT FLOOR HEAT INSULATOR
-
Install the No. 1 front floor heat insulator with the 3 bolts.
- Torque:
- 17 N*m { 168 kgf*cm, 12 ft.*lbf }
-