FRONT SEAT ASSEMBLY (for Split Bench Seat Type) REASSEMBLY
-
SET FRONT CENTER SEATBACK COVER
-
Set the front center seatback cover to the center seatback pad.
-
-
INSTALL RECLINING SEATBACK ADJUSTER ASSEMBLY
-
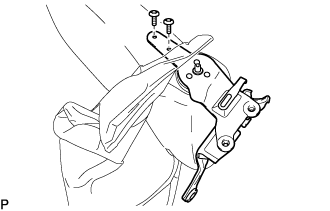
Using a "TORX" socket T50, install the reclining seatback adjuster assembly with the 2 "TORX" bolts.
- Torque:
- 41 N*m { 418 kgf*cm, 30 ft.*lbf }
-
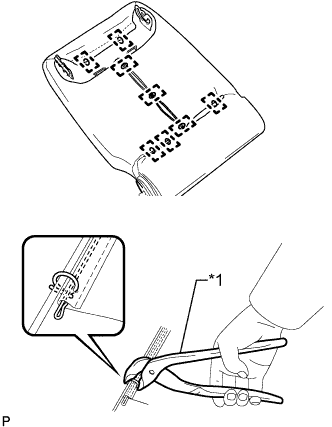
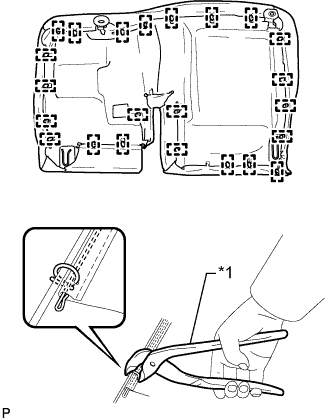
Text in Illustration *1 Hog Ring Pliers Using hog ring pliers, install the front center seatback cover to the center seatback pad with new hog rings.
Note
-
Be careful not to damage the cover.
-
When installing the hog rings, take care to minimize wrinkles as much as possible.
-
-
-
INSTALL FRONT SEAT CUSHION COVER SET PLATE
-
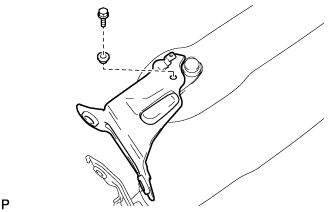
Install the front seat cushion cover set plate with the bolt and bush.
- Torque:
- 16 N*m { 163 kgf*cm, 12 ft.*lbf }
-
-
INSTALL CENTER SEAT UPPER HINGE COVER
-
Engage the claw to install the center seat upper hinge cover.
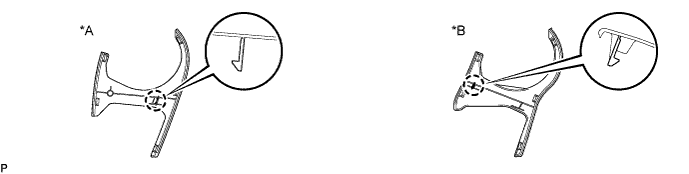
Text in Illustration *A for Standard Body *B for Wide Body
-
-
INSTALL CENTER SEAT HINGE COVER RH
-
Engage the claw to install the center seat hinge cover RH with the screw.
-
-
INSTALL CENTER SEAT HINGE COVER LH
-
Engage the 5 claws to install the center seat hinge cover LH with the 2 screws.
-
-
INSTALL RECLINING ADJUSTER RELEASE HANDLE
-
Install the reclining adjuster release handle with the screw.
-
-
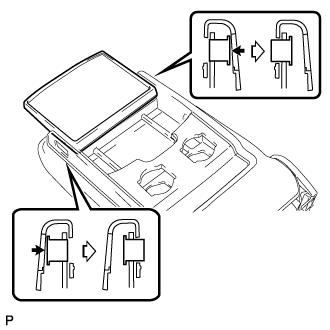
INSTALL CONSOLE BOX ASSEMBLY
-
Engage the 2 claws to install the console box assembly with the 2 screws.
-
Install the 2 caps to the console box assembly.
-
-
INSTALL REAR SEAT CENTER ARMREST SUPPORT
-
Install 2 rear seat center armrest supports with the 2 screws.
-
Install the 2 center seat hinge spacers.
-
-
INSTALL FRONT SEAT SIDE TABLE
-
Push the 2 center seat hinge spacers in the direction indicated by the arrow in the illustration.
-
Install the front seat side table with the 4 screws.
-
-
INSTALL FRONT SEATBACK CONTROL PANEL HOLE COVER
-
Engage the 4 claws to install the 2 front seatback control panel hole covers.
-
-
INSTALL RECLINING ADJUSTER INSIDE COVER LH
-
Engage the claw and install the reclining adjuster inside cover LH with the 2 screws.
-
-
INSTALL RECLINING ADJUSTER INSIDE COVER RH
Tech Tips
Use the same procedures for the RH and LH sides.
-
INSTALL RECLINING ADJUSTER INSIDE COVER LH
-
Install the reclining adjuster inside cover LH with the 2 screws.
-
-
INSTALL RECLINING ADJUSTER INSIDE COVER RH
-
Install the reclining adjuster inside cover RH to the front seatback frame sub-assembly.
-
-
INSTALL FRONT INNER SEAT CUSHION SHIELD
-
Engage the 5 claws to install the front inner seat cushion shield with the screw.
-
-
INSTALL FRONT NO. 1 INNER SEAT CUSHION SHIELD
-
Engage the 8 claws to install the front No. 1 inner seat cushion shield with the screw.
-
-
INSTALL RECLINING ADJUSTER RELEASE HANDLE
-
Engage the claw to install the reclining adjuster release handle.
-
-
INSTALL SEPARATE TYPE FRONT SEATBACK PAD
-
Install the separate type front seatback pad to the front seatback frame sub-assembly.
-
-
INSTALL SEPARATE TYPE FRONT SEATBACK COVER
-
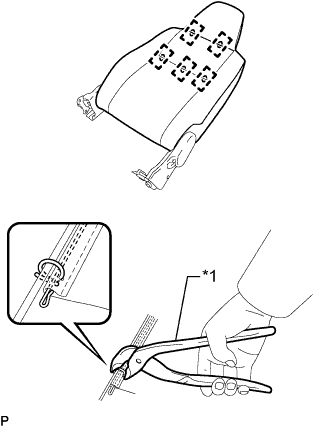
Text in Illustration *1 Hog Ring Pliers Using hog ring pliers, install the separate type front seatback cover to the separate type front seatback pad with new hog rings.
Note
-
Be careful not to damage the cover.
-
When installing the hog rings, take care to minimize wrinkles as much as possible.
-
-
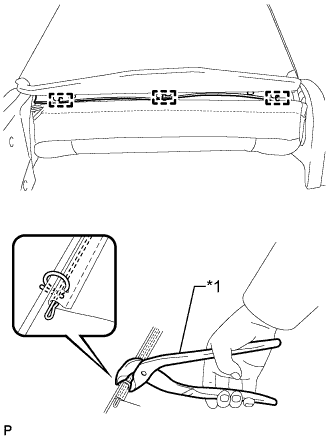
Text in Illustration *1 Hog Ring Pliers Using hog ring pliers, install new hog rings.
Note
Be careful not to damage the cover.
-
-
INSTALL SEPARATE TYPE FRONT SEAT CUSHION COVER
-
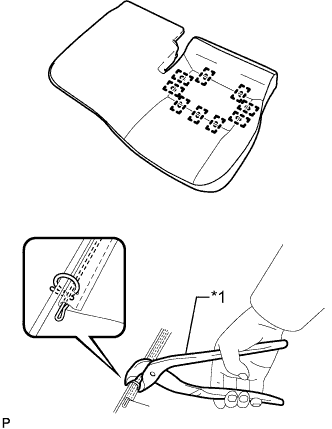
Text in Illustration *1 Hog Ring Pliers Using hog ring pliers, install the separate type front seat cushion cover to the separate type front seat cushion pad with new hog rings.
Note
-
Be careful not to damage the cover.
-
When installing the hog rings, take care to minimize wrinkles as much as possible.
-
-
Text in Illustration *1 Hog Ring Pliers Using hog ring pliers, install new hog rings.
Note
Be careful not to damage the cover.
-