OUTER REAR VIEW MIRROR REMOVAL
Tech Tips
-
Use the same procedure for RHD and LHD vehicles.
-
The procedure listed below is for LHD vehicles.
-
Use the same procedure for the RH and LH sides.
-
The procedure listed below is for the LH side.
-
REMOVE FRONT DOOR LOWER FRAME BRACKET GARNISH LH
-
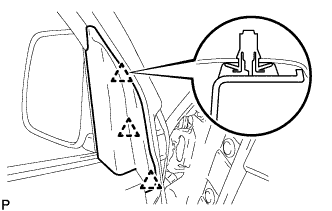
Detach the 3 clips and remove the front door lower frame bracket garnish LH.
-
Remove the 3 remaining clips on the body, and reinstall them to the front door lower frame bracket garnish LH.
-
-
REMOVE FRONT DOOR WINDOW REGULATOR HANDLE ASSEMBLY (w/o Power Window, w/ Retract Mirror)
-
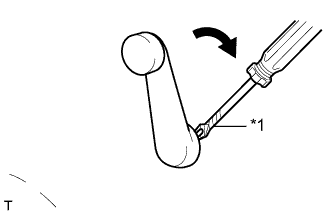
Text in Illustration *1 Protective Tape Insert a clip remover between the front door regulator inside handle plate and front door trim board sub-assembly LH.
Tech Tips
Tape the clip remover tip before use.
-
Turn the handle clockwise to remove the snap ring, front door window regulator handle assembly and plate assembly.
-
-
REMOVE POWER WINDOW REGULATOR MASTER SWITCH ASSEMBLY (w/ Power Window, w/ Retract Mirror)
-
Remove the 2 screws.
-
Using a moulding remover, detach the 3 clips and 4 claws.
-
Disconnect the switch connector and remove the power window regulator master switch assembly.
-
-
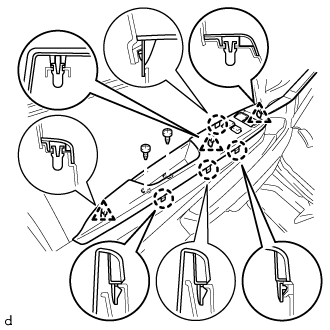
REMOVE FRONT DOOR TRIM BOARD SUB-ASSEMBLY LH (w/o Power Window, W/ Retract Mirror)
-
Remove the 3 screws.
-
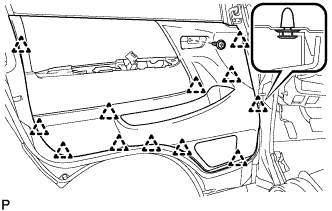
Using a clip remover, detach the 12 clips and remove the front door trim board sub-assembly LH.
Note
-
Do not place hands on the pocket when removing the front door trim board sub-assembly.
-
The pocket may detach and discoloration or damage may occur if hands are placed on the pocket when removing the front door trim board sub-assembly.
Tech Tips
If a clip cannot be reached with the clip remover, pull on the lower trim to remove it.
-
-
-
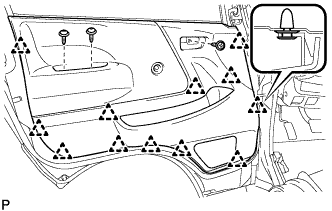
REMOVE FRONT DOOR TRIM BOARD SUB-ASSEMBLY LH (w/ Power Window, w/ Retract Mirror)
-
Remove the screw.
-
Using a clip remover, detach the 12 clips and remove the front door trim board sub-assembly LH.
Note
-
Do not place hands on the pocket when removing the front door trim board sub-assembly.
-
The pocket may detach and discoloration or damage may occur if hands are placed on the pocket when removing the front door trim board sub-assembly.
Tech Tips
If a clip cannot be reached with the clip remover, pull on the lower trim to remove it.
-
-
-
REMOVE OUTER REAR VIEW MIRROR ASSEMBLY LH
-
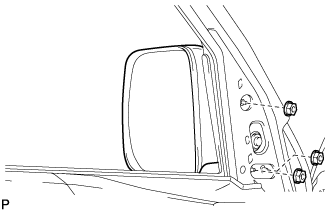
w/o Retract Mirror:
-
Remove the 3 nuts and outer rear view mirror assembly LH.
-
-
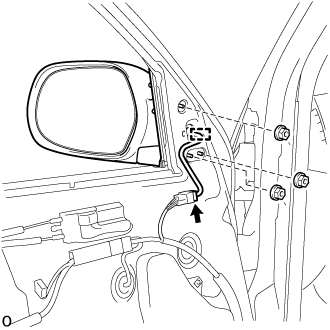
w/ Retract Mirror:
-
Disconnect the connector.
-
Detach the clamp and remove the 3 nuts and outer rear view mirror assembly LH.
-
-