FRONT DOOR SPEAKER REMOVAL
-
REMOVE FRONT DOOR WINDOW REGULATOR HANDLE ASSEMBLY (Without Power Window)
-
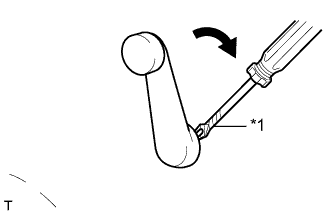
Text in Illustration *1 Protective Tape Insert a clip remover between the front door regulator inside handle plate and front door trim board sub-assembly LH.
Tech Tips
Tape the clip remover tip before use.
-
Turn the handle clockwise to remove the snap ring, front door window regulator handle assembly and plate assembly.
-
-
REMOVE FRONT DOOR TRIM BOARD SUB-ASSEMBLY
-
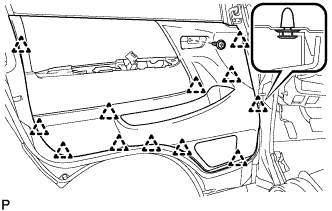
Remove the screw.
-
Using a clip remover, detach the 12 clips and remove the front door trim board sub-assembly LH.
Note
-
Do not place hands on the pocket when removing the front door trim board sub-assembly.
-
The pocket may detach and discoloration or damage may occur if hands are placed on the pocket when removing the front door trim board sub-assembly.
Tech Tips
If a clip cannot be reached with the clip remover, pull on the lower trim to remove it.
-
-
-
REMOVE FRONT NO.1 SPEAKER ASSEMBLY
-
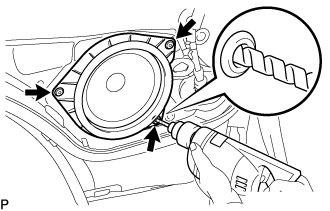
Disconnect the connector.
-
Drill out the 3 rivet heads using a drill with a bit diameter of less than 4 mm (0.16 in.), and remove the front No.1 speaker assembly from the front door panel.
-
Operate the drill along the rivet head circumference and cut out the flange.
CAUTION:
Be careful. The cut rivet is very hot.
Note
-
Do not drill the rivet at an angle as this will cause damage to the drill and drill hole. Line up the drill and rivet, and carefully drill out the rivet head.
-
Be careful as the cut rivet will be very hot.
-
-
After drilling out the flange, continue drilling to push out the shards on the drill.
-
Using a vacuum cleaner, remove the rivet fragments and shavings from the inside of the door.
-