AIR CONDITIONING UNIT REMOVAL
-
DISCONNECT CABLE FROM NEGATIVE BATTERY TERMINAL
Note
When disconnecting the cable, some systems need to be initialized after the cable is reconnected Click here.
-
REMOVE WINDSHIELD WIPER ARM COVER
-
Remove the 2 windshield wiper arm covers.
-
-
REMOVE FRONT WIPER ARM AND BLADE ASSEMBLY RH
-
Remove the nut and front wiper arm and blade assembly RH.
-
-
REMOVE FRONT WIPER ARM AND BLADE ASSEMBLY LH
-
Remove the nut and front wiper arm and blade assembly LH.
-
-
REMOVE COWL VENT COVER RH
-
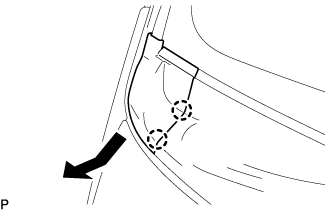
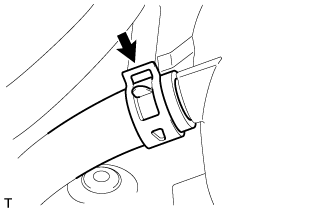
Disengage the 2 claws and remove the cowl vent cover RH as shown in the illustration.
-
-
REMOVE COWL VENT COVER LH
-
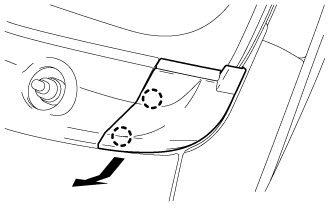
Disengage the 2 claws and remove the cowl vent cover LH as shown in the illustration.
-
-
REMOVE COWL TOP VENTILATOR LOUVER SUB-ASSEMBLY
-
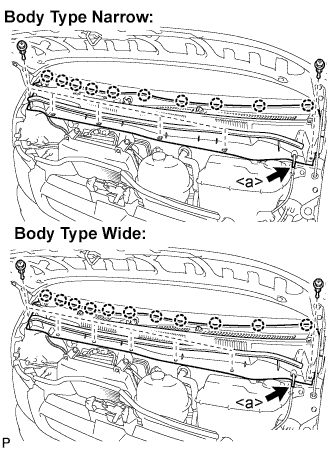
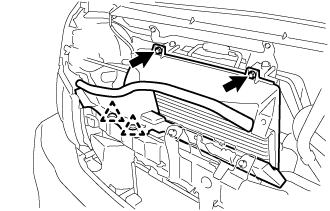
Disconnect the washer hose at position <a> shown in the illustration.
-
Body type narrow:
-
Disengage the 10 claws, and remove the 6 clips and cowl top ventilator louver sub-assembly.
-
-
Body type wide:
-
Disengage the 11 claws, and remove the 7 clips and cowl top ventilator louver sub-assembly.
-
-
-
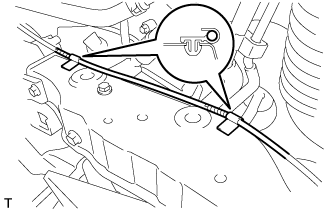
REMOVE WINDSHIELD WIPER MOTOR AND LINK ASSEMBLY
-
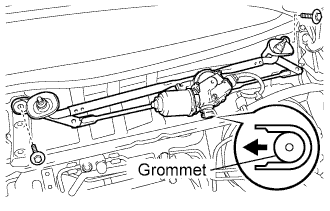
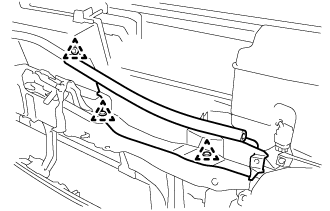
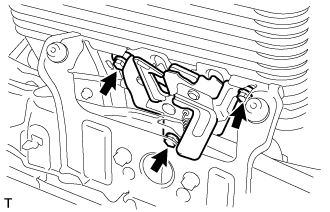
Disconnect the connector.
-
Remove the 2 bolts.
-
Disengage the grommet and remove the windshield wiper motor and link assembly as shown in the illustration.
-
-
REMOVE ENGINE UNDER COVER NO.1 (w/ Under Cover and Intercooler)
-
DRAIN ENGINE COOLANT (for 2KD-FTV)
CAUTION:
Do not remove the radiator reservoir cap sub-assembly while the engine and radiator are still hot. Pressurized, hot engine coolant and steam may be released and cause serious burns.
-
Loosen the radiator drain cock plug.
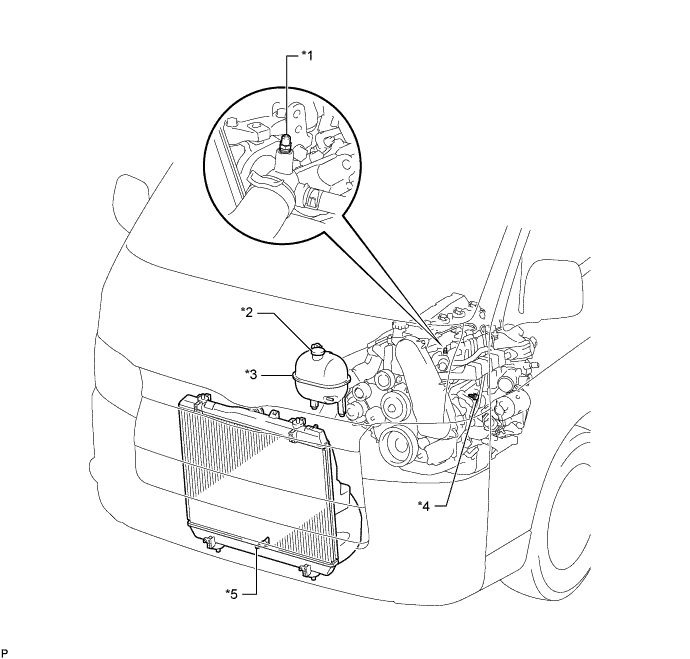
Text in Illustration *1 Bleeder Plug *2 Radiator Reservoir Cap Sub-assembly *3 Radiator Reservoir Assembly *4 Cylinder Block Drain Cock Plug *5 Radiator Drain Cock Plug - - -
Remove the radiator reservoir cap sub-assembly.
-
Loosen the cylinder block drain cock plug (on the engine oil cooler cover), and drain the engine coolant.
-
Tighten the radiator drain cock plug.
-
Tighten the cylinder block drain cock plug (on the engine oil cooler cover).
- Torque:
- 8.0 N*m { 82 kgf*cm, 71 in.*lbf }
-
-
DRAIN ENGINE COOLANT (for 2TR-FE)
CAUTION:
Do not remove the radiator reservoir cap sub-assembly while the engine and radiator are still hot. Pressurized, hot engine coolant and steam may be released and cause serious burns.
Tech Tips
Collect the engine coolant in a container and dispose of it according to local regulations.
-
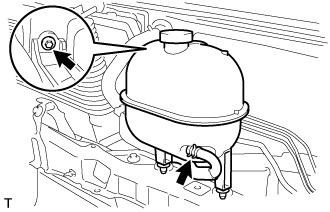
Loosen the radiator drain cock plug and drain the engine coolant.
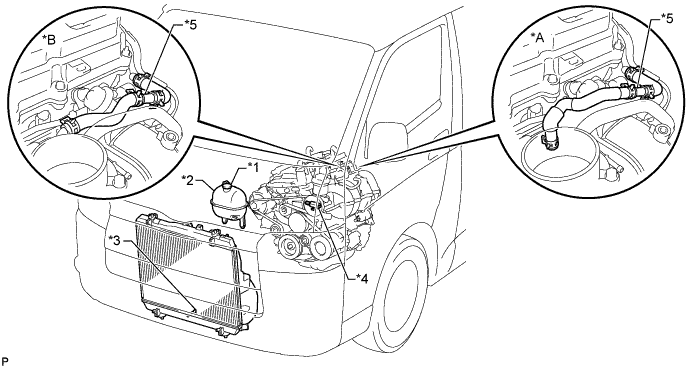
Text in Illustration *A w/ Dual VVT-i *B w/o Dual VVT-i *1 Radiator Reservoir Cap Sub-assembly *2 Radiator Reservoir Assembly *3 Radiator Drain Cock Plug *4 Cylinder Block Water Drain Cock Plug *5 2-Way - - -
Remove the radiator reservoir cap sub-assembly.
-
Loosen the cylinder block water drain cock plug and drain the engine coolant from the engine.
-
-
DRAIN ENGINE COOLANT (for 2TR-FE)
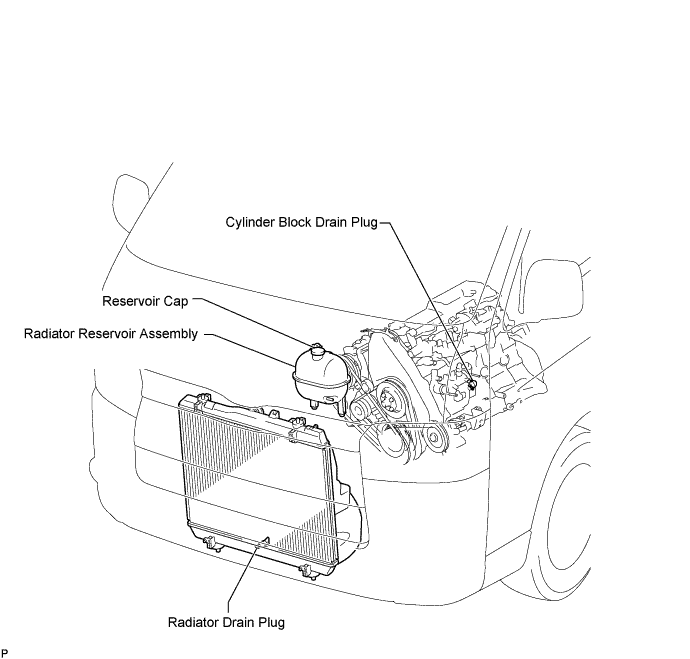
CAUTION:
To avoid the danger of being burned, do not remove the reservoir cap while the engine and radiator assembly are still hot. Thermal expansion will cause hot engine coolant and steam to blow out from the radiator assembly.
-
Loosen the radiator drain plug.
-
Remove the reservoir cap.
-
Loosen the cylinder block drain plug and drain the coolant.
-
Tighten the radiator drain plug.
-
Tighten the cylinder block drain plug.
- Torque:
- 13 N*m { 130 kgf*cm, 9 ft.*lbf }
-
-
DRAIN ENGINE COOLANT (for 1GD-FTV)
CAUTION:
Do not remove the radiator cap sub-assembly while the engine assembly and radiator assembly are still hot. Pressurized, hot engine coolant and steam may be released and cause serious burns.
-
Connect a hose with an inside diameter of 9 mm (0.354 in.) to the radiator drain cock.
-
Loosen the radiator drain cock plug.
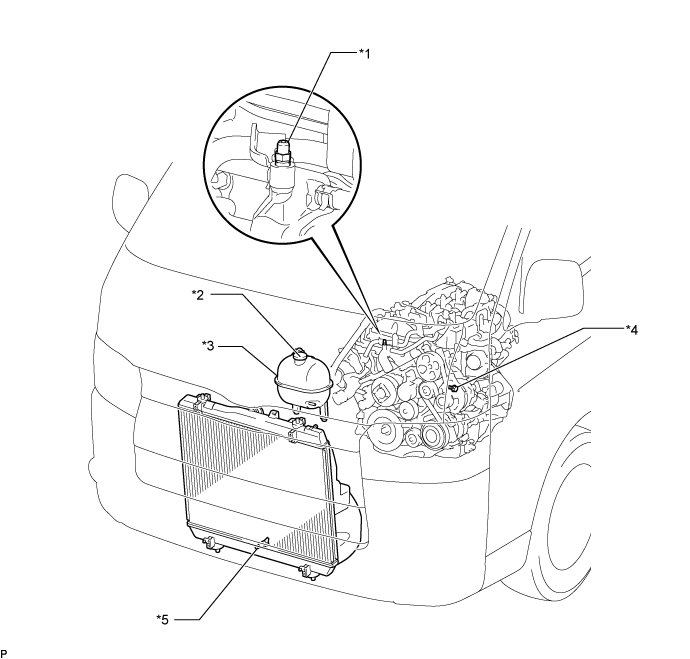
Text in Illustration *1 Bleeder Plug *2 Radiator Cap Sub-assembly *3 Radiator Reserve Tank Assembly *4 Cylinder Block Drain Cock Plug *5 Radiator Drain Cock Plug - - -
Remove the radiator cap sub-assembly.
-
Loosen the cylinder block drain cock plug, and drain the engine coolant.
-
Tighten the radiator drain cock plug.
-
Tighten the cylinder block drain cock plug.
- Torque:
- 13 N*m { 130 kgf*cm, 9 ft.*lbf }
-
Disconnect the hose from the radiator drain cock.
-
-
REMOVE RADIATOR GRILLE (for Standard Body)
-
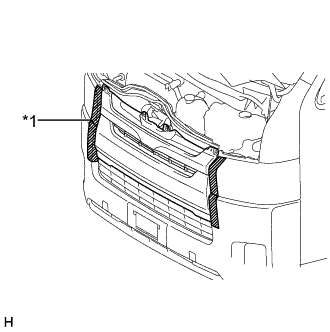
Text in Illustration *1 Protective Tape Put protective tape around the radiator grille.
-
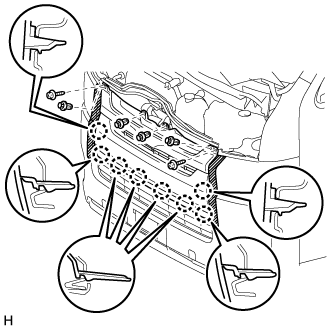
Remove the 4 clips and 2 screws.
-
Detach the 8 claws and remove the radiator grille.
-
-
REMOVE RADIATOR GRILLE (for Wide Body)
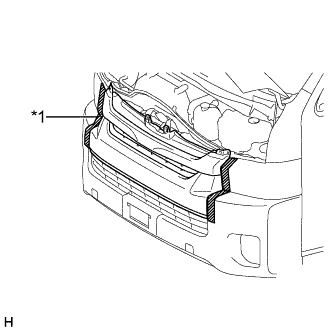
-
Put protective tape around the radiator grille.
Text in Illustration *1 Protective Tape -
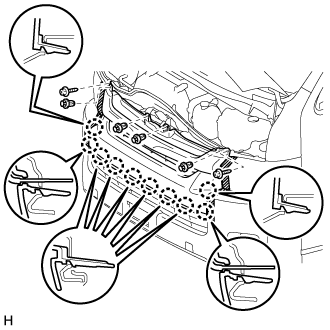
Remove the 4 clips and 2 screws.
-
Detach the 10 claws and remove the radiator grille.
-
-
REMOVE NO. 2 AIR INLET DUCT (w/ Intercooler)
-
Detach the 3 clips and remove the No. 2 air inlet duct.
-
-
REMOVE NO. 1 AIR INLET DUCT (w/ Intercooler)
-
Detach the 2 clips.
-
Remove the 2 bolts and No. 1 air inlet duct.
-
-
DRAIN WINDSHIELD WASHER FLUID (w/ Intercooler)
-
REMOVE WINDSHIELD WASHER JAR ASSEMBLY
-
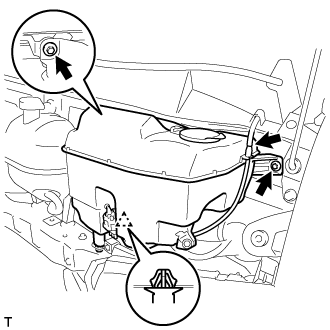
Disconnect the washer hose.
-
Detach the clamp.
-
Remove the 2 bolts and windshield washer jar.
-
Disconnect the washer hose.
-
Detach the clamp.
-
Disconnect the 2 connectors.
-
-
REMOVE RADIATOR RESERVE TANK ASSEMBLY (w/ Intercooler)
-
Disconnect the water by-pass hose.
-
Remove the bolt and radiator reserve tank.
-
Disconnect the No. 2 water by-pass hose.
-
-
REMOVE HOOD LOCK ASSEMBLY (w/ Intercooler)
-
Remove the 3 bolts and hood lock.
-
Disconnect the hood lock control cable.
-
-
REMOVE RADIATOR SUPPORT SUB-ASSEMBLY (w/ Intercooler)
-
Remove the hood lock control cable from the 2 clamps.
-

Remove the 6 bolts, 2 screws and upper radiator support.
-
-
REMOVE INTERCOOLER ASSEMBLY (w/ Intercooler)
-
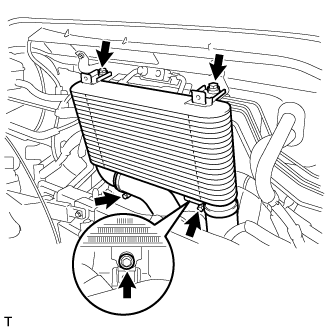
Loosen the hose clamp and disconnect the No. 2 air hose.
-
Loosen the hose clamp and disconnect the No. 3 air hose.
-
Remove the 3 bolts and intercooler.
-
-
DISCONNECT COOLER REFRIGERANT SUCTION PIPE A
-
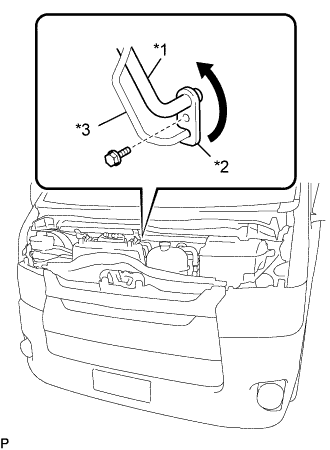
Text in Illustration *1 Cooler Refrigerant Suction Pipe A *2 Hook Connector *3 Cooler Refrigerant Liquid Pipe B Remove the bolt, and slide the hook connector.
-
Disconnect the cooler refrigerant suction pipe A.
-
Remove the O-ring from the cooler refrigerant suction pipe A.
Note
Seal the openings of the disconnected parts using vinyl tape to prevent moisture and foreign matter from entering.
-
-
DISCONNECT COOLER REFRIGERANT LIQUID PIPE B
-
Disconnect the cooler refrigerant liquid pipe B.
-
Remove the O-ring from the cooler refrigerant liquid pipe B.
Note
Seal the openings of the disconnected parts using vinyl tape to prevent moisture and foreign matter from entering.
-
-
DISCONNECT HEATER WATER HOSE OUTLET
-
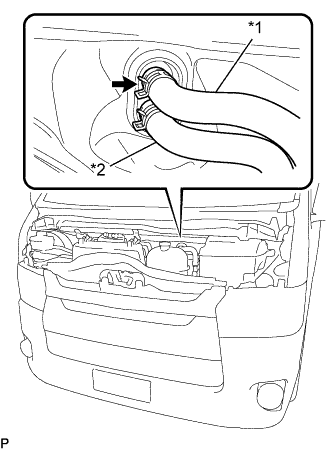
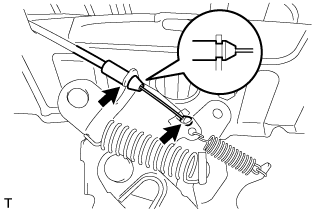
Text in Illustration *1 Heater Outlet Water Hose *2 Heater Water Inlet Hose A Using pliers, grip the claws of the clip and slide the clip to disconnect the heater outlet water hose.
-
-
DISCONNECT HEATER WATER HOSE INLET A
Tech Tips
Disconnection of the heater water outlet hose A is the same as for the heater water inlet hose A.
-
REMOVE INSTRUMENT PANEL ASSEMBLY
-
REMOVE STEERING COLUMN ASSEMBLY
-
REMOVE AIR DUCT NO.1
-
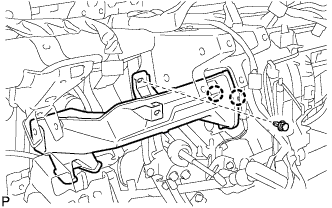
Remove the clip.
-
Release the 2 claws and remove the air duct No.1.
-
-
DISCONNECT PARKING BRAKE CONTROL HANDLE SUB-ASSEMBLY
-
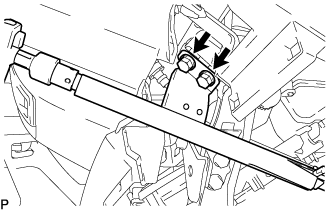
Remove the 2 bolts and disconnect the parking brake control handle sub-assembly.
-
-
REMOVE INSTRUMENT PANEL TO FLOOR BRACE SUB-ASSEMBLY
-
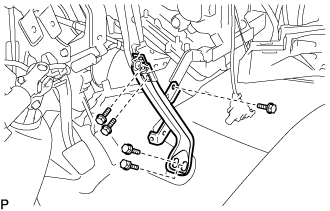
Remove the 5 bolts and the instrument panel to floor brace sub-assembly.
-
-
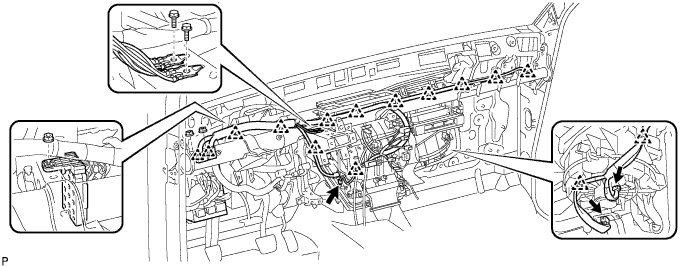
REMOVE INSTRUMENT PANEL REINFORCEMENT ASSEMBLY
-
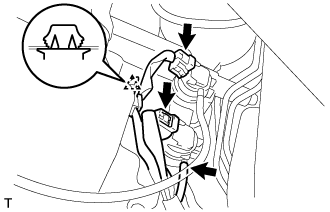
Remove the clamps and connectors, and then disconnect the wire harness.
-
Remove the bolts, nuts and junction blocks.
-
Remove the 2 caps and 2 bolts.
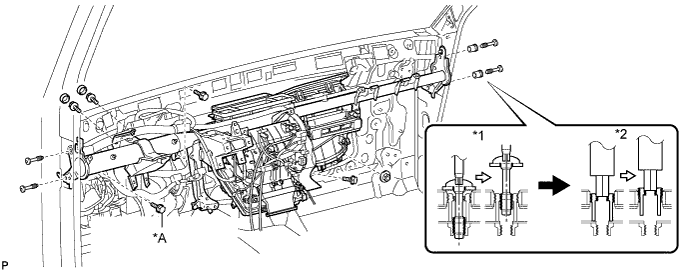
Text in Illustration *A for Manual Transmission - - *1 ''Torx'' Bolt *2 Collar -
Remove the 2 bolts and nut. (AUTOMATIC TRANSMISSION)
-
Remove the 3bolts and nut. (MANUAL TRANSMISSION)
-
Using a "Torx" socket wrench (T40), remove the 4 "Torx" bolts.
Tech Tips
The "Torx" bolts on the passenger side can be removed with the collar for adjustment.
-
Using a hexagon wrench 12 mm, remove the 2 collars and instrument panel reinforcement assembly.
-
-
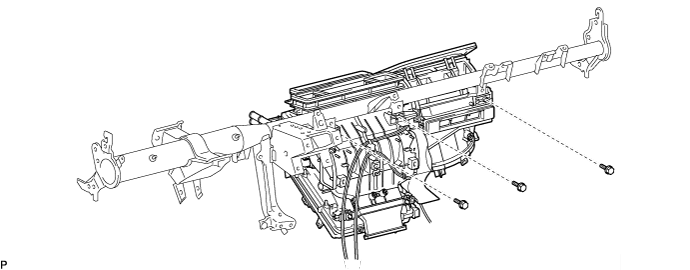
REMOVE AIR CONDITIONER UNIT ASSEMBLY
-
Remove the 3 bolts and air conditioner unit assembly.
-
-
REMOVE AIR DUCT NO.2
-

Release the 2 claws and remove the air duct No.2.
-
-
REMOVE AIR CONDITIONING RADIATOR ASSEMBLY
-
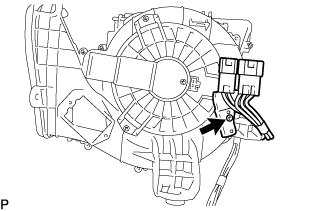
w/ PTC
-
Remove the screw and then disconnect the wire harness.
-
-

Remove the 3 screws and air conditioning radiator assembly.
-