CLUTCH MASTER CYLINDER INSTALLATION
-
INSTALL CLUTCH MASTER CYLINDER PUSH ROD CLEVIS
-
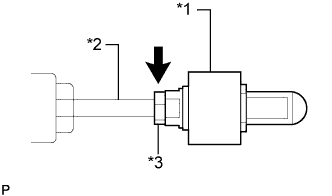
Text in Illustration *1 Push Rod Clevis *2 Push Rod *3 Lock Nut Install the lock nut to the push rod.
-
Install the push rod clevis and temporarily tighten the lock nut.
Tech Tips
-
Be sure to install the lock nut at the same position as before removal.
-
Fully tighten the lock nut when adjusting the clutch pedal.
-
-
-
INSTALL CLUTCH MASTER CYLINDER ASSEMBLY
-
Install the clutch master cylinder with the 2 nuts.
- Torque:
- 14 N*m { 145 kgf*cm, 10 ft.*lbf }
-
Apply MP grease to the sliding portions of the push rod clevis and clutch pedal.
Text in Illustration 
MP grease -
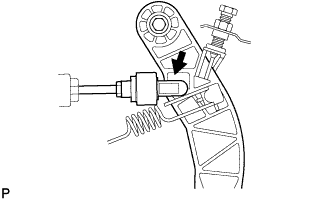
Install the push rod clevis to the cutout of the pedal from the right side of the vehicle and push it downward.
Note
Check that the push rod cannot be turned 30° or more in order to confirm that the clevis is securely engaged in the pedal.
-

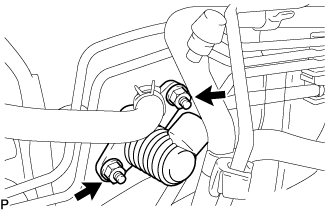
Text in Illustration *a Yellow Mark Using a union nut wrench, connect the clutch tube to the clutch master cylinder.
- Torque:
- 25 N*m { 255 kgf*cm, 18 ft.*lbf }
Note
Use the formula to calculate special torque value for situations where a union nut wrench is combined with a torque wrench Click here.
-
Connect the clutch reservoir tube with the clip.
Note
Face the yellow mark upward.
-
-
INSTALL WINDSHIELD WASHER MOTOR AND PUMP ASSEMBLY (for LHD)
-
w/ Rear Wiper:
Connect the 2 connectors and 2 washer hoses.
-
w/o Rear Wiper:
Connect the connector and washer hose.
-
Attach the washer hose to the windshield washer motor and pump assembly.
-
Install the windshield washer motor and pump assembly with the 2 bolts.
- Torque:
- 5.4 N*m { 55 kgf*cm, 48 in.*lbf }
-
Connect the connector to the windshield washer motor and pump assembly.
-
-
ADD BRAKE FLUID
Fluid SAE J1703 or FMVSS No. 116 DOT3 or equivalent Note
Do not remove the filter from the brake master cylinder reservoir and be sure to fill with new brake fluid to avoid any potential contamination of the brake system. Contamination, for example by dirt particles or mineral oil, could lead to functional brake problems.
-
BLEED CLUTCH LINE
-
Fill the brake reservoir tank with brake fluid and bleed the clutch system.
- Torque:
- 11 N*m { 110 kgf*cm, 8 ft.*lbf }
-
-
CHECK FOR BRAKE FLUID LEAKAGE
Tech Tips
Check for leakage in the clutch system.
-
INSPECT BRAKE FLUID LEVEL IN RESERVOIR
-
Check the fluid level and add fluid if necessary.
Fluid SAE J1703 or FMVSS No.116 DOT3 or equivalent Note
Do not remove the filter from the brake master cylinder reservoir and be sure to fill with new brake fluid to avoid any potential contamination of the brake system. Contamination, for example by dirt particles or mineral oil, could lead to functional brake problems.
-
-
INSPECT AND ADJUST CLUTCH PEDAL HEIGHT